background image

CLEANING YOUR REFRIGERATOR 

 WARNING

BEFORE CLEANING: Turn the refrigerator off at the 

power point and unplug the cord to prevent any 

chance of electrocuting yourself. 

Your stainless steel refrigerator is manufactured from 

mark-resistant stainless steel. This stainless steel has a 

special advanced protective coating that eases the 

removal of marks such 

as fingerprints and water spots. To keep its 

appearance, clean it regularly with lukewarm soapy 

water and a soft cloth.

 CAUTION

Never use stainless steel cleaners, abrasive pads or 

other cleaners that will scratch the surface. Damage to 

the appliance after delivery is not covered by your 

warranty.

Interior
 Clean the inside of your refrigerator regularly with a 

soft cloth, unscented mild soap and lukewarm water. 

Thoroughly dry all surfaces and removable parts and 

avoid getting water on the controls. Replace removable 

parts, plug power cord in and switch the power on 

before returning the food.

Ice and Water 
 Clean the  components of the ice maker /water 

dispenser regularly with a soft cloth, unscented mild 

soap and rinsing thoroughly with lukewarm water.  
For further information on the care and cleaning of your 

Icemaker, Ice dispenser of water dispenser refer to the 

section "Ice and Water Models"

Door seals
 Always keep door seals clean by washing them with a 

mild detergent and warm water, followed by a thorough 

drying. Sticky food and drink can cause seals to stick to 

the cabinet and tear when you open the door.
Never use hot water, solvents, commercial kitchen 

cleaners, aerosol cleaners, metal polishes, caustic or 

abrasive cleaners, or scourers to clean your refrigerator. 

Many commercially available cleaning products and 

detergents contain solvents that will damage your 

refrigerator. Use only a soft cloth with an unscented 

mild soap and lukewarm water.

  CAUTION

To clean a crisper or freezer bin with telescopic 

extension slides, simply wipe with a damp cloth and 

warm soapy water. 

Never immerse the cover in water, as this could affect 

the operation of the slide.

Switching off your refrigerator
If you switch off your refrigerator for an extended 

period, follow these steps to reduce the chances of 

mould:

GENERAL INFORMATION

22    electrolux.com.au

1                     .         Remove all food.
2                . Remove the power plug from the power point.
3. Thoroughly clean and dry the interior.
4.  Ensure that all the doors are wedged open slightly

for air circulation.

Summary of Contents for EBE4507

Page 1: ... 00000000000 2 Text image to 0488 446 622 Australia only 3 00000000000 2017 Electrolux Home Products Pty Ltd EST_PhotoRegister_Fridge_70x70_Dec17 Easy register with your smartphone 1 Photograph the camera icon including the 4 dots 00000000000 2 Then text it to 0488 446 622 Australia only 00000000000 ETE4607 ETE5407 EBE4507 EBE5307 EBE5367 EHE5267 EFE4227 ERE5047 ...

Page 2: ... to use Before you use the refrigerator we recommend that you read through the relevant sections of this manual which provides a description of your refrigerator and its functions To avoid the risks that are always present when you use an electric appliance it is important that the refrigerator is installed correctly and that you read the safety instructions carefully to avoid misuse and hazards W...

Page 3: ...al authorities and ask for the correct method of disposal When you dispose of your old refrigerators and freezers remove any doors Children can suffocate if they get trapped inside The plug must be accessible when the appliance is in position Never try to repair the refrigerator yourself only use a qualified or authorised service person for repairs WARNING R600a refrigerant warning This appliance ...

Page 4: ...esh or cooked meat and cheese or as an additional crisper The drawer will prevent strong food odours from impacting the rest of the refrigerator To remove the deli drawer pull it forward then lift it up and pull it further forward TasteLock crisper Use the crisper to store vegetables fruit or small goods Dairy compartment This compartment can be used to store dairy FlexStor door bins Slide the bin...

Page 5: ...ward then lift it up and pull it further forward Auto humidity control TasteLock crisper Use the crisper to store vegetables fruit or small goods Twist Serve ice Refer to the section Using your Refrigerator for details on removing and using this feature Freezer storage bin Refer to the section Using your Refrigerator for details on removing and using this feature BOTTOM MOUNT TasteGuard Deodoriser...

Page 6: ...erator To remove the deli drawer pull it forward then lift it up and pull it further forward TasteLock crisper Use the crisper to store vegetables fruit or small goods Automatic ice maker Refer to the section Using your Refrigerator for details on using this feature Freezer storage bin Refer to the section Using your Refrigerator for details on removing and using this feature ICE WATER Auto humidi...

Page 7: ...sper The drawer will prevent strong food odours from impacting the rest of the refrigerator To remove the deli drawer pull it forward then lift it up and pull it further forward TasteGuard Deodoriser Dairy compartments These compartments can be used to store dairy FlexStor door bins Slide the bins to meet different storage needs To remove lift and tilt To replace tilt the top and push down until l...

Page 8: ... The drawer will prevent strong food odours from impacting the rest of the refrigerator To remove the deli drawer pull it forward then lift it up and pull it further forward FreshZone crispers Use the crisper to store vegetables fruit or small goods Dairy compartment This compartment can be used to store dairy FlexStore door bins Slide the bins to meet different storage needs To remove lift and ti...

Page 9: ...nformation on how to use this feature refer to the section About the User Interface EFE4227 illustrated SINGLE DOOR LED lighting Your freezer is fitted with LED lighting Glass shelves The glass shelves improve visibility Storage bins Refer to the section Using your Refrigerator for details on removing and using this feature Automatic ice maker Refer to the section Using your Refrigerator for detai...

Page 10: ...mmended airspace CABINET DOOR 30mm 30mm X Y If you have a cupboard above the refrigerator with a rear gap of less than 100 mm Y recommended clearance at the top of the refrigerator increases from 30mm to 70mm X minimum INSTALLING YOUR NEW APPLIANCE INSTALLING YOUR REFRIGERATOR 1 Roll the refrigerator into place 10 15mm Height adjusting nut Fixed rear rollers The rollers are designed for forward or...

Page 11: ...f water tubing 1 x 1 2 tap fitting Water supply and plumbing A drinkable water supply to suit a 1 2 tap fitting is required adjacent to the refrigerator It is recommended that a licensed plumber install a new water supply outlet nearer to the appliance should the tubing supplied not be long enough It is not recommended that the tubing be extended as this could adversely affect the flow of water to ...

Page 12: ...l occurs it is recommended to contact a licensed plumber for advice Water is to be connected as per diagrams below Internal Filter Single door freezer with external filter sink brackets mains water inlet kitchen cupboard filter Do not screw the brackets into the refrigerator as this may void your warranty and permanently damage the refrigerator Step 5 Write date on filter The filter will need to be...

Page 13: ...hrough the system to remove this air or allow some time for the air to be removed over subsequent dispensing For normal use water dispenser will automatically shut off after 2 minutes of continuous operation IMPORTANT As the water cut off is not instant leave the glass under the dispenser briefly until the water has stopped flowing to avoid spills Clean and empty the dispenser drip tray regularly ...

Page 14: ...y small amounts of water released during the filter replacement 1 Ensure that the ice maker is turned off Diagram 1 2 Remove the filter by turning anti clockwise 180 3 Slide the old water filter cartridge straight out of the housing and discard it Diagram 2 4 Unwrap the new filter cartridge and using the alignment guide slide it gently into filter housing until it stops against the filter connecti...

Page 15: ...rward of the ribs on the freezer floor as it will keep the door open Ribs For bottom mount refrigerators where freezer is below the fresh food compartment Ensure all freezer drawers and shelves are pushed back completely to prevent them from keeping the door open REMOVING FEATURES AHC Auto Humidity Control Auto Humidity Filter Cartridge Auto Humidity Control automatically releases excess moisture ...

Page 16: ... and shelf together to break the ice 2 Before you remove The ice carriage remember to disengage it from the glass shelf as it may result in damage to the assembly 3 Remove the centre runner by disengaging it at the front of the shelf and removing it from the rear USING YOUR REFRIGERATOR CONTINUED Insert into the slot at the rear of the shelf Then engage into the front of the shelf 1 Refit the runn...

Page 17: ...ts and wait at least 24 hours to see if the new temperature is correct to your liking Checking the softness of ice cream is a good indication that your freezer is the right temperature while checking the temperature of water kept in the refrigerator is a good way of checking the temperature of the food compartment Temperatures inside each compartment may vary depending on how much food you store a...

Page 18: ...rease button Decreases temperature of selected compartment 7 Increase button Increases temperature of selected compartment 8 Mode indicators Boost Fast Ice Holiday Indicates appliance operation mode 9 Display Lock button Selects lock state of user interface 10 Mode select button Selects operation mode of appliance 11 Drinks Chill button Selects drinks chill timer 12 Filter status indicators Indica...

Page 19: ...ing Ice Maker on off Enables disables ice maker and water dispensing features To enable disable press button 14 to cycle through on off modes Indicator 13 will illuminate when either the ice maker or water dispenser are deactivated Ice Cube Size Ice cube size can be adjusted for personal preference or to suit supply water pressure Press and hold buttons 10 and 14 for 3 seconds Press button 6 to cy...

Page 20: ...d Fast Ice buttons together for 3 seconds within first 12 seconds of appliance starting Four pre set ice cube sizes can be selected by the user Press Fast Ice button to scroll through options and press Temp button to confirm Freezer temperature scale icons Indicates the temperature setting of the freezer compartment Temperature adjust button Press any button to awaken control Press the Temp button...

Page 21: ...vent food spoilage Call for service Alarm Icon What it means Operation Freezer Temperature Alarm Except Single door freezer Activates if the freezer temperature is 10 C over set temperature for a period of 50 minutes except during a defrost An alarm will sound the temperature icons will flash To deactivate the alarm for 50 minutes press any button To deactivate alarm for 12 hrs on the ice water mo...

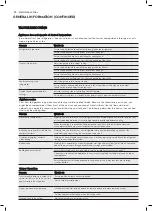
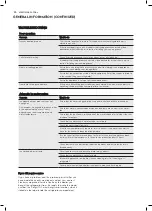
Page 22: ...ith lukewarm water For further information on the care and cleaning of your Icemaker Ice dispenser of water dispenser refer to the section Ice and Water Models Door seals Always keep door seals clean by washing them with a mild detergent and warm water followed by a thorough drying Sticky food and drink can cause seals to stick to the cabinet and tear when you open the door Never use hot water sol...

Page 23: ...ts 2 3 Days 2 Months Store in an airtight container or foil Lobster and crabs 1 2 Days 2 Months Prawns 1 2 Days 2 Months Never freeze prawns in salty water as this will dehydrate the flesh Dairy Milk Until Expiry Date Not Suitable If dairy takes on a smell or colour and you are unsure about it it is best to throw it out Yoghurt 7 10 Days Not Suitable Hard Cheeses 2 Weeks 2 Months 2 Months Grated D...

Page 24: ... them Concern What to do Motor noise compressor Nothing This is normal as your new refrigerator uses a variable speed compressor and fan that at start up and on warm days runs at a high speed to provide additional cooling When less cooling is required the compressor and fan will run at a lower speed Note that the compressor noise may seem louder at the start of the on cycle A clicking noise heard ...

Page 25: ...de when not in use Press any button to wake user interface Check that the user interface is in awake mode refer to section About the user interface Check that the user interface is not locked refer to section About the user interface If the user interface is frozen turn the appliance off for five minutes for the memory to clear then turn back on Check that the user interface is not in Sabbath Mode...

Page 26: ...ruction under the ice maker and ensure the ice bin is fitted correctly Ice has bad odour or taste Cover food to ensure ice does not absorb foreign odours Check that the water filter is not out of date Interior of appliance or ice bin may require cleaning refer to Cleaning your refrigerator Discard stale ice monthly and allow ice maker to produce a fresh supply TROUBLESHOOTING Door operation Concer...

Page 27: ...NOISES BRRR HISSS CLICK BLUBB CRACK SSSRRR OK CLICK CLICK SSSRRR SSSRRR BRRR BRRR HISSS HISSS BLUBB BLUBB CRACK CRACK 27 ...

Page 28: ...28 electrolux com au NOTES ...

Page 29: ...NOTES 29 ...

Page 30: ...30 electrolux com au NOTES ...

Page 31: ...by Electrolux c cosmetic damage which does not affect the operation of the Appliance d damage to the Appliance caused by i i negligence or accide ii ii misuse or abuse including fa e to properly maintain or service iii improper negligent or faulty servicing or repair works done by anyone other than an Electrolux authorised repairer or ASC iv iv normal wear and t v v power surges electrical storm d...

Page 32: ...lephone 0800436245 fax email web 0800 225 088 customercare electrolux co electrolux co nz To add a touch of professional inspiration to your home visit electrolux com au or electrolux co nz electrolux com au or electrolux co nz P No 2018 Electrolux Home Products Pty Ltd ABN 51 004 762 341 Electrolux Home Products Australia EMAN_Refrigeration_Factory_Oct18 ...

Reviews: