background image

10

Before using your tumble dryer for the first time, we
recommend to place a few damp cloths inside the
appliance and dry for approximately 30 minutes
(programme

L

).

There may be dust inside a brand new tumble dryer. 

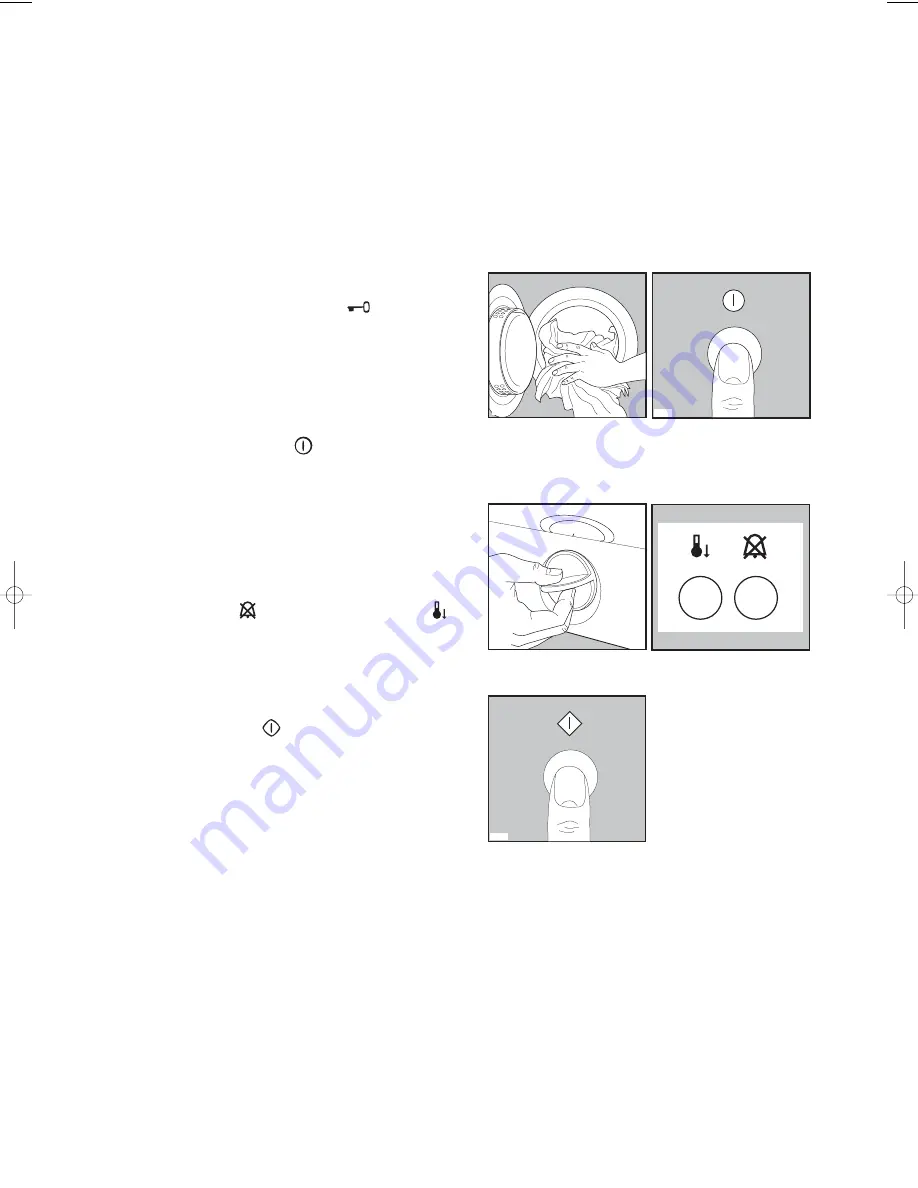
1. Load the laundry

Open the door by depressing button 

.

Load the items one at a time, shaking them out
loosely and close the door.
Please check the laundry does not get caught
between the door and filter.

2. Switch the machine on

Depress the ON/OFF button 

. The mains-on light

comes on.

3. Select the drying programme

Turn the selector dial to the desired programme.

4. Select the required options

Depress Buzzer Off 

and/or Low Temp. Button 

,

if required.

5. Start the machine

Depress START button 

for 2 seconds, the

machine starts operating.

To change a programme already in progress

, turn

the selector dial to “0”, select the new programme
and then depress START button.

Operating Sequence

P0305

P0080

B

M0028

P0885

125995195.qxp  2005-03-16  10:34  Page 10

Summary of Contents for EDE421E

Page 1: ...TUMBLE DRYER TORKTUMLARE TØRRETUMBLER TØRKETROMMEL INSTRUCTION BOOKLET BRUKSANVISNING BRUGSANVISNING BRUKSANVISNING EDE 421 E 125 995 194 S N GB DK 125 995 195 ...

Page 2: ...ence and pass it on to any future owners Transport damage When unpacking the appliance check that it is not damaged If in doubt do not use it and contact the retailer Guide to use the Instruction Book The following symbols will be found in the text to guide you throughout the instructions Safety instructions Hints and tips Environmental information How do we help to protect the environment We use ...

Page 3: ...hine on 10 Select the drying programme 10 Select the required options 10 Start the machine 10 When drying is completed 11 At the end of the programme 11 Hints Tips on Drying 12 Maintenance and Cleaning 13 External cleaning 13 Cleaning the door 13 Cleaning the filter 13 Something Not Working 14 Installation Instructions 15 Technical Specifications 15 Installation 16 Positioning 16 Fitting the vent ...

Page 4: ... an explosion Tumble dry only items washed with water Risk of fire items that have been spotted or soaked with vegetable or cooking oil constitute a fire hazard and should not be placed in the tumble dryer If you have washed your laundry with stain remover you must execute an extra rinse cycle before loading your tumble dryer In order to avoid danger of fires caused by excessive drying do not use ...

Page 5: ...shall be handed over to the applicable collection point for the recycling of electrical and electronic equipment By ensuring this product is disposed of correctly you will help prevent potential negative consequences for the environment and human health which could otherwise be caused by in appropriate waste handling of this product For more detailed information about recycling of this product ple...

Page 6: ...ieved through very frugal electricity consumption and short drying times Your New Tumble Dryer 1 Top cover 2 Programme chart 3 Door opening button 4 Mains On Light 5 ON OFF Button 6 Low Temperature Button 7 Buzzer Off Button 8 Start Button 9 Control Lights 10 Programme Selector Dial 11 Rating Plate 12 Fluff filter 13 Adjustable feet 14 Side vent outlet 15 Ring nut 16 Rear vent outlet Description o...

Page 7: ...out 2 seconds to start the selected drying programme If the door is opened during drying programme this button has to be depressed after closing the door to re start the programme 8 Programme phase indicator The different lights indicate the following functions Drying Light This light indicates that the machine is performing the drying phase Cool Tumbling Light This light will illuminate when the ...

Page 8: ...ch can be obtained with electronic control are illustrated in the programme chart Timed Programmes I L For a personalized drying or additional drying of single items The selector dial incorporates a drying cycle up to 60 minutes for cotton and up to 30 minutes for synthetics The selected time can be extended when the original programme is completed by resetting the dial for a further period of dry...

Page 9: ...linen Table cloths 5 Iron dry D Dishtowels Bed linen Table cloths 5 Machine iron dry E Dishtowels Synthetic and mixed fabrics non iron bed linen and table cloths 2 5 Extra dry F shirts blouses Synthetic and mixed fabrics i e bed linen and table cloths 2 5 Store dry G jumpers baby garments Delicates sensitive to high temperatures 2 5 Slightly damp H Time controlled drying for drying single 2 5 pers...

Page 10: ... the laundry does not get caught between the door and filter 2 Switch the machine on Depress the ON OFF button The mains on light comes on 3 Select the drying programme Turn the selector dial to the desired programme 4 Select the required options Depress Buzzer Off and or Low Temp Button if required 5 Start the machine Depress START button for 2 seconds the machine starts operating To change a pro...

Page 11: ...icrease phase for approx 30 mins During this period the drum will rotate at regular intervals to avoid creasing and the buzzer will sound for 1 second every 10 seconds unless you have depressed the BUZZER OFF button You can remove the laundry at any time If you do not remove the laundry at this stage the machine will complete the anti crease phase and then will stop automatically only the pilot li...

Page 12: ...DO NOT load dripping wet laundry into the dryer Roll the article in a towel or spin to remove excess water Close poppers and zips and fasten any buttons Sort the laundry Separate synthetics from cotton linens and dry separately Remove the laundry immediately after the programme has finished Use a fabric conditioning sheet to reduce static We recommend the sheet is pinned to an article of laundry u...

Page 13: ... door to remove any fluff Accurate cleaning ensures correct drying Cleaning the filter Your dryer will only function well if the filter is clean The filter collects all the fluff which accumulates during drying and it must therefore be cleaned at the end of each programme before removing the laundry with a damp cloth The filter cannot be removed Do not be alarmed by the amount of fluff It is not d...

Page 14: ...ositioned The START button has not been depressed Drying takes too long or laundry is not dry enough The laundry has not been spun properly The filter is clogged up The room temperature is too high Has the correct programme been chosen The Low Temperature Button has been depressed although full heating should be used for drying There is too much laundry inside the appliance The dryer is not correc...

Page 15: ...t person DIMENSIONS Height 85 cm Width 60 cm Depth 57 cm ELECTRICAL CONNECTION 220 230 V 50 Hz MAX POWER ABSORBED 2200 W MIN FUSE RATING 10 A MAX DRYING CAPACITY Cotton linen 5 kg Synthetics 2 5 kg Drum Volume 108 l CONSUMPTION Cotton linen 3 3 kWh 5 5 kg store dry Cotton linen 2 7 kWh 5 5 kg iron dry Synthetics 1 10 kWh 2 5 kg store dry This appliance complies with the following E E C Directives ...

Page 16: ...e carpets strips of wood or similar This might cause heat build up which would interfere with the operation of the appliance Important When operating the tumble dryer the room temperature must not exceed 35 C as it may affect the performance of the appliance P0046 Fitting the vent hose To simplify the installation there is a choice of vent outlets one at the back the others in the left and right h...

Page 17: ...t squashed If the hose is partially squashed drying efficiency will be reduced resulting in longer drying times and higher energy consumption If the hose is completely squashed the safety cut outs with which the machine is fitted may operate P0055 Electrical connection Before connecting the machine check that the mains voltage corresponds to the voltage given in the technical specifications Check ...

Reviews: