background image

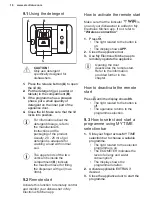
9.10 Opening the door while

the appliance operates

Opening the door while a programme is

running pauses the wash cycle. The

display shows the remaining duration of

the programme. After closing the door,

the wash cycle resumes from the point of

interruption.
Opening the door while the remote start

is activated deactivates this function.

Activate the remote start again before

you close the door; otherwise, the wash

cycle starts immediately after you close

the door. Opening the door does not

deactivate the remote start if the delay

start is set.
If you open the door during the delay

start countdown, the countdown is

paused. The display shows the current

countdown status. After closing the door,

the countdown resumes.

Opening the door while the

appliance operates may

affect the energy

consumption and the

programme duration.

If the door is opened for

more than 30 seconds

during the drying phase, the

running programme ends. It

does not happen if the door

is opened by the AirDry

function.

9.11 The Auto Off function

This function saves energy by switching

the appliance off when it is not operating.
The function comes into operation

automatically:

• When the programme is completed.

• After 5 minutes if a programme was

not started.

9.12 End of the programme

When the programme is complete, the

display shows 0:00.
The Auto Off function switches the

appliance off automatically.
All buttons are inactive except for the

on/off button.

If the display shows upd,

refer to "Troubleshooting".
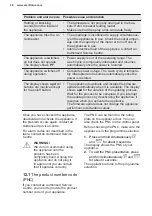
10. HINTS AND TIPS

10.1 General

Follow the hints below to ensure optimal

cleaning and drying results in daily use

and to protect the environment.
• Washing dishes in the dishwasher as

instructed in the user manual usually

consumes less water and energy than

washing dishes by hand.

• Load the dishwasher to its full

capacity to save water and energy.

For best cleaning results, arrange

items in the baskets as instructed in

the user manual and do not overload

the baskets.

• Do not pre-rinse dishes by hand. It

increases the water and energy

consumption. When needed, select a

programme with a prewash phase.

• Remove larger residues of food from

the dishes and empty cups and

glasses before putting them inside the

appliance.

• Soak or slightly scour cookware with

firmly cooked-on or baked-on food

before washing it in the appliance.

• Make sure that items in the baskets

do not touch or cover each other.

Only then can the water completely

reach and wash the dishes.

www.electrolux.com

20

Summary of Contents for EEQ67410W

Page 1: ...EEQ67410W EN Dishwasher User Manual ...

Page 2: ...ROL PANEL 8 5 PROGRAMME SELECTION 9 6 BASIC SETTINGS 11 7 WIRELESS CONNECTION 15 8 BEFORE FIRST USE 16 9 DAILY USE 17 10 HINTS AND TIPS 20 11 CARE AND CLEANING 22 12 TROUBLESHOOTING 26 13 TECHNICAL INFORMATION 31 14 ENVIRONMENTAL CONCERNS 32 My Electrolux Kitchen app www electrolux com 2 ...

Page 3: ...ce Centre ensure that you have the following data available Model PNC Serial Number The information can be found on the rating plate Warning Caution Safety information General information and tips Environmental information Subject to change without notice 1 SAFETY INFORMATION Before the installation and use of the appliance carefully read the supplied instructions The manufacturer is not responsib...

Page 4: ...hen areas in shops offices and other working environments by clients in hotels motels bed breakfast and other residential type environments Do not change the specification of this appliance The operating water pressure minimum and maximum must be between 0 5 0 05 10 1 0 bar MPa Follow the maximum number of 13 place settings If the supply cord is damaged it must be replaced by the manufacturer its ...

Page 5: ...ed to be installed connected to a grounding connection in the building Make sure that the parameters on the rating plate are compatible with the electrical ratings of the mains power supply Always use a correctly installed shockproof socket Do not use multi plug adapters and extension cables Make sure not to cause damage to the mains plug and to the mains cable Should the mains cable need to be re...

Page 6: ... heating elements including heat pumps piping and related equipment including hoses valves filters and aquastops structural and interior parts related to door assemblies printed circuit boards electronic displays pressure switches thermostats and sensors software and firmware including reset software Please note that some of these spare parts are only available to professional repairers and that n...

Page 7: ...asket 11 Lower basket 12 Upper basket 3 1 Beam on Floor The Beam on Floor is a light that is displayed on the floor below the appliance door A red light comes on when a programme starts It remains on for the duration of the programme A green light comes on when the programme is complete The red light flashes when the appliance has a malfunction The Beam on Floor is off when the appliance is deacti...

Page 8: ...ormally soiled dishwashing load 4 3 Indicators Indicator Description Rinse aid indicator It is on when the rinse aid dispenser needs refill ing Refer to Before first use Salt indicator It is on when the salt container needs refilling Refer to Before first use Machine Care indicator It is on when the appliance needs internal cleaning with the Machine Care programme Refer to Care and cleaning Drying...

Page 9: ...justs the dishwashing cycle to the type of load The appliance senses the degree of soil and the amount of dishes in the baskets It adjusts the temperature and quantity of water as well as the wash duration 5 3 EXTRAS You can adjust the programme selection to your needs by activating EXTRAS ExtraHygiene ExtraHygiene provides better hygiene results by keeping the temperature between 65 and 70 C for ...

Page 10: ...termediate rinse Final rinse 60 C Drying AirDry ExtraPower GlassCare ExtraHy giene ECO Crockery cutlery pots pans Normal lightly dried on Prewash Dishwashing 50 C Intermediate rinse Final rinse 55 C Drying AirDry ExtraPower GlassCare ExtraHy giene AUTO Sense Crockery cutlery pots pans All Prewash Dishwashing 50 60 C Intermediate rinse Final rinse 60 C Drying AirDry Not applicable Machine Care For ...

Page 11: ...re the appliance by changing basic settings according to your needs Number Setting Values Description1 1 Water hard ness From level 1L to level 10L default 5L Adjust the level of the water softener ac cording to the water hardness in your area 2 Rinse aid level From level 0A to level 6A de fault 4A Adjust the level of the rinse aid accord ing to the necessary dosage 3 End sound On Off default Acti...

Page 12: ...The bar of the ECOMETER dedicated to the chosen setting flashes The display shows the current setting value 2 Press OK to enter the setting The bar of the ECOMETER dedicated to the chosen setting is on The other bars are off The current setting value flashes 3 Press Previous or Next to change the value 4 Press OK to confirm the setting The new setting is saved The appliance returns to the basic se...

Page 13: ...This process is automatic and is the part of the normal dishwasher operation When the prescribed quantity of water see values in the table has been used since the previous regeneration process a new regeneration process will be initiated between the final rinse and the programme end Water softener level Amount of water l 1 250 2 100 3 62 Water softener level Amount of water l 4 47 5 25 6 17 7 10 8...

Page 14: ...sfactory while using multi tablets only it is possible to deactivate the dispenser and the indicator However for best drying performance always use rinse aid and keep the rinse aid indicator active To deactivate the rinse aid dispenser and indicator set the level of rinse aid to 0A 6 4 End sound You can activate an acoustic signal that sounds when the programme is completed Acoustic signals sound ...

Page 15: ... Energy 5 0 2 4 GHz DSSS Max Power Wi Fi 2 4 GHz 20 dBm Wi Fi 5 GHz 23 dBm Bluetooth Low Energy 5 0 20 dBm Encryption WPA WPA2 7 1 How to connect the dishwasher to the network and to the app To connect your dishwasher you need Wireless network with the Internet connection Mobile device connected to the wireless network 1 Launch My Electrolux Kitchen app on your mobile device and follow the instruc...

Page 16: ... that the current level of the water softener agrees with the hardness of the water supply If not adjust the level of the water softener 2 Fill the salt container 3 Fill the rinse aid dispenser 4 Open the water tap 5 Start the programme Quick to remove any residuals from the manufacturing process Do not use detergent and do not put dishes in the baskets After starting the programme the appliance r...

Page 17: ...esigned specifically for dishwashers 1 Open the lid C 2 Fill the dispenser B until the rinse aid reaches the marking MAX 3 Remove the spilled rinse aid with an absorbent cloth to prevent excessive foam formation 4 Close the lid Make sure that the lid locks into position Fill the rinse aid dispenser when the indicator A is clear 9 DAILY USE 1 Open the water tap 2 Press and hold until the appliance ...

Page 18: ...lux Kitchen app How to activate the remote start Make sure that the indicator is on and your dishwasher is added in My Electrolux Kitchen app If not refer to Wireless connection 1 Press The light related to the button is on The display shows APP 2 Close the appliance door 3 Use My Electrolux Kitchen app to remotely operate the appliance Opening the door deactivates the remote start Refer to the in...

Page 19: ...ress The light related to the button is on The display shows the longest possible program duration 2 Close the appliance door to start the program The appliance senses the type of load and adjusts a suitable wash cycle During the cycle the sensors operate several times and the initial program duration can decrease 9 7 How to delay the start of a programme 1 Select a programme 2 Double press The di...

Page 20: ...operation automatically When the programme is completed After 5 minutes if a programme was not started 9 12 End of the programme When the programme is complete the display shows 0 00 The Auto Off function switches the appliance off automatically All buttons are inactive except for the on off button If the display shows upd refer to Troubleshooting 10 HINTS AND TIPS 10 1 General Follow the hints be...

Page 21: ...efer to the instructions on the detergent packaging Always use the correct quantity of rinse aid Insufficient dosage of rinse aid decreases the drying results Using too much rinse aid results in bluish layers on the items Make sure that the water softener level is correct If the level is too high the increased quantity of salt in the water might result in rust on cutlery 10 3 What to do if you wan...

Page 22: ...es limescale and grease buildup When the appliance senses the need for cleaning the indicator is on Start the Machine Care programme to clean the appliance interior How to start the Machine Care programme Before starting the Machine Care programme clean the filters and spray arms 1 Use a descaler or a cleaning product designed specifically for dishwashers Follow the instructions on the packaging D...

Page 23: ... appliance with a moist soft cloth Only use neutral detergents Do not use abrasive products abrasive cleaning pads or solvents 11 5 Cleaning the filters The filter system is made of 3 parts C B A 1 Turn the filter B counterclockwise and remove it 2 Remove the filter C out of filter B 3 Remove the flat filter A 4 Wash the filters 5 Make sure that there are no residues of food or soil in or around t...

Page 24: ...ll it upwards 2 Wash the spray arm under running water Use a thin pointed tool e g a toothpick to remove particles of soil from the holes 3 To install the spray arm back press it downwards 11 7 Cleaning the upper spray arm We recommend to clean the upper spray arm regularly to prevent soil from clogging the holes Clogged holes can cause unsatisfactory washing results 1 Pull out the upper basket 2 ...

Page 25: ...the delivery tube A with the mounting element B C B A 1 Move the upper basket to the lowest level to reach the spray arm more easily 2 To detach the spray arm C from the delivery tube A turn the mounting element B counterclockwise and pull the spray arm downwards 3 Wash the spray arm under running water Use a thin pointed tool e g a toothpick to remove particles of soil from the holes Run the wate...

Page 26: ... appliance does not fill with water The display shows i10 or i11 Make sure that the water tap is open Make sure that the pressure of the water supply is not too low For this information contact your local water authority Make sure that the water tap is not clogged Make sure that the filter in the inlet hose is not clog ged Make sure that the inlet hose has no kinks or bends The appliance does not ...

Page 27: ...ults and energy savings The programme lasts too long If the delay start option is set cancel the delay set ting or wait for the end of the countdown Activating options increases the programme dura tion The displayed programme duration is different than the duration in the con sumption values table Refer to the consumption values table in the chapter Programme selection The remaining time in the di...

Page 28: ...le The display shows upd for the duration of the updating process Wait for the process to be complete If you interrupt the update process by deactivating the appliance it resumes when you activate the appliance The firmware update does not change the appliance performance declaration values Once you have checked the appliance deactivate and activate the appliance If the problem occurs again contac...

Page 29: ... is too high Ad just the rinse aid dosage to a lower level The quantity of detergent is too high There are stains and dry wa ter drops on glasses and dishes The released quantity of rinse aid is not sufficient Adjust the rinse aid dosage to a higher level The quality of the rinse aid can be the cause The interior of the appliance is wet This is not a defect of the appliance Humidity con densates o...

Page 30: ...shwasher safe items are washed in the appliance Load and unload the basket carefully Refer to the basket loading leaflet Place delicate items in the upper basket Activate the GlassCare option to ensure special care for glassware and delicate items Refer to Before first use Daily use or Hints and tips for other possible causes 12 3 Problems with wireless connection Problem Possible cause and soluti...

Page 31: ...Move router as close to the dishwasher as possible or consider purchasing a wireless range extender 13 TECHNICAL INFORMATION Dimensions Width height depth mm 596 818 898 550 Electrical connection 1 Voltage V 200 240 Frequency Hz 50 60 Water supply pressure bar minimum and maximum 0 5 10 MPa minimum and maximum 0 05 1 0 Water supply Cold water or hot water 2 max 60 C Capacity Place settings 13 1 Re...

Page 32: ...Put the packaging in relevant containers to recycle it Help protect the environment and human health by recycling waste of electrical and electronic appliances Do not dispose of appliances marked with the symbol with the household waste Return the product to your local recycling facility or contact your municipal office www electrolux com 32 ...

Page 33: ......

Page 34: ......

Page 35: ......

Page 36: ... of the open software and robotics communities to the development project To access the source code of these free and open source software components whose license conditions require publishing and to see their full copyright information and applicable license terms please visit http electrolux opensoftwarerepository com folder NIU5 www electrolux com shop 117853951 A 402021 ...

Reviews: