8
•
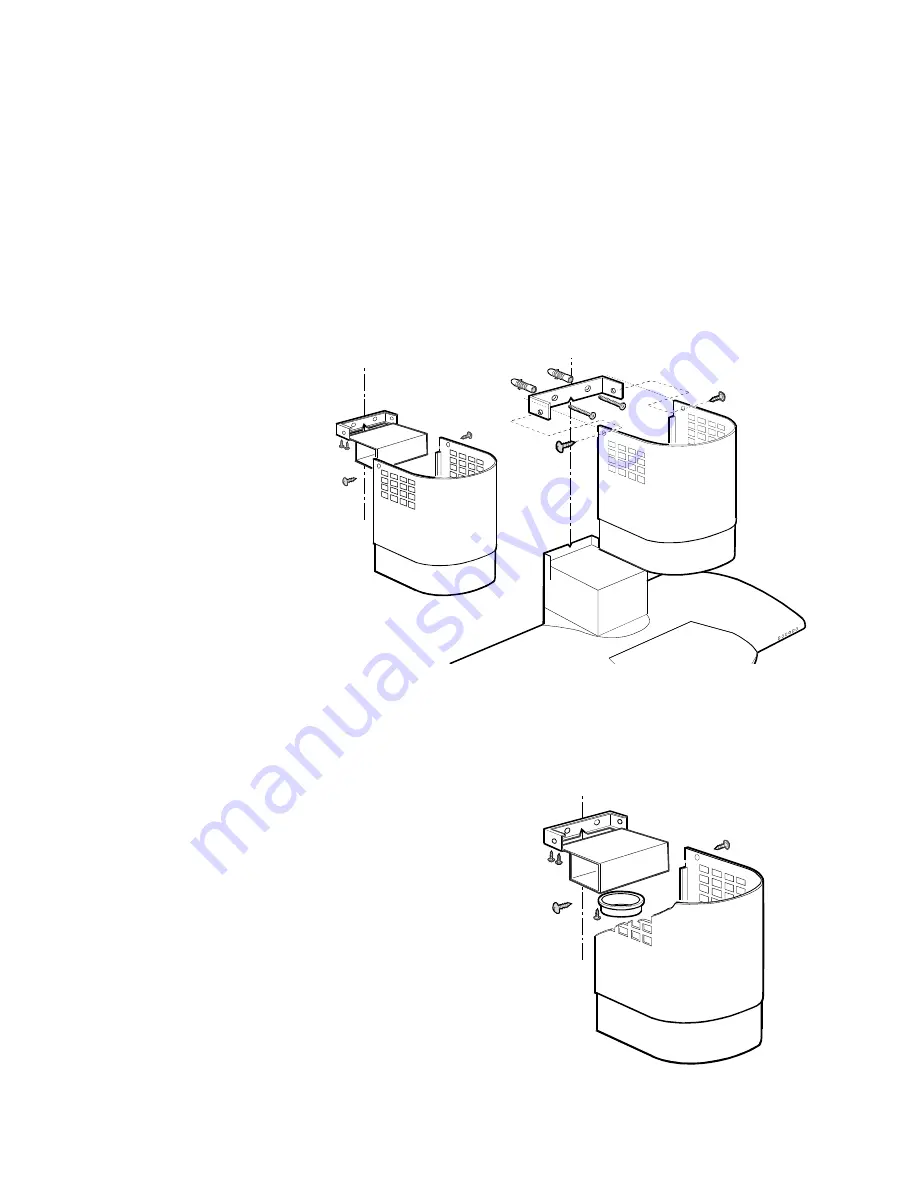
Remove the telescopic chimney support M by
unscrewing the side screws R (one on each side - these
screws must be kept). Fig. 6.
•
Remove the air pipe L from the telescopic chimney
support M; to do this, unscrew the four screws (Ø 2,9 x
9,5 mm) fixing the air pipe to the support (these screws
must be kept). Fig. 6.
•
Fit the telescopic chimney support to the wall, at a point
close to the ceiling. The telescopic chimney support has
a reference mark P, which must coincide with the line
that you have already drawn on the wall. Fig. 6.
•
Using a pencil, mark the two holes required to fix the
support, and drill the holes (Ø 8 mm). Fig. 6.
•
Insert two plugs and fix the telescopic chimney support
M using 2 screws size (5x45 mm). Fig. 6.
•
During installation the plug must not be connected to
the power supply.
Select the hood operating mode
•
Extractor operation
Fix the 150 mm diameter ABS pipe to the hood outlet
and ensure that the other end discharges into the open
air.
•
Filter operation
If the connector ring has not yet been installed, it must
be fitted at this point (Q in Fig. 7, bayonet connector).
Turn it in a clockwise direction and fix it to the air pipe
L using a screw. Insert the air pipe into the telescopic
chimney support and fix it with four screws (Ø 2,9 x 9,5
mm). Fig. 7.
Fix the 150 mm diameter ABS pipe to the hood outlet,
and connect it to the air pipe connector ring.
For both versions:
•
The hood can now be connected to the power supply.
•
If a gas non-return valve has been installed or is required,
ensure that it opens and closes properly.
•
Fix the top part the telescopic outlet pipe to the relative
support, using the two 3 mm dia x 9 mm screws R. Fig. 6.
•
Slide the bottom part of the telescopic outlet pipe
downward until it rests in its housing on the top of the
hood.
•
Replace the grease filters.
R
R
R
R
M
M
L
P
Q
L
Summary of Contents for EFC 928
Page 1: ...User Manual EFC 928 GB ...
Page 9: ...9 ...
Page 10: ...10 ...
Page 11: ...11 ...
Page 12: ...LI1REA Ed 06 01 ...


