background image

33

Mounting of hood on wall

l

In this case 3 expansion plugs Ø  8 mm and 3
screws 5x45 are needed and must be pur-
chased separate.

l

Make 3 Ø 8 mm holes in the wall.  2 at points
H, 1 as desired at points I.

l

Insert the three Ø  8 mm expansion plugs into
the wall.

l

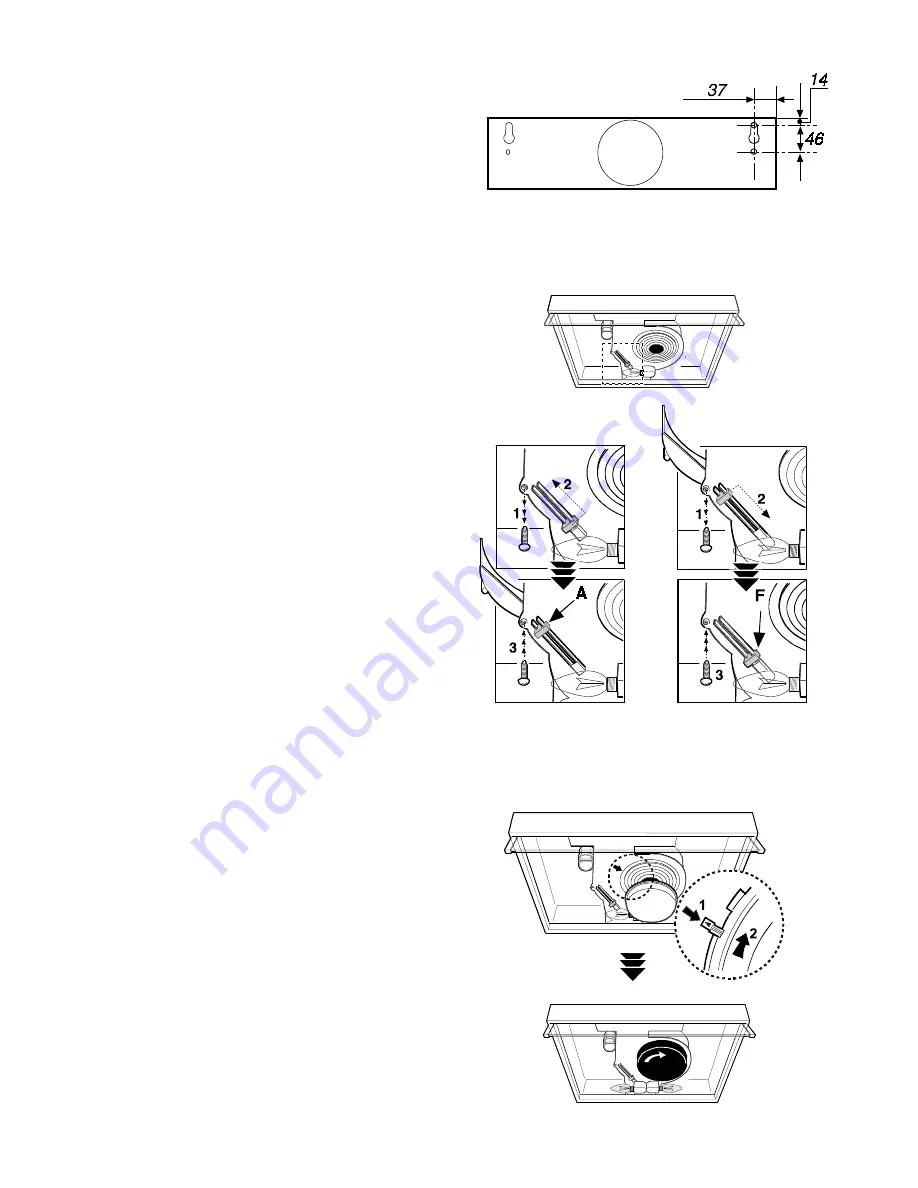
Insert 2 5x45 screws at points H but do not
tighten them completely.

l

Open the grid.

l

Fit the hood into holes H, tighten the 2 screws.

l

From inside the hood, insert the third 5x45
screw into hole I (Fig. 6).

Exhausting mode

l

Connect the air outlet to the smoke exhaust
hose

l

Open the suction grid (Fig. 11).

l

Check that the selection lever for evacuation/
recycle is in the position A - external evacua-
tion. (Fig. 8).

l

Refit the suction grid.

Recirculation mode (with carbon
filter)

The air outlets D (Fig. 2) must be shut.

l

Open the suction grid (Fig. 11).

l

Check that the selection lever for evacuation/
recycle is in the position : F - recycle (Fig. 7)

Mounting the circular charcoal filter
(Fig. 8):
a. 
Position the circular charcoal filter so that it

covers the plastic grate which protects the fan
wheel and motor.

b. Check that the small tab (1) coincides with the

arrow (2) printed on the conveyor.

c. Turn in clockwise direction.

Fig. 7

Fig. 8

Recirculation

mode

Exhausting

 mode

Fig. 6

Summary of Contents for EFT 600-2

Page 1: ...Gebrauchsanweisung Libro de Instrucciones EFT 600 2 EFT 604 Manual de Instruções User Manual UK P E D ...

Page 2: ...2 Unpacking 32 Placement 32 Electrical connection 32 Mounting of hood on wall 32 Mounting under cupboard 33 Exhausting mode 33 Recirculation mode with carbon filter 33 Using the hood 34 Speed regulation 34 Work light 34 Correct ventilation 34 Important to know 34 Maintenance 35 Grease filter 35 Carbon filter 35 Attention 35 Cleaning 35 Changing the lighting elements 35 If the hood does not functio...

Page 3: ...s l The hood cannot be connected to flues of other appliances that run on energy sources other than electricity Please keep to the provisions of official directives regarding the question of fumes discharge l When the hood is used at the same time of other appliances that run on energy sources other than electricity provision must be made for an adequate supply of air l When installed the hood mus...

Page 4: ...lug H in the unused exhaust hole bayonet coupling Plug H is for closing the unused hole Attention In the horizontal runs the duct must be slightly slanted about 10 and directed upwards to vent the air easily from the room to the outside The hood cannot be connected to flues f other appliances that run on energy sources other than electricity Recycling The air is filtered through a carbon filter an...

Page 5: ... cm above gas or mixed fuel burners Fig 4 Electrical connection The hood has a power cord with moulded plug with earth connection to be connected to a wall outlet of 230 V The power cord length is 1 m Mounting under cupboard l Make the holes on the bottom of the cupboard l From inside the cupboard insert the 4 supplied screws and tighten them in the appropriate holes on the appliance Fig 5 Attenti...

Page 6: ...to the smoke exhaust hose l Open the suction grid Fig 11 l Check that the selection lever for evacuation recycle is in the position A external evacua tion Fig 8 l Refit the suction grid Recirculation mode with carbon filter The air outlets D Fig 2 must be shut l Open the suction grid Fig 11 l Check that the selection lever for evacuation recycle is in the position F recycle Fig 7 Mounting the circ...

Page 7: ...andle Switch on and off with the left slide switch Correct ventilation To have the cooker hood working correctly the windows in the kitchen should be closed In stead a window in an adjacent room should be open Important to know If the hood is run at the same time as a burner or fireplace that depend on ambient air for example gas Diesel coal or wood heaters water heaters etc be careful because the...

Page 8: ...in normal use Ask the technical assistance service or manufacturing company for a new one The carbon filter must never be washed Dismounting the carbon filter a Disconnect the hood from the electricity b Remove the exhausting grid Fig 11 c Pull out the tab 1 d Turn the filter in the counterclockwise direction 2 Attention Failure to observe the rules for cleaning the appliance and changing and clea...

Page 9: ...n approved service com pany Remember to save the purchase recite and the Warranty card only used in some coun tries Service and spare parts Service and spare parts you will get via your dealer or service company When you order service or spare parts you should be ready to give the product number and model denomination This information you will find on the rating label Take away the grease filter a...

Page 10: ... m3 h x 170 m3 h Min 120 m3 h Dimension Height 130 mm Width 599 mm Depth 493 mm Light 2 x 40 W E 14 Grease filter 1 pc Mains Voltage 220 230 V Electric safety class Class 2 Power rating total 200 W x Valid when the hood is used with carbon filter recirculation ...

Page 11: ...1007 YW LI1BMA Ed 12 98 ...

Reviews: