background image

5.1 

Energy savings

• If possible, always put the lids on the

pans.

• When the liquid starts to boil, turn down

the flame to barely simmer the liquid.

Use cookware with diameters applicable
to the size of burners.

Burner

Diameters of cook-

ware

Triple

Crown

180 - 260 mm

Front Semi-

rapid

120 - 220 mm

Rear Semi-

rapid

120 - 220 mm

Auxiliary

80 - 180 mm

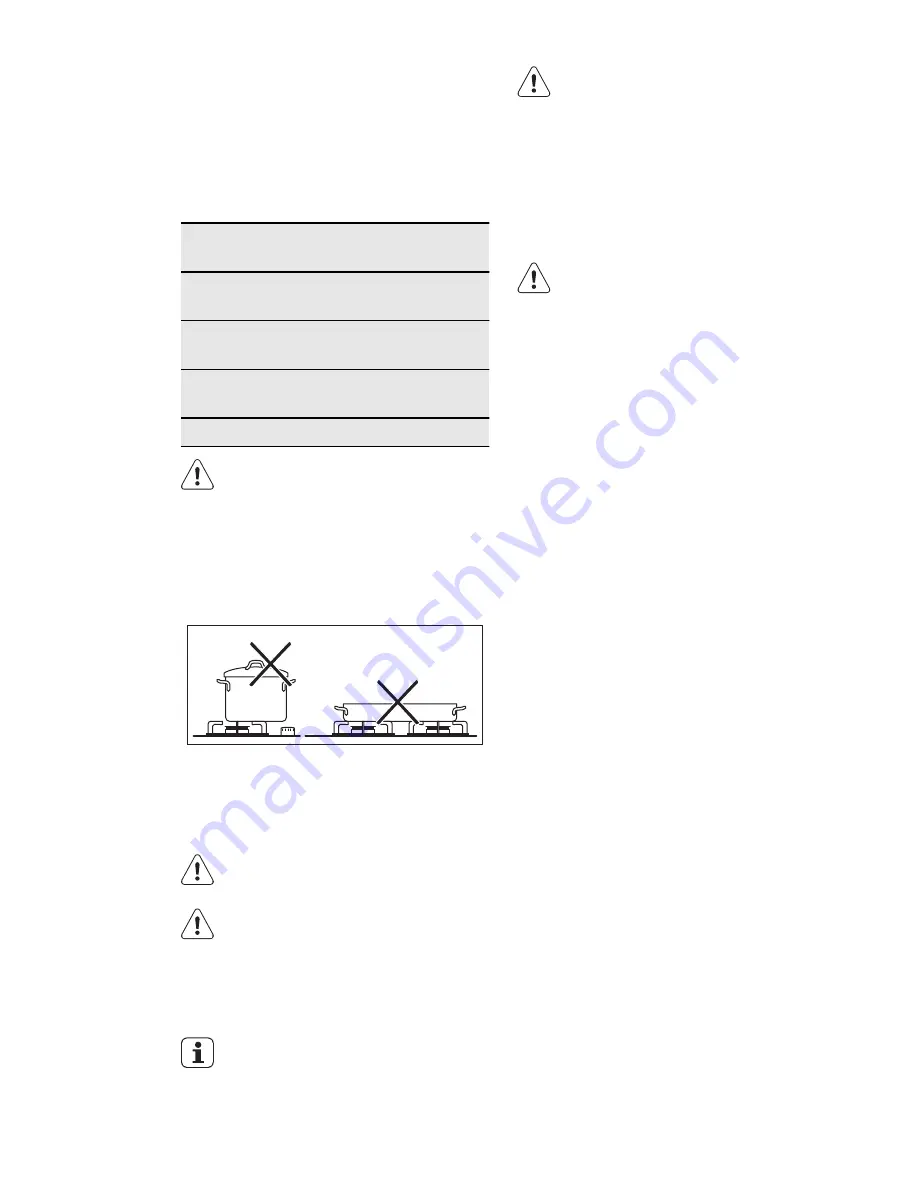
WARNING!

Make sure that the bottoms of
pots do not stand above the con-
trol knobs. If the control knobs are
under the bottoms of pots, the
flame heats them up.
Do not put the same pan on two
burners.

WARNING!

Make sure that pot handles is not
above the front edge of the cook-
top. Make sure that pots are cen-
trally put on the rings in order to
get maximum stability and to get
lower gas consumption.

Do not put unstable or damaged pots on
the rings to prevent from spill and injury.

WARNING!

Do not use a flame diffuser.

Information on acrylamides

Important!

 According to the newest

scientific knowledge, if you brown food
(specially the one which contains starch),
acrylamides can pose a health risk. Thus,
we recommend that you cook at the
lowest temperatures and do not brown
food too much.

6. 

CARE AND CLEANING

WARNING!

Refer to the Safety chapters.

WARNING!

Deactivate the appliance and let it
cool down before you clean it.
Disconnect the appliance from the
electrical supply before you do
cleaning or maintenance work.

Scratches or dark stains on the
surface have no effect on how the
appliance operates.

• You can remove the pan supports to

easily clean the hob.

• To clean the enamelled parts, cap and

crown, wash them with warm soapy
water and dry them carefully before you
put them back.

• Wash stainless steel parts with water,

and then dry them with a soft cloth.

• The pan supports 

are not

 dishwasher

proof. They must be washed 

by hand

.

• When you wash the pan supports by

hand, take care when you dry them as
the enamelling process occasionally
leaves rough edges. If necessary, re-
move stubborn stains using a paste
cleaner.

8

www.electrolux.com

Summary of Contents for EGS6343NOX

Page 1: ...EGS6343NOX EN HOB USER MANUAL ...

Page 2: ...u ll get great results every time Welcome to Electrolux Visit our website for Get usage advice brochures trouble shooter service information www electrolux com Register your product for better service www electrolux com productregistration Buy Accessories Consumables and Original spare parts for your appliance www electrolux com shop CUSTOMER CARE AND SERVICE We recommend the use of original spare...

Page 3: ...nowledge if they are supervised by an adult or a per son who is responsible for their safety Do not let children play with the appliance Keep all packaging away from children Keep children and pets away from the appliance when it operates or when it cools down Accessible parts are hot If the appliance has a child safety device we recom mend that you activate it Cleaning and user maintenance shall ...

Page 4: ...ce is installed above draw ers make sure that the space between the bottom of the appliance and the up per drawer is sufficient for air circula tion The bottom of the appliance can get hot We recommend to install a non combustile separation panel under the appliance to prevent access to the bot tom Electrical connection WARNING Risk of fire and electrical shock All electrical connections must be m...

Page 5: ...us combustion Used oil that can contain food rem nants can cause fire at a lower temper ature than oil used for the first time Do not put flammable products or items that are wet with flammable products in near or on the appliance WARNING Risk of damage to the appliance Do not keep hot cookware on the con trol panel Do not let cookware to boil dry Do not activate the cooking zones with empty cookw...

Page 6: ...ace layout 3 4 2 1 1 Semi rapid burner 2 Triple Crown burner 3 Auxiliary burner 4 Control knobs 3 2 Control knobs Symbol Description no gas supply off position ignition position maximum gas supply Symbol Description minimum gas supply 4 DAILY USE WARNING Refer to the Safety chapters 4 1 Ignition of the burner WARNING Be very careful when you use open fire in kitchen environment Manufacturer declin...

Page 7: ... minimum 1 minute In the absence of electricity you can ignite the burner without elec trical device in this case approach the burner with a flame push the relevant knob down and turn it counter clockwise to maximum gas release position If the burner accidentally goes out turn the control knob to the off position and try to light the burner again after minimum 1 minute The spark generator can star...

Page 8: ...portant According to the newest scientific knowledge if you brown food specially the one which contains starch acrylamides can pose a health risk Thus we recommend that you cook at the lowest temperatures and do not brown food too much 6 CARE AND CLEANING WARNING Refer to the Safety chapters WARNING Deactivate the appliance and let it cool down before you clean it Disconnect the appliance from the...

Page 9: ...n candle with a metal electrode Keep these components well clean to prevent difficult lighting and check that the burner crown holes are not obstructed 6 2 Periodic maintenance Periodically speak your local Service Force Centre to check the conditions of the gas supply pipe and the pressure ad juster if fitted 7 TROUBLESHOOTING Problem Possible cause Remedy There is no spark when lighting the gas ...

Page 10: ...roved spare parts shops 7 1 Labels supplied with the accessories bag Stick the adhesive labels as indicated be low MOD PROD NO SER NO DATA MOD PROD NO SER NO DATA MODEL MODEL MOD PROD NO SER NO 03 IT MADE IN ITALY TYPE 230V 50Hz IP20 0049 1 2 3 1 Stick it on Guarantee Card and send this part 2 Stick it on Guarantee Card and keep this part 3 Stick it on instruction booklet 8 INSTALLATION WARNING Re...

Page 11: ...9891 with a maximum length 2 m When installation is complete make sure that the seal of each pipe fitting is correct Use a soapy solution not a flame 8 2 Injectors replacement 1 Remove the pan supports 2 Remove the caps and crowns of the burner 3 With a socket spanner 7 remove the injectors and replace them with the ones which are necessary for the type of gas you use see table in Techni cal Infor...

Page 12: ...r a multiple connec tion Make sure that the ground con nection agrees with the standards and regulations Do not let the power cable to heat up to a temperature higher than 90 C To prevent contact between the cable and the appliance below the hob use the clamps which are on the side of the cabi net A A Rigid copper pipe or flexible pipe of stainless steel 8 5 Replacement of the connection cable To ...

Page 13: ...a continu ous supply of air The electrical connec tion of the hob and the oven must be in stalled separately for safety reasons and to let easy remove oven from the unit 50 cm2 360 cm2 180 cm2 120 cm2 9 TECHNICAL INFORMATION Hob dimensions Width 595 mm Length 525 mm Hob recess dimensions Width 560 mm Length 480 mm Heat input Triple Crown burner 3 8 kW Semi Rapid burner 1 9 kW Auxiliary burner 1 0 ...

Page 14: ... inj 1 100 mm G30 28 30 mbar G31 37 mbar g h g h Auxiliary 1 0 50 73 71 Semi rapid 1 9 71 138 136 Triple Crown 3 8 98 276 271 10 ENVIRONMENT CONCERNS Recycle the materials with the symbol Put the packaging in applicable containers to recycle it Help protect the environment and human health and to recycle waste of electrical and electronic appliances Do not dispose appliances marked with the symbol...

Page 15: ...ENGLISH 15 ...

Page 16: ...www electrolux com shop 892953047 B 362012 ...

Reviews: