background image

9

OPERATING INSTRUCTIONS

Stop+go

The   function sets all cooking zones that operate to the 
lowest heat setting (   ). When   operates, you cannot 
change the heat setting.

 does not stop the timer function. 

•  To activate this function touch  .   comes on. 
•  To deactivate this function touch  . The heat setting  

that you set before comes on.

Lock 

When the cooking zones operate, you can lock the control 
panel, but not  . It prevents an accidental change of the 
heat setting. First set the heat setting. To start this function 
touch  . The symbol   comes on for 4 seconds. The 
Timer stays on. To stop this function touch  . The heat 
setting that you set before comes on. When you stop the 
appliance, you also stop this function.

The child safety device

This function prevents an accidental operation of the hob.
Starting the child safety device:
•  Start the hob with  . Do not set the heat settings. 
•  Touch   for 4 seconds. The symbol   comes on. 
•  Stop the hob with  .
Switching off the child safety device:
•   Start the hob with  . Do not set the heat settings. 

Touch   for 4 seconds. The symbol   comes on.

•  Stop the hob with  .
Overriding the child safety device for one cooking session:
•  Start the hob with  . The symbol   comes on. 
•   Touch   for 4 seconds. Set the heat setting in less 

than 10 seconds. You can operate the hob. 

•  When you stop the hob with  , the child safety device 

operates again.

Hob²Hood 

This is an advanced automatic function which connects 
the hob to a special hood. Both the hob and the hood 
have an infra — red signal communicator. Speed of the 
fan is defined automatically on basis of mode setting and 
temperature of the hottest cookware on the hob. You can 
also operate the fan from the hob manually.


IMPORTANT!

For most of the hoods the remote system is 
originally deactivated. Activate it before you use 
the function.For more information refer to hood 
user manual.

Operating the function automatically 

The default automatic mode from the factory is H5. You can 
change the automatic mode by following the instructions 
below. When you activate the hob the hood will adjust the 
fan speed automatically. Please note the below table is a 
guide, the fan speed varies depending on the temperature 
measured on the cooking zones of the cooktop which can 
be affected by the heat setting(s) selected as well as the size 
and volume of what you are cooking.
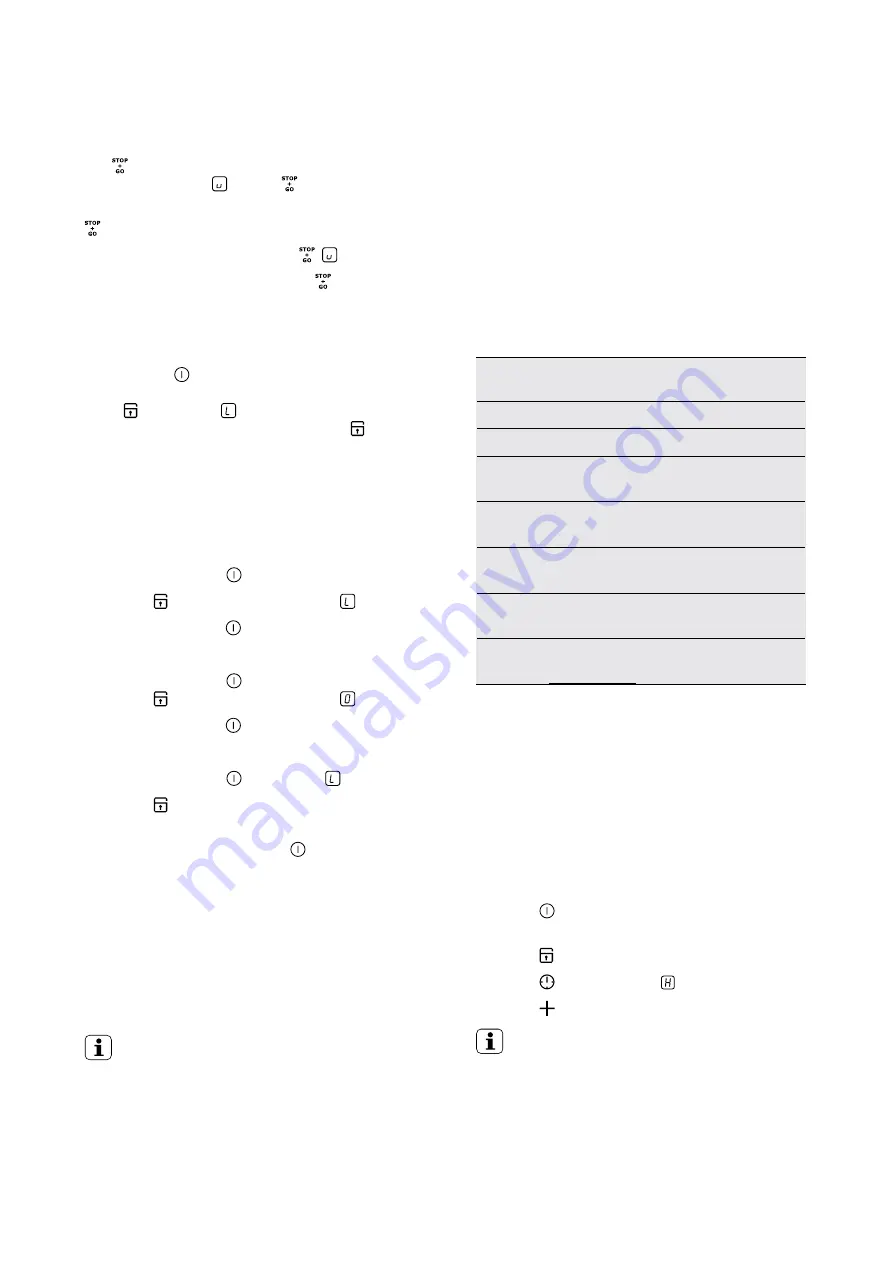
Automatic modes

Automatic 

light

Boiling

1)

Frying

2)

Mode H0 Off

Off

Off

Mode H1 On

Off

Off

Mode 

H2

3)

On

Fan speed 

1

Fan speed 

1

Mode H3 On

Off

Fan speed 

1

Mode H4 On

Fan speed 

1

Fan speed 

1

Mode H5 On

Fan speed 

1

Fan speed 

2

Mode H6 On

Fan speed 

2

Fan speed 

3

1.   The hob detects the boiling process and activates fan 

speed in accordance with automatic mode. 

2.   The hob detects the frying process and activates fan 

speed in accordance with automatic mode.

3.   This mode activates the fan and the light and does not 

rely on the temperature.

Changing the automatic mode 

1.   Deactivate the appliance.
2.   Touch 

 for 3 seconds. The display comes on and 

goes off

3.   Touch    for 3 seconds.
4.   Touch 

 a few times until   comes on.

5.   Touch 

 of the Timer to select an automatic mode.


IMPORTANT!

To operate the hood directly on the hood panel 
deactivate the automatic mode of the function.

When you finish cooking and deactivate the hob, 
the hood fan may still operate for a certain period 
of time. After that time the system deactivates the 
fan automatically and prevents you from accidental 
activation of the fan for the next 30 seconds.

Summary of Contents for EHI645BB

Page 1: ...Installation User manual Induction hob EHI645BB EHI845BB ...

Page 2: ...applications such as Staff kitchen areas in shops offices and other working environments Farm houses By clients in hotels motels and other residential type environments Bed and breakfast type environments BEFORE YOU CALL Please ensure you read the instruction manual fully before you call for service or a full service fee could be applicable Record model and serial number here Model number ________...

Page 3: ... by the lack of an adequate ventilation space The bottom of the appliance can get hot We recommend to install a non combustile separation panel under the appliance to prevent access to the bottom Please read the user manual carefully and store in a handy place for later reference Pass the user manual on to possible new owners of the appliance Read the following carefully to avoid damage or injury ...

Page 4: ...t with flammable products in near or on the appliance Do not try to extinguish a fire with water Disconnect the appliance and cover the flame with a lid or a fire blanket WARNING Risk of damage to the appliance The glass ceramic can be damaged by objects falling onto it The edge of the glass ceramic can be damaged by being knocked by the cookware Cookware made of cast iron cast aluminium or with d...

Page 5: ... unlock the control panel 3 Timer indicators of cooking zones To show for which cooking zone you set the time 4 The timer display To show the time in minutes 5 To activate the Power function 6 To activate the Bridge function 7 A heat setting display To show the heat setting 8 Control bar To set a heat setting 9 To increase or decrease the time 10 To set a cooking zone 11 To activate and deactivate...

Page 6: ...tay warm residual heat Lock The child safety function operates Not correct cookware or too small or no cookware on the cooking zone The automatic switch off function operates Heat setting displays OptiHeat control 3 step residual heat indicator WARNING Risk of burns from residual heat OptiHeat Control shows the level of the residual heat The induction cooking zones make the heat necessary for cook...

Page 7: ...ctivates automatically after 2 minutes You do not deactivate a cooking zone or change the heat setting After some time comes on and the appliance deactivates See the table below Automatic switch off times Heat setting Stops after 6 hours 5 hours 4 hours 1 5 hours The heat setting Touch the control bar at the heat setting Change to the left or the right if it is necessary Do not release before you ...

Page 8: ...h again and again until the indicator of the required cooking zone comes on Starting the Count Down Timer touch of the timer to set the time 00 99 minutes When the indicator of the cooking zone flashes slower the time counts down Checking the remaining time select the cooking zone with The indicator of the cooking zone flashes faster Display shows the remaining time Changing the Count Down Timer s...

Page 9: ...n also operate the fan from the hob manually IMPORTANT For most of the hoods the remote system is originally deactivated Activate it before you use the function For more information refer to hood user manual Operating the function automatically The default automatic mode from the factory is H5 You can change the automatic mode by following the instructions below When you activate the hob the hood ...

Page 10: ...t your retailer before calling service If a service call is placed and the sounds are normal you will be charged for the visit HELPFUL HINTS AND TIPS Operating the fan speed manually You can also operate the function manually To do that touch when the hob is active This deactivates automatic operation of the function and allows you to change the fan speed manually When you press you raise the fan ...

Page 11: ...he operation time depends on the heat setting level and the length of the cooking operation Hints and Tips for Hob Hood function When you operate the hob with the function Protect the hood panel from direct sunlight Do not spot halogen light on the hood panel Do not cover the hob panel Do not interrupt the signal between the hob and the hood for example with a hand or a cookware handle Hood in the...

Page 12: ...s as necessary Turn halfway through 25 45 12 13 Heavy fry hash browns loin steaks steaks 5 15 min Turn halfway through 45 64 14 Boil large quantities of water cook pasta sear meat goulash pot roast deep fry chips 100 Boil large quantities of water Power management is activated Examples of cooking applications The relation between the heat setting and the cooking zone consumption of power is not li...

Page 13: ...st be removed immediately with a special scraper for the glass If not permanent damage to the cooktop glass can occur which is not covered under warranty You cannot activate the appliance or operate it You touched 2 or more sensor fields at the same time The Stop Go function operates There is water or fat stains on the control panel Activate the appliance again and set the heat setting in less tha...

Page 14: ...the chapter Operating instructions comes on No cookware on the cooking zone Incorrect cookware The diameter of the bottom of the cookware is too small for the cooking zone The cookware do not cover the cross Put cookware on the cooking zone Use the correct cookware Use larger diameter cookware Cover the cross fully and number comes on There is an error in the appliance Disconnect the appliance fro...

Page 15: ... units and work surfaces that align to the standards Connection cable Use the correct mains cable of type H05BB F Tmax 90 C or higher for a single phase or two phase connection min 25mm min 5mm min 20mm R 5mm R 5mm EHI845BB EHI645BB 600mm 600mm 490 1 mm 490 1 mm 750 1 mm 560 1mm min 500mm min 5mm min 50mm IMPORTANT If you use a protection box an additional accessory1 the front airflow space of 5mm...

Page 16: ... the cooking zones can be different in some small ranges from the data in the table It changes with the material and dimensions of the cookware ENVIRONMENT ENVIRONMENT CONCERNS Recycle the materials with the symbol Put the packaging in applicable containers to recycle it Help protect the environment and human health and to recycle waste of electrical and electronic appliances Do not dispose applia...

Page 17: ...17 NOTES ...

Page 18: ...18 electrolux com au NOTES ...

Page 19: ...or incorrect power supply v incomplete or improper installation vi incorrect improper or inappropriate operation vii insect or vermin infestation viii failure to comply with any additional instructions supplied with the Appliance b the Appliance is modified without authority from Electrolux in writing c the Appliance s serial number or warranty seal has been removed or defaced d the Appliance was ...

Page 20: ... com au Electrolux Home Products New Zealand telephone 0800 436 245 fax 0800 225 088 email customercare electrolux co nz web electrolux co nz To add a touch of professional inspiration to your home visit electrolux com au or electrolux co nz electrolux com au or electrolux co nz P No ANC A05797901 2016 Electrolux Home Products Pty Ltd EMAN_IND_Mar16 ...

Reviews:

Related manuals for EHI645BB