background image

2

Finding Information

Please read and save this guide

Thank you for choosing Electrolux, our new premium 
brand in home appliances. This Use & Care Guide is 
part of our commitment to customer satisfaction and 
product quality throughout the service life of your new 
appliance.

Purchase date

Electrolux model number

Electrolux serial number

Keep a record for quick 
reference

Finding Information .............................................. 2

Safety ............................................................... 3

Feature Overview ................................................. 5

Installation ......................................................... 6

Removing the Doors ............................................11

Installing Door Handles ........................................13

Connecting the Water Supply ..................................14

Controls ...........................................................15

Automatic Ice & Water Maker/Dispenser ....................20

Automatic Ice Maker - Freezer ................................22

Storage Features ................................................23

Storing Food and Saving Energy ..............................28

Normal Operating Sounds ......................................29

Changing the Water and Air Filters ...........................30

Care and Cleaning ...............................................32

Solutions to Common Problems ...............................35 

Warranty ..........................................................39

Table of contents

Questions?

For toll-free telephone support in the U.S. and Canada: 
1-877-4ELECTROLUX (1-877-435-3287)

For online support and product information visit http://
www.electroluxappliances.com

NOTE

Registering your product with Electrolux enhances 
our ability to serve you. You can register online at 
www.electroluxappliances.com or by sending your 
Product Registration Card in the mail.

Doors


  Handles are secure and tight


  Door seals completely to cabinet on all sides


  Freezer drawer is level across top

Leveling


  Refrigerator is level, side-to-side and tilted 1/4 

(6mm) front-to-back


  Toe grille is properly attached to refrigerator


  Cabinet is setting solid on all corners

Electrical Power


  House power turned on


  Refrigerator plugged in

Ice Maker


  House water supply connected to refrigerator


  No water leaks present at all connections - 

recheck in 24 hours


  Ice maker is turned ON


  Ice & water dispenser operates correctly


  Front filter must be flush with filter housing 

(select models)

Final Checks


  Shipping material removed


  Fresh food and freezer temperatures set


  Crisper humidity controls set


  Registration card sent in

Installation Checklist

Summary of Contents for EI23BC65KS

Page 1: ...242183201 January 2012 EN FREEZER REFRIGERATOR FR RÉFRIGÉRATEUR CONGÉLATEUR ES REFRIGERADOR CON CONGELADOR USE AND CARE GUIDE GUIDE D UTILISATION ET D ENTRETIEN GUIA DE USO Y CUIDADO ...

Page 2: ...anada 1 877 4ELECTROLUX 1 877 435 3287 For online support and product information visit http www electroluxappliances com NOTE Registering your product with Electrolux enhances our ability to serve you You can register online at www electroluxappliances com or by sending your Product Registration Card in the mail Doors Handles are secure and tight Door seals completely to cabinet on all sides Free...

Page 3: ...before using your new refrigerator DANGER DANGER indicates an imminently hazardous situation which if not avoided will result in death or serious injury Remove all staples from the carton to avoid injury Staples can also damage finishes if they come in contact with other appliances or furniture Child Safety Packing Materials Packing cartons covered with rugs bedspreads plastic sheets or stretch wr...

Page 4: ...y pulling on the power cord Always grip the plug firmly and pull straight out from the receptacle to prevent damaging the power cord To avoid electrical shock unplug the refrigerator before cleaning and before replacing a light bulb or LED light Performance may be affected if the voltage varies by 10 or more Operating the refrigerator with insufficient power can damage the compressor Such damage i...

Page 5: ...zer drawer IMPORTANT Features not included with your refrigerator can be purchased at www electroluxappliances com or by calling 1 877 435 3287 Luxury GlideTM Crisper Drawer Luxury DesignTM Shelves Special Items Mat Inside PTD LED Lights Water Filter Removable Ice Bin Soft Closing Perfect TempTM Drawer PTD or Deli Drawer with humidity slides Freezer Baskets with organizers LED Light Soft Serve Bin...

Page 6: ...arances for ease of installation proper air circulation and plumbing and electrical connections Sides Top inch 9 5 mm Back 1 inch 25 4 mm Door opening Your refrigerator should be positioned to allow easy access to a counter when removing food For best use of refrigerator drawers and freezer baskets the refrigerator should be in a position where both can be fully opened CAUTION DO NOT install the r...

Page 7: ...asket seal Pull Drawer Out From Both Sides Grab Drawer At Center Then Push Against Freezer Drawer Cabinet Leveling Refrigerator Door Alignment if necessary Guidelines for final positioning of your refrigerator All four corners of the cabinet must rest firmly on the floor The sides should tilt 1 4 inch 6 mm from front to back to ensure that doors close and seal properly Doors should align with each...

Page 8: ...ttom of Door A B Loosen Remove Screw where applicable 6 Ensure door stops in desired location before resuming normal use To level the doors using the adjustable lower hinge select models 1 Remove all food items from door bins on door being adjusted 2 Open doors to 90 degrees 3 Loosen or remove screw Adjusting Door Re tighten Screw NOTE View shown is looking up at the bottom of the refrigerator doo...

Page 9: ...he door while adjusting the washer To raise the door rotate washer clockwise when viewed from the bottom To lower door rotate washer counter clockwise when viewed from the bottom 5 Re tighten the screw where applicable ensuring it is between the spokes of the washer Screw will not be tight just insert until it is flush with the hinge Adjusting Flipper Mullion Height Screw where applicable Raising ...

Page 10: ... the hanger directly upwards and pull toward you to remove it from the ladder 3 Place top hooks of the hanger into the desired slot and lower straight down until lower hooks rest on the ladder 4 Relock shelf by pushing the slide mechanism away from you 6 Gently set the shelf onto the hanger once the back is secured by the hanger 5 While holding shelf at a 45 degree angle with the gray handle facin...

Page 11: ...leeve pull the tube away Removing the Doors Getting through narrow spaces If your refrigerator will not fit through an entrance area you can remove the doors Check first by measuring the entrance To prepare for removing the doors 1 Make sure the electrical power cord is unplugged from the wall outlet 2 Open the freezer drawer and remove the toe grille see Installation section 3 Remove any food fro...

Page 12: ...wer slides pulled out hang drawer onto slide brackets ensuring pins on each side are fully inserted into slots on each side CAUTION Drawer is heavy Use caution when lifting 6 Tighten four 4 drawer screws 7 Recheck gasket seal 8 Install the toe grille by fitting into place 2 Reinstall four 4 drawer screws two 2 per side tighten down and close drawer C Pull Drawer Out From Both Sides Grab Drawer At ...

Page 13: ... 3 to install opposite handle Ensure the holes for the set screws are facing towards the first door 5 Position freezer handle end caps over left and right pre installed shoulder bolts that are fastened to the drawer ensuring the holes for the set screws are facing down 6 While holding handle firmly against drawer fasten left and right Allen set screws C with supplied Allen wrench Mounting Refriger...

Page 14: ...y about 2 turns behind refrigerator as shown and arrange coils so they do not vibrate or wear against any other surface 7 Turn ON water supply at shutoff valve and tighten any connections that leak 8 Reconnect refrigerator to electrical power source 9 To turn ice maker on lower wire signal arm freezer ice maker or set the ice maker s On Off power switch to the On position fresh food ice maker Figu...

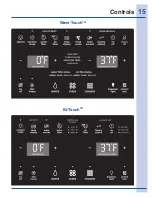
Page 15: ...15 Controls Wave TouchTM IQ TouchTM ...

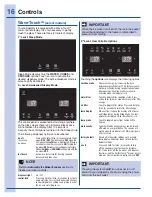
Page 16: ... indicator is lit water filter Touch to display filter condition status Press and hold for three 3 seconds to reset after filter change air filter Touch to display filter status Press and hold for three 3 seconds to reset after filter change temp display When active it allows the display of the freezer and fridge temps during Sleep Mode The tem perature is displayed when the indicator is lit temp ...

Page 17: ...link with the first touch After five 5 seconds of inactivity the display will beep to accept the new temperature After 10 seconds the display times out and returns to the basic display The Sabbath Mode is a feature that disables portions of the refrigerator and its controls for both Wave TouchTM and IQ TouchTM in accordance with observance of the weekly Sabbath and religious holidays within the Or...

Page 18: ...ol panel It is only necessary to gently touch the glass There are three 3 dispenser modes 1 Water 2 Ice Cubes 3 Crushed Ice An indicator light will be illuminated above the active feature Touch the icon to activate the options below ice off Press and hold for three 3 seconds to turn the ice maker ON or OFF The ice maker is OFF when the LED above the Ice Off icon is illuminated If there is no indic...

Page 19: ...n off the cooling system to clean the refrigerator It also turns off the ice maker and all dispenser functions The temperature display will read OFF Door Ajar If the door has been left open for an extended period of time an alarm will sound and the door ajar indicator will display on the right side of the control panel The alarm is turned off by closing the door The mute sounds key will blink to p...

Page 20: ...ure should fall between 30 psi and 100 psi Excessive pressure may cause water filter to malfunction NOTE The water dispenser has a built in device that shuts off the water flow after three 3 minutes of continuous use To reset this shutoff device simply release the dispenser paddle NOTE The ice maker also has a built in plastic signal bale arm that automatically stops ice production when the ice bi...

Page 21: ... ice bin with mild detergent Do not use harsh or abrasive cleaners Rinse with clear water 4 Allow the ice bin to dry completely before replacing in the freezer 5 Replace the ice bin Turn the ice maker on CAUTION NEVER use an ice pick or similar sharp instrument to break up the ice This could damage the ice bin To loosen stuck ice use warm water Before replacing the ice bin make sure it is complete...

Page 22: ...or the water supply is turned off turn off the ice maker by lifting wire signal arm Cleaning the ice maker Clean the ice maker and ice bin at regular intervals especially prior to vacation or moving 1 Turn off the ice maker 2 Remove the ice bin 3 Empty and carefully clean the ice bin with mild detergent Do not use harsh or abrasive cleaners Rinse with clean water 4 Allow the ice bin to dry complet...

Page 23: ...e hanger into the desired slot and lower straight down until lower hooks rest on the ladder 4 Relock shelf by pushing the slide mechanism away from you 6 Gently set the shelf onto the hanger once the back is secured by the hanger CAUTION Shelves must be removed prior to moving the refrigerator 5 While holding shelf at a 45 degree angle with the gray handle facing you push the shelf into the back o...

Page 24: ...y item that you want to prevent moving around Cool Zone Drawer select models Some models are equipped with a drawer for short term storage of bulk items This drawer includes sliding controls for adjusting the humidity inside Removing Crisper Drawer To remove the Crisper Drawer for cleaning 1 Pull the drawer out until it stops 2 Lift the front slightly and remove the drawer Special Item Mat NOTE An...

Page 25: ... of the crisper drawers 6 The three favorite selections provide flexibility to set and store personal temperature selections The temperature is adjusted up by pressing the or buttons The drawer will store the selected temperature setting until it is changed 7 The control buttons can be locked to prevent accidental changes by pressing the control lock button for three 3 seconds Deactivate by pressi...

Page 26: ...eps tall containers in the bin from falling forward when opening or closing the refrigerator door To install insert the ends of the retainer into the holes Tilt can bins The can bins allow you to efficiently and securely store up to eight 12 ounce canned beverages Tilt Can Bin Freezer Features varies by model To Remove Middle Basket 1 Remove all items from basket 2 Remove basket by pulling basket ...

Page 27: ...rature This is perfect for storing items that need a softer texture in order to easily serve items such as ice cream Dividers Removal Lift up on the front of the middle divider and pull out Squeeze handle and lift up in the center of the divider to move it side to side The divider cannot be removed Wire Middle Basket Divider Plastic Lower Basket Divider ...

Page 28: ...newly purchased food designated for the freezer will be preserved as quickly as possible Activating fast freeze also will help your freezer more efficiently maintain the selected temperature after placing new purchases with pre existing frozen foods Storing Food and Saving Energy Avoid adding too much warm food to the freezer at one time This overloads the freezer slows the rate of freezing and ca...

Page 29: ...ic control automatic defrost control These parts can produce a snapping or clicking sound when turning the cooling system on and off F Condenser fan You may hear air being forced through the condenser G Compressor Modern high efficiency compressors run much faster than older models The compressor may have a high pitched hum or pulsating sound H Water valve Makes a buzzing sound each time it opens ...

Page 30: ...ilter replacement 1 Turn Off the ice maker on the control panel 2 Push the filter release button above the cartridge to disconnect it 3 Slide the old water filter cartridge straight out of the housing and discard it 4 Unpack the new filter cartridge and remove the two 2 protective caps covering the inlet and exit of the filter Slide the filter gently into the housing until it stops against the sna...

Page 31: ...ce maker chute Replacing your PureAdvantageTM air filter To ensure optimal filtering of refrigerator odors you should change the air filter every six 6 months the filter status light on the Touch Panel prompts you to replace the filter after six 6 months 1 Open the air filter door 2 Remove the old filter and discard it 3 Unpack the new filter and slide it into the housing 4 To close the air filter...

Page 32: ... it Shifting it from side to side may damage flooring Be careful not to move the refrigerator beyond the plumbing connections Damp objects stick to cold metal surfaces Do not touch refrigerated surfaces with wet or damp hands NOTE If you set your temperature controls to turn off cooling power to lights and other electrical components will continue until you unplug the power cord from the wall outl...

Page 33: ...less steel cleaners Never use CHLORIDE or cleaners with bleach to clean stainless steel Clean stainless steel front and handles with non abrasive soapy water and a dishcloth Rinse with clean water and a soft cloth Use a non abrasive stainless steel cleaner These cleaners can be purchased at most home improvement or major department stores Always follow manufacturer s instruction Do not use househo...

Page 34: ...e other hand while pressing the connector latch 4 Replace LED light and snap in place assuring the light is facing in toward the unit inside fresh food and freezer Ordering Replacement LED Lights Order new LEDs by calling 877 808 4195 online at www electroluxappliances com or through the dealer where you bought the refrigerator Here is the product number to request when ordering LED Light Part 241...

Page 35: ... valve is not a self piercing saddle valve Clean valve Replace valve if necessary Ice maker is not making enough ice Ice maker is producing less ice than you expect The water filter may be clogged with foreign material The water supply line is kinked Saddle valve on cold water pipe is clogged or restricted by foreign material The fresh food and freezer ice makers will each produce approximately 2 ...

Page 36: ...e together The ice water filter cartridge could be clogged Replace the filter cartridge Dispensing system operates best at 30 100 psi water pressure Well water pressures should fall within this range Light Is Not On Concern Potential Cause Common Solution Light is not on Light bulb is burned out or LED light is damaged No electric current is reaching refrigerator Control system has disabled lights...

Page 37: ...rigerator causes it to run more Open doors less often Ensure refrigerator is level Keep food and containers from blocking door See Problem section Opening Closing of Doors Drawers Set freezer control to warmer setting until refrigerator temperature is satisfactory Allow 24 hours for temperature to stabilize Clean or change gasket Leaks in door seal will cause refrigerator to run longer in order to...

Page 38: ...e supply and completely rinse out the tank Connect unit to cold water line that supplies water to the kitchen faucet For best results use copper tubing for water connections Contact water treatment plant for help in checking water supply source Water pressure is extremely low Cut off and cut on pressures are too low well systems only Reverse osmosis system is in regenerative phase Have someone tur...

Page 39: ...3 Damages to the finish of appliance or home incurred during transportation or installation including but not limited to floors cabinets walls etc 14 Damages caused by services performed by unauthorized service companies use of parts other than genuine Electrolux parts or parts obtained from persons other than authorized service companies or external causes such as abuse misuse inadequate power su...

Reviews: