background image

Summary of Contents for EI30SM55JBA

Page 1: ...Use _ Care Guide Over the Range Microwave Oven 316902426 TINSEB258WRRZ EL01 ...

Page 2: ...Internet production information visit http www electroluxappliances com PRECAUTIONS TO AVOID POSSIBLE EXPOSURE TO EXCESSIVE MICROWAVE ENERGY a Do not attempt to operate this oven with the door open since open door operation can result in harmful exposure to microwave energy It is important not to defeat or tamper with the safety interlocks b Do not place any object between the oven front face and ...

Page 3: ... Cook Sensor Cook chart Popcorn Fresh Veggies Frozen Veggies Baked Potato Sensor Reheat Popcorn chart Fresh Veggies chart 2 Frozen Veggies chart 19 Baked Potato chart 19 2 Sensor Reheat chart 19 3 AUTO MODES 20 26 4 Auto Cook 20 5 Auto Cook chart 20 6 Dinner recipes 21 7 10 Keep Warm 22 7 Melt Soften 23 7 Melt Soften chart 23 8 Snacks 24 8 Snacks chart 24 9 Auto Reheat 25 10 Auto Reheat chart 25 1...

Page 4: ...uctions on page 30 31 16 Do not mount over a sink 17 Do not store anything directly on top of the appli ance surface when the appliance is in operation 18 To reduce the risk of fire in the oven cavity a Do not overcook food Carefully attend to appliance when paper plastic or other combustible materials are placed inside the oven to facilitate cooking b Remove wire twist ties from paper or plastic ...

Page 5: ...if there is one 2 Check to see that there is a WALL TEMPLATE and TOP CABINET TEMPLATE Read enclosures and SAVE the Use and Care Guide Check the oven for any damage such as misaligned or bent door damaged door seals and sealing surfaces broken or loose door hinges and latches and dents inside the cavity or on the door If there is any damage do not operate the oven and contact your dealer or ELECTRO...

Page 6: ...an outlet near the appliance The Power Supply Cord and plug must be connected to a separate 120 Volt AC 60 Hz 15 Amp or more branch circuit single grounded receptacle The receptacle should be located inside the cabinet directly above the Microwave Oven mounting location as shown in Figure 1 NOTES 1 If you have any questions about the grounding or electri cal instructions consult a qualified electr...

Page 7: ...e Cooking Arrange food carefully Place thickest areas towards outside of dish Watch cooking time Cook for the shortest amount of time indicated and add more as needed Food severely overcooked can smoke or ignite Cover foods while cooking Check recipe or cookbook for suggestions paper towels wax paper microwave plastic wrap or a lid Cov ers prevent spattering and help foods to cook evenly Shield wi...

Page 8: ...e of overcooking food NEVER use the cavity for storing cookbooks or other items Select store and handle food carefully to pre serve its high quality and minimize the spread of foodborne bacteria Keep waveguide cover clean Food residue can cause arcing and or fires Use care when removing items from the oven so that the utensil your clothes or accessories do not touch the safety door latches Keep al...

Page 9: ... t or2 seconds or package Use special popcorn pad General Cut baked goods with filling after heating to release steam and avoid burns Stir liquids briskly before and after heating to avoid eruption Heat or cook in closed glass jars or air tight containers Can in the microwave as harmful bacteria may not be destroyed Deep fat fry Usedeep bowl when cooking liquids Dry wood gourds herbs or wet or cer...

Page 10: ...e ideal Paper towels are good for covering foods for reheating and absorbing fat while cooking bacon Wax paper can be used for cooking and reheating Plastic wrap that is specially marked for micro wave use can be used for cooking and reheating DO NOT allow plastic wrap to touch food Vent so steam can escape Lids that are microwave safe are a good choice because heat is kept near the food to hasten...

Page 11: ...ee times for low and four times to turn off the light 10 Fan pad Touch the fan pad once for high speed twice for medium speed three times for low speed and four times to turn off the fun 11 Auto Touch control panel 12 Time display Digital display 99 minutes 99 seconds 13 Ventilation openings 14 Removable turntable The tumtable will rotate clockwise or counter clockwise Only remove for cleaning 15 ...

Page 12: ...ion of the display will light to indicate what function is in progress 29 29 29 27 28 13 18 18 19 25 23 22 29 13 29 Number next to the control panel illustration indicates pages on which there are feature descriptions and usage information ...

Page 13: ...orrect clock time ERROR will appear in the display Touch the STOP clear pad and re set the clock 5 Cancel a program during cooking touch twice Using the Rack The rack allows several foods to be cooked or reheated at one time However for the best cooking and reheating use Turntable ON function and cook with SENSOR MODES or AUTO MODES without the rack When the rack is used set time and power level m...

Page 14: ...s the cooking time which is recommended for foods such as cheese milk and long slow cooking of meats Consult cook book or recipes for specific recommendations power level X2 90 Suppose you want to defrost for 5 minutes at 30 Step Touch 1 Enter defrosting time 2 Touch the power level pad eight times to enter a power level of 30 3 Touch the START add 30 sec pad power level x 8 START add 30 sec When ...

Page 15: ...erature 4 Any Sensor Settings selection can be pro grammed with More or Less Time Adjustment See page 28 5 More or less food than the quantity listed in the 1 chart should be cooked following the guidelines 2 in any microwave cookbook 6 During the first part of SENSOR MODES food name will appear on the display Do not open the oven door or touch the STOP clear pad during this part of the cycle The ...

Page 16: ...e SENSOR COOK that uses the sensor You can cook many foods by touching the sensor cook pad and the food number You don t need to calculate cooking time or power level Frozen Entrees Ground Meat Rice Fish Seafood Chicken Breast Suppose you want to cook Frozen Entrees 1 Touch the sensor cook pad number 1 for Frozen Entrees Sel3SOr cook 2 At end follow the directions in the display 3 Touch the START ...

Page 17: ...asserole and cover with wax paper or plastic wrap When oven stops turn patties over or stir meat in casserole to break up large pieces Re cover and touch the START add 30 sec pad After cooking let stand covered for 2 to 3 minutes 4 FiSh Seafo0d 0125 2 0ib Arrange in ring around Shallow giass dish roll fillet With k 0 2 0 9 kg edges underneath Cover with plastic wrap After cooking et stand CoVered ...

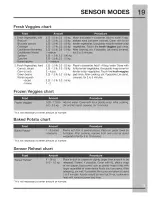
Page 18: ...n Fresh Veggies Suppose you want to cook popcorn Frozen Veggies Baked Potato Sensor Reheat Suppose you want to reheat soup SteP Touch Regular Touch the popcorn pad once Snack Touch the popcorn pad twice x_ Step Touch Touch the sensor reheat pad sensor for soup reheat Popcorn chart ...

Page 19: ... tender vegetables Use plastic wrap cover for 2 4 pcs tender crisp vegetables Touch the fresh veggies 0 25 1 5 Ib 0 2 0 6 kg pad twice After cooking stir if possible Let stand covered for 2 to 5 minutes 0 25 1 5 lb 0 2 0 6 kg 1 2 Frozen Veggies chart It iS not necessary to enter amount or number Baked Potato chart It iS not necessary to enter amount or number Sensor Reheat chart It iS not necessar...

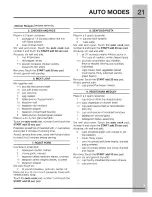
Page 20: ... START add 30 sec pad to continue cooking START add 30 sec i iD i i_i iiii Ji i_ i iiiiiiiiiiiiii iiiiii iii 2 Scrambled 1 8 eggs Eggs For each egg use 1 teaspoon of butter or margarine and 1 tablespoon of milk Place butter or margarine in dish measuring cup or casserole large enough for the egg to expand Mix egg and milk together Pour on to butter or margarine in dish Cover with wax paper Place i...

Page 21: ...pound boneless pork loin center cut Place loin in a 13 x 9 x 2 inch casserole Cover with vented plastic wrap Touch the auto cook pad number 7 and touch the START add 30 sec pad 8 SEAFOOD PASTA Place in a 3 quart casserole 8 9 ounces fresh tortellini 2 cups water Stir well and cover Touch the auto cook pad number 8 and touch the START add 30 sec pad At pause stir well and add 1 jar 17 ounces creamy...

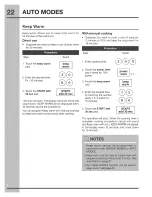
Page 22: ...lay will show 30 00 and count down KEEP WARM will be displayed every 10 seconds during the countdown You can program Keep warm with manual cooking to keep food warm continuously after cooking 1 Enter cooking time Touch the power level pad 4 times for 70 power Touch the keep warm pad Enter the desired time by touching the number pads 1 5 0 and 0 for 15 minutes power level x 4 keep warm 5 Touch the ...

Page 23: ... same number pad at Step t to select quantity Ex Touch number 2 two more times for 1 square_ 3 Touch the START add 30 sec pad melt soften _x2 I START add 30 sec Melt Soften chart Soften J 3 cecreaml DO NOTCOVER _ _ i i 1 pint After touching tt_eme it s0ften Pad toucf_ numbei 3 twotimes ior l 6int 1 2 ga ion Aftert0uching the melt soften pad touchnumber 3 three times for 1 2 gallon 4 Creamcheese Us...

Page 24: ...ng the number 3 Ex 0 3 Ib or 0 3 kg chicken nuggets snacks _ 3 Touch the START add START 30 sec pad add 30 sec Snacks chart 2 Hand Held 3 4 oz Use f0r frozen FrenChfries cheese sticks appetizers etc Remove from outer Snacks 85 it3 g package Arrange on flat p ate Follow package directions for howtowrap or cover Be careful when removing from the oven as snack may be very hot 4 Chicken 0 3_ i 0 Ib Pl...

Page 25: ...ART add 30 sec pad I START add 30 sec Auto Reheat chart 2 Frozen Ro ls 1 10 pieces Use this pad to warm rolls muffins biscUits bagels etc Large items Muffins should be considered as 2 or3 regular size Arrange on f at plate cover with paper towel TouCh the auto reheat pad and number 2to increase qUantity and touch the START add 30 sec Pad 41 Beverage 0 5_ 2 0 cups This setting is go0d for restoring...

Page 26: ...r oven will stop Open the door follow the instruction shown in the display and close the door Touch the START add 30 sec pad auto defrost START add 30 sec START add 30 sec After defrost cycle ends let stand covered Auto Defrost chart 2 SteakS Chops 0 5 _4 01b After each stage rearrange and if there are Warm or thawed portiOns Fish 0 3 1 8 kg shield with small flat pieces of a uminum foil Remove an...

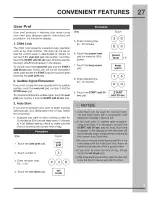
Page 27: ...wish to have the oven operate with no audible signals touch the user pref pad number 2 and the STOP clear pad To cancel and restore the audible signal touch the user pref pad number 2 and the START add 30 sec pad 3 Auto Start If you wish to program your oven to begin cooking automatically at a designated time of day follow this procedure Suppose you want to start cooking a stew for 20 minutes at 5...

Page 28: ...tomatically Suppose you want to cook roast beef for 5 minutes at 100 and then continueto cook for 30 minutesat 50 Ste13 i _ ii TotJch 1 Enter cooking time for 1st stage 2 Touch the power level pad once for t00 power for 1st stage 3 Enter second cooking time for 2nd stage power level x 1 G More or Less Time Adjustment Should you discover that you like any of SENSOR MODES or AUTO MODES slightly more...

Page 29: ...eep warm in AUTO MODES When Turntable ON is set Turntable is turned and when Turntable OFF is set Turntable is stopped When SENSOR MODES and AUTO MODES are selected Turntable ON is automatically set Turntable ON OFF can be set during Manual Cook ing and cooking programming by touching the turntable on off pad Step Touch Touch number 2 Demonstration Mode To demonstrate touch the set clock pad numbe...

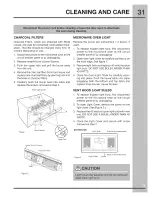
Page 30: ... WAVEGUIDE COVER The waveguide cover is located on the ceiling in the microwave oven cavity It is made from mica so requires special care Keep the waveguide cover clean to assure good microwave oven performance Carefully wipe with a damp cloth any food spatters from the surface of the cover immediately after they occur Built up splashes may overheat and cause smoke or possibly catch fire DO NOT RE...

Page 31: ...1 3 above if 1 To replace krypton light bulb first disconnect power to the microwave oven at the circuit breaker panel or by unplugging 2 Open oven light cover by carefully pulling up on the front edge See figure 1 3 Remove light bulb and replace 40 watts krypton light bulb DO NOT USE BULB LARGER THAN 40 WATTS Close the Oven Light Cover by carefully push ing into place Push the louver back into pl...

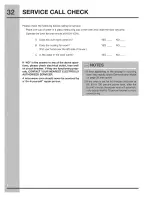
Page 32: ... oven light come on B Does the cooling fan work Put your hand over the left side of louver C Is the water in the oven warm YES NO YES NO YES NO if NO is the answer to any of the above ques tions please check electrical outlet fuse and or circuit breaker If they are functioning prop erly CONTACT YOUR NEAREST ELECTROLUX AUTHORIZED SERVICER A microwave oven should never be serviced by a do it yoursel...

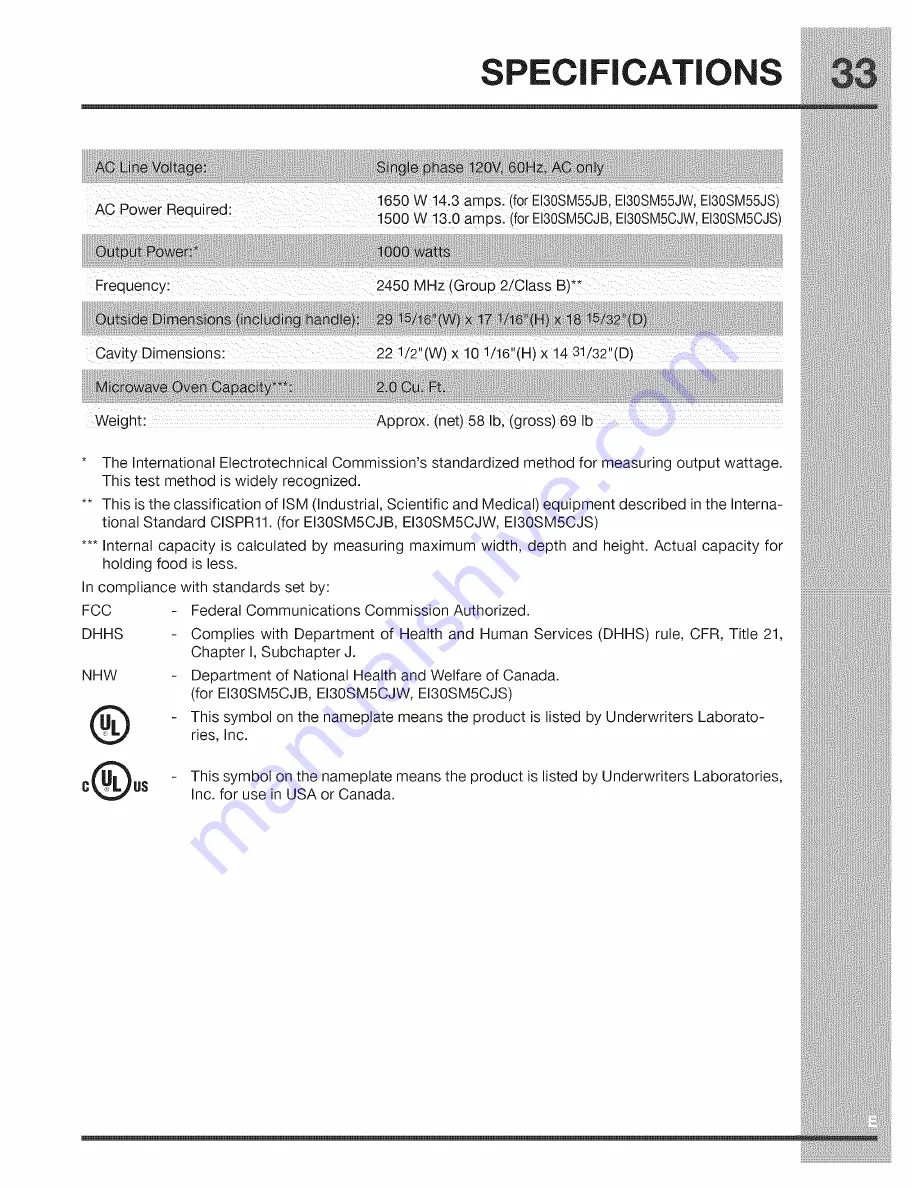
Page 33: ...Standard CISPR11 for EI30SM5CJB EI30SM5CJW EI30SM5CJS Internal capacity is calculated by measuring maximum width depth and height Actual capacity for holding food is less In compliance with standards set by FCC DHHS NHW Federal Communications Commission Authorized Complies with Department of Health and Human Services DHHS rule CFR Title 21 Chapter I Subchapter J Department of National Health and W...

Page 34: ... including the state of Alaska 14 Damages to the finish of appliance or home incurred during transportation or installation including but not limited to floors cabinets walls etc 15 Damages caused by services performed by unauthorized service companies use of parts other than genuine Electrolux parts or parts obtained from persons other than authorized service companies or external causes such as ...

Page 35: ... Canada l 877 4ELECTROLUX 1 877 435 3287 For online support and internet product information www electroluxappliances com 2008 Electrolux Home Products Inc Post Office Box 212378 Augusta Georgia 30917 USA All right reserved Printed in the Thailand ...

Reviews: