background image

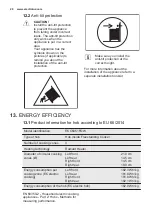
12.2 Anti-tilt protection

CAUTION!

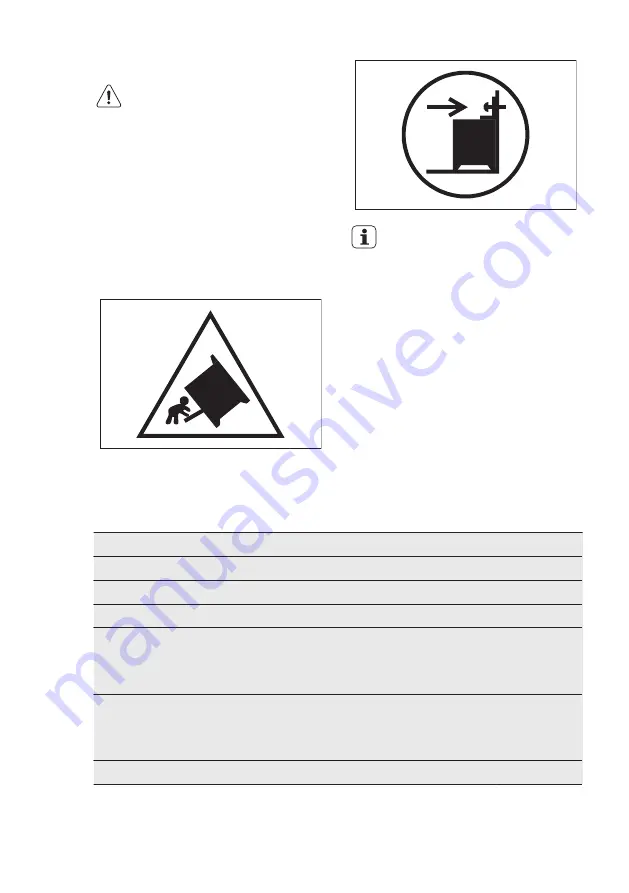
Install the anti-tilt protection

to prevent the appliance

from falling under incorrect

loads. The anti-tilt protection

only works when the

appliance is put in a correct

area.

Your appliance has the

symbols shown on the

pictures (if applicable) to

remind you about the

installation of the anti-tilt

protection.

Make sure you install the

anti-tilt protection at the

correct height.

For more information about the

installation of the appliance refer to a

separate installation booklet

13. ENERGY EFFICIENCY

13.1 Product information for hob according to EU 66/2014

Model identification

EKC6051FOW

Type of hob

Hob inside Freestanding Cooker

Number of cooking zones

4

Heating technology

Radiant Heater

Diameter of circular cooking

zones (Ø)

Left front

Left rear

Right front

Right rear

21.0 cm

14.5 cm

14.5 cm

18.0 cm

Energy consumption per

cooking zone (EC electric

cooking)

Left front

Left rear

Right front

Right rear

182.3 Wh/kg

181.8 Wh/kg

181.8 Wh/kg

182.1 Wh/kg

Energy consumption of the hob (EC electric hob)

182.0 Wh/kg

EN 60350-2 - Household electric cooking

appliances - Part 2: Hobs - Methods for

measuring performance.

www.electrolux.com

28

Summary of Contents for EKC6051FOW

Page 1: ...EKC6051FOW EN Cooker User Manual ...

Page 2: ... it you can be safe in the knowledge that you ll get great results every time Welcome to Electrolux Visit our website for Get usage advice brochures trouble shooter service information www electrolux com webselfservice Register your product for better service www registerelectrolux com Buy Accessories Consumables and Original spare parts for your appliance www electrolux com shop CUSTOMER CARE AND...

Page 3: ...concerning use of the appliance in a safe way and understand the hazards involved Do not let children play with the appliance Keep all packaging away from children Keep children and pets away from the appliance when it operates or when it cools down Accessible parts are hot Cleaning and user maintenance shall not be made by children without supervision 1 2 General Safety Only a qualified person mu...

Page 4: ...e which may result in shattering of the glass If the supply cord is damaged it must be replaced by the manufacturer its Authorised Service Centre or similarly qualified persons in order to avoid a hazard Be careful when you touch the storage drawer It can get hot To remove the shelf supports first pull the front of the shelf support and then the rear end away from the side walls Install the shelf ...

Page 5: ...socket is loose do not connect the mains plug Do not pull the mains cable to disconnect the appliance Always pull the mains plug Use only correct isolation devices line protecting cut outs fuses screw type fuses removed from the holder earth leakage trips and contactors The electrical installation must have an isolation device which lets you disconnect the appliance from the mains at all poles The...

Page 6: ...r cooking purposes only It must not be used for other purposes for example room heating 2 4 Care and Cleaning WARNING Risk of injury fire or damage to the appliance Before maintenance deactivate the appliance Disconnect the mains plug from the mains socket Make sure the appliance is cold There is the risk that the glass panels can break Replace immediately the door glass panels when they are damag...

Page 7: ...ol indicator 2 Knob for the oven functions 3 Knob for the temperature 4 Temperature lamp symbol indicator 5 Knobs for the hob 6 Heating element 7 Lamp 8 Shelf support removable 9 Fan 10 Shelf positions 3 2 Cooking surface layout 180 mm 145 mm 145 mm 210 mm 1 3 4 5 6 2 1 Cooking zone 1200 W 2 Steam outlet number and position depend on the model 3 Cooking zone 1800 W 4 Cooking zone 1200 W 5 Residual...

Page 8: ... the maximum temperature 6 Let the appliance operate for 15 minutes Accessories can become hotter than usual The appliance can emit an odour and smoke This is normal Make sure that the airflow in the room is sufficient 4 3 Opening and closing the door with the mechanical door lock The mechanical door lock is activated by default To open the door move the lock to the right Close the door without pr...

Page 9: ...he cooking process is completed Turn the knob to a necessary heat setting To complete the cooking process turn the knob to the off position 5 2 Residual heat indicator WARNING There is a risk of burns from residual heat The indicator comes on when a cooking zone is hot 6 HOB HINTS AND TIPS WARNING Refer to Safety chapters 6 1 Cookware The bottom of the cookware must be as thick and flat as possibl...

Page 10: ...n halfway through 7 8 Heavy fry hash browns loin steaks steaks 5 15 Turn halfway through 9 Boil water cook pasta sear meat goulash pot roast deep fry chips 7 HOB CARE AND CLEANING WARNING Refer to Safety chapters 7 1 General information Clean the hob after each use Always use cookware with clean bottom Scratches or dark stains on the surface have no effect on how the hob operates Use a special cle...

Page 11: ... temperature to select a temperature 3 To deactivate the oven turn the knobs for the oven functions and temperature to the off position 8 2 Oven functions Symbol Oven function Application Off position The appliance is off Hot Air To bake on up to 2 shelf positions at the same time and to dry food Set the temperature 20 40 C lower than for Conventional Cooking Conventional To bake and roast food on...

Page 12: ...he deep pan between the guide bars of the shelf support and the wire shelf on the guide bars above All accessories have small indentations at the top of the right and left side to increase safety The indentations are also anti tip devices The high rim around the shelf is a device which prevents cookware from slipping 9 OVEN HINTS AND TIPS WARNING Refer to Safety chapters The temperature and baking...

Page 13: ...or streaky The oven temperature is too high The next time you bake set a slightly lower oven temperature The cake sinks and be comes soggy lumpy or streaky The baking time is too short Set a longer baking time You cannot decrease baking times by setting higher temperatures The cake sinks and be comes soggy lumpy or streaky There is too much liquid in the mixture Use less liquid Be careful with mix...

Page 14: ... 2 4 Pancake 150 160 50 60 3 Fruit cakes 140 150 70 80 3 Muffins 160 170 15 25 2 4 Jam roll 190 210 6 15 3 Buns 185 195 8 15 2 4 Long loaf 170 180 25 35 2 4 Gingerbread 160 170 8 15 2 4 Dish cake 150 160 30 40 2 4 Sponge cakes Madeira cakes 150 160 50 60 2 Meringues 100 90 120 2 4 Meringue bases 100 90 120 2 4 Biscuits 150 160 10 20 2 4 Choux pastry 155 165 30 40 2 4 Fruit tarts short crust pastry...

Page 15: ...45 1 2 Rye bread mix 275 1 baking 190 55 65 1 Baguettes 220 230 15 30 3 4 Pancake 170 180 50 60 2 3 Dish cake 170 180 35 45 3 4 Sponge cakes Madeira cakes 170 180 40 50 1 2 Sandwich cake roll 200 225 8 12 3 4 Meringues 100 90 120 3 4 Meringue bases 100 90 120 3 4 Biscuits 160 180 6 15 3 4 Choux pastry 170 190 30 45 3 4 Swiss rolls 190 210 10 12 3 4 Fruit tarts short crust pastry 175 200 pre baking...

Page 16: ...s home made pre baking roll 215 225 35 45 3 4 Tarts home made finishing 215 225 35 45 3 4 Tarts frozen 200 15 25 3 4 1 Preheat the oven 9 6 Hot Air Cooking Food Temperature C Time min Shelf po sition Fish boiling 150 160 1 2 4 Fish frying 165 175 1 2 4 Meatloaf 165 175 60 70 2 4 Danish meatballs 165 175 35 45 2 4 Liver pâté 165 175 65 75 2 4 Potato gratin 175 55 65 2 4 Lasagne home made 175 60 70 ...

Page 17: ...that stated on the packaging If the time given is 30 mins then the preparation time will be around 30 10 40 min 9 7 Conventional Cooking Food Temperature C Time min Shelf po sition Fish boiling 160 170 1 2 3 Fish frying 180 200 1 2 3 Meatloaf 175 200 45 60 2 3 Danish meatballs 175 200 30 45 3 4 Liver pâté 180 200 50 60 2 3 Gratin 180 200 50 60 2 3 Potato gratin 200 55 65 3 4 Lasagne home made 200 ...

Page 18: ...without the lid We recommend that you cook meat and fish weighing 1 kg and above in the appliance To prevent the meat juices or fat from burning onto the pan put some liquid into the deep pan If necessary turn the roast after 1 2 2 3 of the cooking time Baste large roasts and poultry with their juices several times during roasting This gives better roasting results You can deactivate the appliance...

Page 19: ...80 55 65 2 3 Duck1 150 55 65 2 3 Duck slow roasting1 130 total around 5 hours 2 3 Roast turkey stuffed 150 50 60 1 2 Turkey breast 175 70 80 2 3 1 Other Can be browned off after roasting under the grill or with top bottom heat at 250 C If you are using a meat probe remove it before grilling 9 10 Conventional Roasting Beef Food Temperature C Time min kg Shelf posi tion Roast beef1 125 80 120 2 3 Ru...

Page 20: ...loin1 200 60 3 Neck fillets 180 90 120 2 3 Ham 160 60 100 1 2 1 Other Can be browned off after roasting under the grill or with top bottom heat at 250 C If you are using a meat probe remove it before grilling Poultry Food Temperature C Time min kg Shelf posi tion Chicken parted 200 55 65 2 3 Duck1 160 55 65 2 3 Duck slow roasting1 130 total around 5 hours 2 3 Roast turkey stuffed 160 50 60 1 2 Tur...

Page 21: ... before grilling Lamb Food Temperature C Time min kg Shelf posi tion Leg shoulder rib 160 80 100 2 Pork Food Temperature C Time min kg Shelf posi tion Roast pork1 180 60 70 2 3 Pork Loin1 175 60 2 3 Neck fillets 160 90 120 2 3 Ham 150 60 100 1 2 1 Other Can be browned off after roasting under the grill or with top bottom heat at 250 C If you are using a meat probe remove it before grilling Poultry...

Page 22: ...y flat pieces of meat or fish Always preheat an empty oven with the grill functions for 5 minutes The grilling area is set in centre of the shelf 9 13 Grilling Food Tempera ture C Time min Shelf posi tion 1st side 2nd side Pork chops 250 7 9 4 6 3 4 Lamb chops 250 7 10 5 6 3 4 Chicken parted 250 20 25 15 20 3 4 Sausages 250 3 5 2 4 3 4 Spareribs pre cooked for 20 mins 250 15 20 15 20 3 4 Fish slic...

Page 23: ...e food packaging Put the food on a plate Do not cover it with a bowl or a plate This can extend the defrost time Use the first oven shelf position The one on the bottom Food Quantity Defrosting time min Further defrosting time min Comments Chicken 1 kg 100 140 20 30 Put the chicken on an up turned saucer in a big plate Turn halfway through Meat 1 kg 100 140 20 30 Turn halfway through Meat 500 g 90...

Page 24: ...e agents sharp edged objects or a dishwasher It can cause damage to the nonstick coating 10 2 Stainless steel or aluminium appliances Clean the oven door with a wet sponge only Dry it with a soft cloth Do not use steel wool acids or abrasive materials as they can damage the oven surface Clean the oven control panel with the same precautions 10 3 Removing the shelf supports To clean the oven remove...

Page 25: ...s and push inwards to release the clip seal 1 2 B 2 Pull the door trim to the front to remove it 3 Hold the door glass panels on their top edge one by one and pull them upwards from the guide 4 Clean the door glass panels To install panels do the same steps in reverse 10 6 Oven ceiling WARNING Deactivate the appliance before you remove the heating element Make sure that the appliance is cold There...

Page 26: ...ng the drawer WARNING Do not keep flammable items such as cleaning materials plastic bags oven gloves paper or cleaning sprays in the drawer When you use the oven the drawer can become hot There is a risk of fire The drawer below the oven can be removed for cleaning 1 Pull the drawer out until it stops 2 Lift the drawer slightly so that can be lifted upwards at an angle of the drawer guides To ins...

Page 27: ...ace the lamp Steam and condensation settle on the food and in the cavity of the oven You left the dish in the oven for too long Do not leave the dishes in the oven for longer than 15 20 minutes after the cooking process ends 11 2 Service data If you cannot find a solution to the problem yourself contact your dealer or an Authorised Service Centre The necessary data for the service centre is on the...

Page 28: ...a separate installation booklet 13 ENERGY EFFICIENCY 13 1 Product information for hob according to EU 66 2014 Model identification EKC6051FOW Type of hob Hob inside Freestanding Cooker Number of cooking zones 4 Heating technology Radiant Heater Diameter of circular cooking zones Ø Left front Left rear Right front Right rear 21 0 cm 14 5 cm 14 5 cm 18 0 cm Energy consumption per cooking zone EC ele...

Page 29: ...forced mode 0 90 kWh cycle Number of cavities 1 Heat source Electricity Volume 72 l Type of oven Oven inside Freestanding Cook er Mass 53 0 kg EN 60350 1 Household electric cooking appliances Part 1 Ranges ovens steam ovens and grills Methods for measuring performance 13 4 Oven Energy saving The appliance contains features which help you save energy during everyday cooking General hints Make sure ...

Page 30: ...ials with the symbol Put the packaging in applicable containers to recycle it Help protect the environment and human health and to recycle waste of electrical and electronic appliances Do not dispose appliances marked with the symbol with the household waste Return the product to your local recycling facility or contact your municipal office www electrolux com 30 ...

Page 31: ...ENGLISH 31 ...

Page 32: ...www electrolux com shop 867307154 D 332015 ...

Reviews: