background image

WARNING!

Risk of fire or explosion.

• Fats and oil when heated can release

flammable vapours. Keep flames or
heated objects away from fats and oils
when you cook with them.

• The vapours that very hot oil releases

can cause spontaneous combustion.

• Used oil, that can contain food rem-

nants, can cause fire at a lower temper-
ature than oil used for the first time.

• Do not put flammable products or items

that are wet with flammable products
in, near or on the appliance.

• Do not let sparks or open flames to

come in contact with the appliance
when you open the door.

• Open the appliance door carefully. The

use of ingredients with alcohol can
cause a mixture of alcohol and air.

WARNING!

Risk of damage to the appliance.

• To prevent damage or discoloration to

the enamel:
– do not put ovenware or other objects

in the appliance directly on the bot-
tom.

– do not put aluminium foil directly on

the bottom of the appliance.

– do not put water directly into the hot

appliance.

– do not keep moist dishes and food in

the appliance after you finish the
cooking.

– be careful when you remove or install

the accessories.

• Discoloration of the enamel has no ef-

fect on the performance of the appli-
ance. It is not a defect in the sense of
the warranty law.

• Use a deep baking tray for moist cakes.

Fruit juices cause stains that can be
permanent.

• Do not keep hot cookware on the con-

trol panel.

• Do not let cookware to boil dry.
• Be careful not to let objects or cook-

ware fall on the appliance. The surface
can be damaged.

• Do not activate the cooking zones with

empty cookware or without cookware.

• Do not put aluminium foil on the appli-

ance.

• Cookware made of cast iron, aluminium

or with a damaged bottom can cause
scratches on the glass ceramic. Always
lift these objects up when you have to
move them on the cooking surface.

Lid

• Do not change the specification of the

lid.

• Clean the lid regularly.
• Do not open the lid, when there are

spills on the surface.

• Before you close the lid turn all burners

off.

• Do not close the lid until the hob and

oven are completely cold.

• Glass lids can shatter, when heated (if

applicable).

WARNING!

Make sure to install a stabilizing
means in order to prevent tipping
of the appliance. Refer to Installa-
tion chapter.

2.3 

Care and Cleaning

WARNING!

Risk of injury, fire or damage to
the appliance.

• Before maintenance, deactivate the ap-

pliance and disconnect the mains plug
from the mains socket.

• Make sure the appliance is cold. There

is the risk that the glass panels can
break.

• Replace immediately the door glass

panels when they are damaged. Con-
tact the Service.

• Be careful when you remove the door

from the appliance. The door is heavy!

• Clean regularly the appliance to prevent

the deterioration of the surface material.

• Remaining fat or food in the appliance

can cause fire.

6

www.electrolux.com

Summary of Contents for EKK61500 O

Page 1: ...EKK61500O EN COOKER USER MANUAL 2 RU КУХОННАЯ ПЛИТА ИНСТРУКЦИЯ ПО ЭКСПЛУАТАЦИИ 28 ...

Page 2: ...o whenever you use it you can be safe in the knowledge that you ll get great results every time Welcome to Electrolux Visit our website for Get usage advice brochures trouble shooter service information www electrolux com Register your product for better service www electrolux com productregistration Buy Accessories Consumables and Original spare parts for your appliance www electrolux com shop CU...

Page 3: ...nowledge if they are supervised by an adult or a per son who is responsible for their safety Do not let children play with the appliance Keep all packaging away from children Keep children and pets away from the appliance when it operates or when it cools down Accessible parts are hot If the appliance has a child safety device we recom mend that you activate it Cleaning and user maintenance shall ...

Page 4: ...n WARNING Only a qualified person must in stall this appliance Remove all the packaging Do not install or use a damaged appli ance Obey the installation instruction sup plied with the appliance Always be careful when you move the appliance because it is heavy Always wear safety gloves Do not pull the appliance by the handle Keep the minimum distance from the other appliances and units Make sure th...

Page 5: ...onnect the appliance according to current in stallation regulations Pay attention to requirements regarding adequate venti lation 2 2 Use WARNING Risk of injury burns or electric shock Use this appliance in a household envi ronment Do not change the specification of this appliance Make sure that the ventilation openings are not blocked Do not let the appliance stay unatten ded during operation Dea...

Page 6: ...hat can be permanent Do not keep hot cookware on the con trol panel Do not let cookware to boil dry Be careful not to let objects or cook ware fall on the appliance The surface can be damaged Do not activate the cooking zones with empty cookware or without cookware Do not put aluminium foil on the appli ance Cookware made of cast iron aluminium or with a damaged bottom can cause scratches on the g...

Page 7: ...lacing the lamp disconnect the appliance from the power supply Only use lamps with the same specifi cations 2 5 Service Contact the Service to repair the appli ance We recommend only the use of original spare parts 2 6 Disposal WARNING Risk of injury or suffocation Disconnect the appliance from the mains supply Cut off the mains cable and discard it Remove the door catch to prevent chil dren and p...

Page 8: ...n pull down WARNING The storage compartment can be come hot when the appliance op erates 4 BEFORE FIRST USE WARNING Refer to the Safety chapters CAUTION To open the oven door always hold the handle in the centre 4 1 Initial Cleaning Remove all accessories and removable shelf supports if applicable Clean the appliance before first use Refer to the chapter Care and cleaning 4 2 Preheating Preheat th...

Page 9: ...ust the flame after it is regular If after some tries the burner does not light check if the crown and its cap are in the correct positions A B C D A B C D A Burner cap B Burner crown C Ignition candle D Thermocouple WARNING If the burner does not light after 10 seconds release the knob and turn it to the off position Wait for 1 minute before you try to light the burner again You can light the bur...

Page 10: ...team cleaners or high pressure cleaners WARNING Do not use abrasive cleaners steel wool pads or acids They can cause damage to the appli ance Scratches or dark stains on the surface have no effect on how the appliance operates You can remove the pan supports to easily clean the hob To clean the enamelled parts cap and crown wash them with warm soapy water and dry them carefully before you put them...

Page 11: ...this oc curs the oven temperature is very high and can burn all the dishes You must call the Service immedi ately to replace the oven thermo stat 8 3 Oven functions Oven function Application Off position The appliance is OFF Conventional cooking Heats from the top and bottom elements To bake and roast on one oven level Bottom heat Heats only from the bottom of the oven To bake cakes with crispy or...

Page 12: ...HE ACCESSORIES WARNING Refer to the Safety chapters 9 1 Inserting the baking tray Put the tray in the centre of the oven cavi ty between the front and rear wall This ensures that the heat can circulate in front of and behind the baking tray Make sure that the tray is positioned like in the pic ture with the angled slope in the rear WARNING Do not push the baking tray all the way to the rear wall o...

Page 13: ...components with aluminium foil when you cook This can change the baking results and damage the enamel coat ing 10 1 Baking cakes Preheat the oven for approximately 10 minutes before baking Do not open the oven door before 3 4 of the set cooking time is up If you use two baking trays at the same time keep one level empty between them 10 2 Cooking meat and fish Do not cook meat with weight below 1 k...

Page 14: ...170 10 25 30 Drip pan cake 1500 g enamelled tray at lev el 2 160 170 45 55 1 Chicken whole 1350 g oven shelf at level 2 roasting tray at level 1 200 220 60 70 Chicken half 1300 g oven shelf at level 3 roasting tray at level 1 190 210 30 35 Pork roast cutlet 600 g oven shelf at level 3 roasting tray at level 1 190 210 30 35 Flan bread 800 g enamelled tray at lev el 2 230 250 20 10 15 Stuffed yeast ...

Page 15: ...tray at lev el 2 100 120 40 50 Crumble cake 1500 g enamelled tray at lev el 3 180 190 10 15 25 35 Sponge cake 600 g enamelled tray at lev el 3 160 170 10 25 35 Buttered cake 600 g enamelled tray at lev el 2 180 200 10 20 25 1 After you deactivate the appliance leave the cake in the oven for 7 minutes 2 After you deactivate the appliance leave the cake in the oven for 10 minutes 3 Set the temperatu...

Page 16: ...0 Small cakes 500 500 500 g enamelled tray at level 1 2 or 4 160 10 40 Fatless sponge cake 350 g 1 round alumi nized tray di ameter 26 cm at level 3 160 10 30 Drip pan cake 1200 g enamelled tray at level 3 150 160 40 501 Chicken whole 1400 g oven shelf at level 2 baking tray at level 1 200 50 Pork roast 600 g oven shelf at level 2 baking tray at level 1 180 200 30 40 Flan bread 800 g enamelled tra...

Page 17: ... level 3 190 10 15 Yeast buns 800 800 g enamelled tray at level 1 or 3 200 10 15 Swiss roll 500 g enamelled tray at level 3 150 170 10 10 15 Meringue 400 g enamelled tray at level 2 100 120 50 60 Meringue 400 400 g enamelled tray at level 1 or 3 100 120 55 65 Meringue 400 400 400 g enamelled tray at level 1 2 or 4 115 125 65 75 Crumble cake 1500 g enamelled tray at level 2 170 180 10 20 30 Sponge ...

Page 18: ... oven shelf at level 2 2 220 230 45 55 1 Set the knob for the temperature to 250 C 2 Put a baking tray under the oven shelf on the shelf level 1 11 OVEN CARE AND CLEANING WARNING Refer to the Safety chapters Clean the front of the appliance with a soft cloth with warm water and cleaning agent To clean metal surfaces use a usual cleaning agent Clean the oven interior after each use Then you can rem...

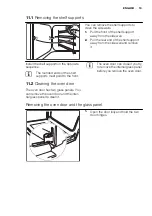
Page 19: ...he shelf supports in the opposite sequence The rounded ends of the shelf supports must point to the front 11 2 Cleaning the oven door The oven door has two glass panels You can remove the oven door and the inter nal glass panel to clean it The oven door can close if you try to remove the internal glass panel before you remove the oven door Removing the oven door and the glass panel 1 Open the door...

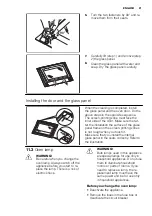
Page 20: ...lose the oven door to the first open ing position halfway Then pull for ward and remove the door from its seat 4 Put the door on a soft cloth on a sta ble surface 5 Release the locking system to re move the internal glass panel 20 www electrolux com ...

Page 21: ... zones is not rough when you touch it Make sure that you install the internal glass panel in the seats correctly Refer to the illustration 11 3 Oven lamp WARNING Be careful when you change the oven lamp Always switch off the appliance before you start to re place the lamp There is a risk of electric shock WARNING Bulb lamps used in this appliance are special lamps for use only in household applian...

Page 22: ...is blow out im mediately after ignition Thermocouple is not heated sufficient After lightning the flame keep the knob pushed for approximately 5 seconds The gas ring burns un evenly Burner crown is blocked with food residues Make sure that the injec tor is not blocked and the burner crown is clear of food particles The appliance does not operate The fuse in the fuse box is released Control the fus...

Page 23: ...ll your freestanding appli ance with cabinets on one or two sides and in the corner Minimum distances Dimen sion mm A 690 Dimen sion mm B 150 13 2 Technical Data Dimensions Height 855 mm Width 600 mm Depth 600 mm Total electricity power 2035 6 W Gas Category I3B P Gas Supply G30 G31 30 mbar By pass diameters Burner Ø By pass in 1 100 mm Auxiliary 29 Semi rapid 32 Triple Crown 67 ENGLISH 23 ...

Page 24: ... use a flexible pipe You must tightly attach the flexible pipe by clamps To install use a pipe holder Make sure that you tightly attach the pipe holder to the gasket and then continue with the gas connection The flexible pipe is cor rect when It cannot become hotter than room temperature or higher than 30 C It is no longer than 1500 mm It does not compress It is not subject to traction or torsion ...

Page 25: ...emove the injectors and replace them with the ones which are necessary for the type of gas you use 4 Assemble the parts follow the same procedure backwards 5 Replace the rating plate it is near the gas supply pipe with the one for the new type of gas supply You can find this plate in the package supplied with the appliance If the supply gas pressure is changeable or different from the necessary pr...

Page 26: ...t protec tion to prevent the appliance to fall with incorrect loads WARNING Your appliance has the symbol shown on the picture if applica ble to remind you about the in stallation of the anti tilt protection Make sure you install the anti tilt protection at the correct height 26 www electrolux com ...

Page 27: ...pboards is larger than the width of the appliance you must adjust the side measurement to center the appliance 13 10 Electrical installation WARNING Only a qualified and competent person must do the electrical in stallation The manufacturer is not responsi ble if you do not follow safety pre cautions from chapter Safety in formation This appliance is supplied with a main plug and a main cable The ...

Page 28: ...да будут превосходными Добро пожаловать в Electrolux На нашем веб сайте Вы сможете Найти рекомендации по использованию изделий руководства по эксплуатации мастер устранения неисправностей информацию о техническом обслуживании www electrolux com Зарегистрировать свое изделия для улучшения обслуживания www electrolux com productregistration Приобрести дополнительные принадлежности расходные материал...

Page 29: ...ными физическими сенсорными или умственными способностями или с недостаточным опы том или знаниями только при условии нахождения под прис мотром лица отвечающего за их безопасность Не позволяйте детям играть с прибором Храните все упаковочные материалы вне досягаемости де тей Не подпускайте детей и домашних животных к прибору ко гда он работает или остывает Доступные для контакта ча сти прибора со...

Page 30: ...как они могут нагреваться Для извлечения направляющих для противня вытяните сна чала переднюю а затем заднюю часть направляющей про тивня из боковой стенки движением направленным от стенки Установка направляющих для противня производит ся в обратном порядке Перед открыванием удалите с крышки явные загрязнения Перед тем как закрывать крышку дайте варочной панели остыть Не используйте жесткие абрази...

Page 31: ...изолированные части прибора должны быть закреплены так чтобы их было невоз можно удалить без специальных инстру ментов Вставляйте вилку сетевого кабеля в розет ку только по окончании установки прибора Убедитесь что после установки прибора к вилке электропитания имеется свободный доступ Не подключайте прибор к розетке электро питания если она плохо закреплена или если вилка неплотно входит в розетк...

Page 32: ... приготовления жиров и масел Образуемые сильно нагретым маслом па ры могут привести самопроизвольному воз горанию Использованное масло может содержать остатки продуктов что может привести к его возгоранию при более низких темпера турах по сравнению с маслом которое ис пользуется в первый раз Не кладите на прибор рядом с ним или внутрь него легковоспламеняющиеся мате риалы или изделия пропитанные л...

Page 33: ...ольшой вес Во избежание повреждения покрытия при бора производите его регулярную очистку Оставшиеся внутри прибора жир или остат ки пищи могут стать причиной пожара Очищайте прибор мягкой влажной тряпкой Используйте только нейтральное моющее средство Не используйте абразивные средства абразивные губки растворители или металлические предметы В случае использования спрея для очистки духового шкафа с...

Page 34: ...ого приготовления 71 мм 3 Вспомогательная горелка 55 мм 4 Горелка с тройным рассекателем 126 мм 3 3 Принадлежности Полка духового шкафа Для кухонной посуды форм для выпечки жаркого Плоский алюминиевый противень для вы печки Для пирогов и печенья Сотейник Для выпекания и жарки или в качестве под дона для сбора жира Телескопические направляющие не во всех моделях Для установки на них полок или проти...

Page 35: ...ные принадлежности могут на греться сильнее обычного Из прибора могут появиться неприятные запахи или дым Это нормально Убедитесь что в помещении имеется достаточная циркуляция воздуха 5 ВАРОЧНАЯ ПАНЕЛЬ ЕЖЕДНЕВНОЕ ИСПОЛЬЗОВАНИЕ ВНИМАНИЕ См Главу Сведения по технике безопасности 5 1 Розжиг горелок ВНИМАНИЕ Будьте внимательны при использова нии открытого огня на кухне Изгото витель не несет ответств...

Page 36: ...аче электро питания после установки прибора или после перебоя в электропитании Это нормально 5 2 Выключение горелки Чтобы потушить пламя поверните ручку на символ ВНИМАНИЕ Всегда уменьшайте пламя или вы ключайте горелку перед тем как сни мать посуду с конфорки 6 ВАРОЧНАЯ ПАНЕЛЬ ПОЛЕЗНЫЕ СОВЕТЫ 6 1 Энергосбережение По возможности всегда накрывайте посуду крышкой Как только жидкость начинает кипеть ...

Page 37: ...ак у них могут быть острые края При необходи мости удаляйте стойкие загрязнения с по мощью чистящей пасты Убедитесь в правильности установки под ставок для посуды после очистки Для того чтобы горелки работали надле жащим образом стержни подставок для по суды должны располагаться в центре го релки Чтобы не повредить варочную панель будьте внимательны при установке подста вок для посуды После чистки...

Page 38: ...Горячий воздух Этот режим позволяет одновременно готовить разные блю да требующие одинаковой температуры приготовления на разных уровнях и без взаимопроникновения запахов При использовании данной функции понизьте температуру духо вого шкафа на 20 C 40 C по сравнению со обычной темпе ратурой которую Вы выбираете при приготовлении в режи ме Верхний нижний нагрев Размораживание Размораживание заморож...

Page 39: ...ки к задней стенке камеры духового шкафа до упора Это не позволит теплу свободно циркулировать вокруг противня Продукты могут подгореть особенно в задней части противня 9 2 Установка принадлежностей для духового шкафа Вставляйте выдвижные принадлежности та ким образом чтобы двухсторонние кромки были расположены в задней части духового шкафа по направлению вниз Вставляйте вы движные принадлежности ...

Page 40: ... ними пустой уровень 10 2 Приготовление мяса и рыбы Не рекомендуется приготовлять мясо ку ском менее 1 кг При приготовлении слиш ком малого количества мяса блюдо полу чается сухим При приготовлении очень жирных блюд ис пользуйте противень для сбора жира во из бежание образования пятен удаление ко торых может оказаться невозможным По окончании приготовления мяса реко мендуется подождать не менее 15...

Page 41: ...дон для жарки на уровне 1 200 220 60 70 Цыпленок половинка 1 3 кг полка духового шкафа на 3 уровне поддон для жарки на уровне 1 190 210 30 35 Свиные жареные от бивные котлеты 600 г полка духового шкафа на 3 уровне поддон для жарки на уровне 1 190 210 30 35 Открытый пирог 800 г эмалированный проти вень на уровне 2 230 250 20 10 15 Дрожжевой пирог с на чинкой 1 2 кг эмалированный проти вень на уровн...

Page 42: ... 40 50 Пирог с обсыпкой 1 5 кг эмалированный проти вень на уровне 3 180 190 10 15 25 35 Бисквитный пирог 600 г эмалированный проти вень на уровне 3 160 170 10 25 35 Сливочный пирог 600 г эмалированный проти вень на уровне 2 180 200 10 20 25 1 После выключения прибора оставьте пирог в духовом шкафу на 7 минут 2 После выключения прибора оставьте пирог в духовом шкафу на 10 минут 3 Установите темпера...

Page 43: ... пирог 1 2 кг 1 2 кг 2 круглых про тивня с алюми ниевым покры тием диаметр 20 см на уров не 1 175 10 55 Маленькие пи рожные 500 г эмалированный противень на уровне 2 150 10 35 Маленькие пи рожные 500 г 500 г эмалированный противень на уровне 1 или 3 145 10 30 Маленькие пи рожные 500 г 500 г 500 г эмалированный противень на уровне 1 2 или 4 160 10 40 Нежирный бис квитный пирог 350 г 1 круглый про т...

Page 44: ...ивень на уровне 2 150 170 60 70 Швейцарский открытый яблочный пирог 1 9 кг эмалированный противень на уровне 3 180 200 15 40 50 Рождественский пирог 2 4 кг эмалированный противень на уровне 3 150 170 10 50 602 Открытый пирог Киш Лорен 1 кг 1 круглый про тивень диа метр 26 см на уровне 2 210 230 15 35 45 Крестьянский хлеб 750 г 750 г эмалированный противень на уровне 3 180 190 153 50 60 Румынский б...

Page 45: ...5 кг эмалированный противень на уровне 2 170 180 10 20 30 Бисквитный пи рог 600 г эмалированный противень на уровне 2 150 170 10 20 30 Сливочный пи рог 600 г 600 г эмалированный противень на уровне 1 или 3 150 170 10 20 30 1 После выключения прибора оставьте пирог в духовом шкафу на 7 минут 2 После выключения прибора оставьте пирог в духовом шкафу на 10 минут 3 Установите температуру 230 C для пре...

Page 46: ...фа на уровень 1 11 ДУХОВОЙ ШКАФ УХОД И ЧИСТКА ВНИМАНИЕ См Главу Сведения по технике безопасности Переднюю часть прибора протирайте мяг кой тканью смоченной теплой водой с моющим средством Для чистки металлических поверхностей используйте обычное чистящее средство Камеру духового шкафа следует очищать после каждого использования Так загряз нения легче удалить и они не будет приго рать Стойкие загря...

Page 47: ...я противня про изводится в обратном порядке Закругленные концы направляющих для противня должны быть направле ны вперед 11 2 Очистка дверцы духового шкафа В дверце духового шкафа имеются две сте клянные панели И дверца духового шкафа и внутренняя стеклянная панель снимаются для чистки Дверца духового шкафа может за хлопнуться при попытке извлечь внутреннюю стеклянную панель если предварительно не ...

Page 48: ...ях 3 Прикройте дверцу до первого фиксируе мого положения наполовину Затем вы тяните дверцу вперед из ее гнезда 4 Положите дверцу на устойчивую поверх ность подложив мягкую ткань 5 Отожмите стопоры чтобы снять внут реннюю стеклянную панель 48 www electrolux com ...

Page 49: ...ется грубой на ощупь там где расположены надписи Внутренняя стеклянная панель должна обяза тельно находиться в своих направляющих См рисунок 11 3 Лампа освещения духового шкафа ВНИМАНИЕ При замене лампы освещения духо вого шкафа будьте осторожны Пе ред заменой лампы всегда выклю чайте прибор Существует опасность поражения электрическим током ВНИМАНИЕ В приборе используются специаль ные лампы предн...

Page 50: ...на домашнем электрощите При розжиге нет искры Крышка и рассекатель го релки стоят неровно Удостоверьтесь что крышка и рассекатель установлены как следует Пламя гаснет сразу после розжига Термопара недостаточно нагрелась После появления пламени подержите ручку нажатой около 5 секунд Газ горит неравномерно по окружности горелки Рассекатель горелки засо рился остатками пищи Убедитесь что инжектор не ...

Page 51: ...лаву Сведения по технике безопасности 13 1 Место для установки прибора B A Отдельно стоящий прибор можно устанав ливать рядом с предметами мебели между ними или в углу Минимальные расстояния Габариты мм A 690 Габариты мм B 150 13 2 Технические данные Габаритные размеры Высота 855 мм Ширина 600 мм Глубина 600 мм Суммарная элек трическая мощ ность 2035 6 Вт Категория газа I3B P Подвод газа G30 G31 3...

Page 52: ...длине можно использовать гибкую подводку Необходимо плотно зафиксировать хомутами гибкую подводку Для установки используйте трубодержатель Убедитесь что трубодержатель плотно при жат к уплотняющей прокладке а затем при ступайте к подключению линии подачи газа Использование гибкой подводки допускается если Ее температура равна температуре в поме щении или превышает ее не более чем на 30 C Ее длина ...

Page 53: ...етки конфорок 2 Снимите с горелок крышки и рассекатели пламени 3 С помощью торцевого ключа на 7 мм де монтируйте форсунки и замените их на те которые соответствуют используемо му типу газа 4 Установите детали на место выполнив вышеприведенную последовательность действий в обратном порядке 5 Замените табличку с техническими дан ными размещенную вблизи трубы подво да газа табличкой соответствующей н...

Page 54: ...ы от опрокидывания обязательна Установите защиту от опрокидывания чтобы не допустить падения прибора из за неверного распределения нагрузки ВНИМАНИЕ На Вашем приборе размещен сим вол показанный на рисунке если это применимо для того чтобы напом нить Вам о необходимости установки защиты от опрокидывания Убедитесь в правильном выборе вы соты установки защиты от опрокиды вания 54 www electrolux com ...

Page 55: ...рокидывания Если расстояние между кухонными шкафами больше чем ширина при бора следует установить его так чтобы зазоры с обеих сторон были одинаковыми 13 10 Электрическое подключение ВНИМАНИЕ Электрическое подключение должно выполняться только квалифициро ванным и опытным специалистом Производитель не несет ответствен ность если пользователь не соблю дает меры безопасности приведен ные в Главе Све...

Page 56: ...помеченную символом Доставьте изделие на местное предприятие по переработке вторичного сырья или обратитесь в свое муниципальное управление 56 www electrolux com ...

Page 57: ...РУССКИЙ 57 ...

Page 58: ...58 www electrolux com ...

Page 59: ...РУССКИЙ 59 ...

Page 60: ...www electrolux com shop 892953655 A 502012 ...

Reviews: