background image

12 

INSTALLATION OF EMM23M38GB 


 CAUTION!

Do not block the air vents. If you do that, the appliance  
can overheat. 

 CAUTION!

Do not connect the appliance to adapters or extension leads. 
This can cause overloading and risk of fire. 

•    Put the appliance far away from steam, hot air and 

water splashes.

•    If the appliance is stored/ transported at sub-zero 

temperatures, do not activate it immediately after 
installation. Allow at least two hours for it to be brought 
up to room temperature before turning on the unit. 

Installation

•   Remove all packing material and any promotional 

material from the microwave oven.

•   Examine the oven for any damage such as dents or a 

broken door. Do not install if the oven is damaged. Call 
the service centre.

•   Remove the protective film on the oven cabinet 

surface. Do not remove the light brown Mica cover 
that is attached to the right-hand side of the oven 
cavity to protect the magnatron.

•   Do not leave the packing material so that small 

children can play with it. This can be hazardous.


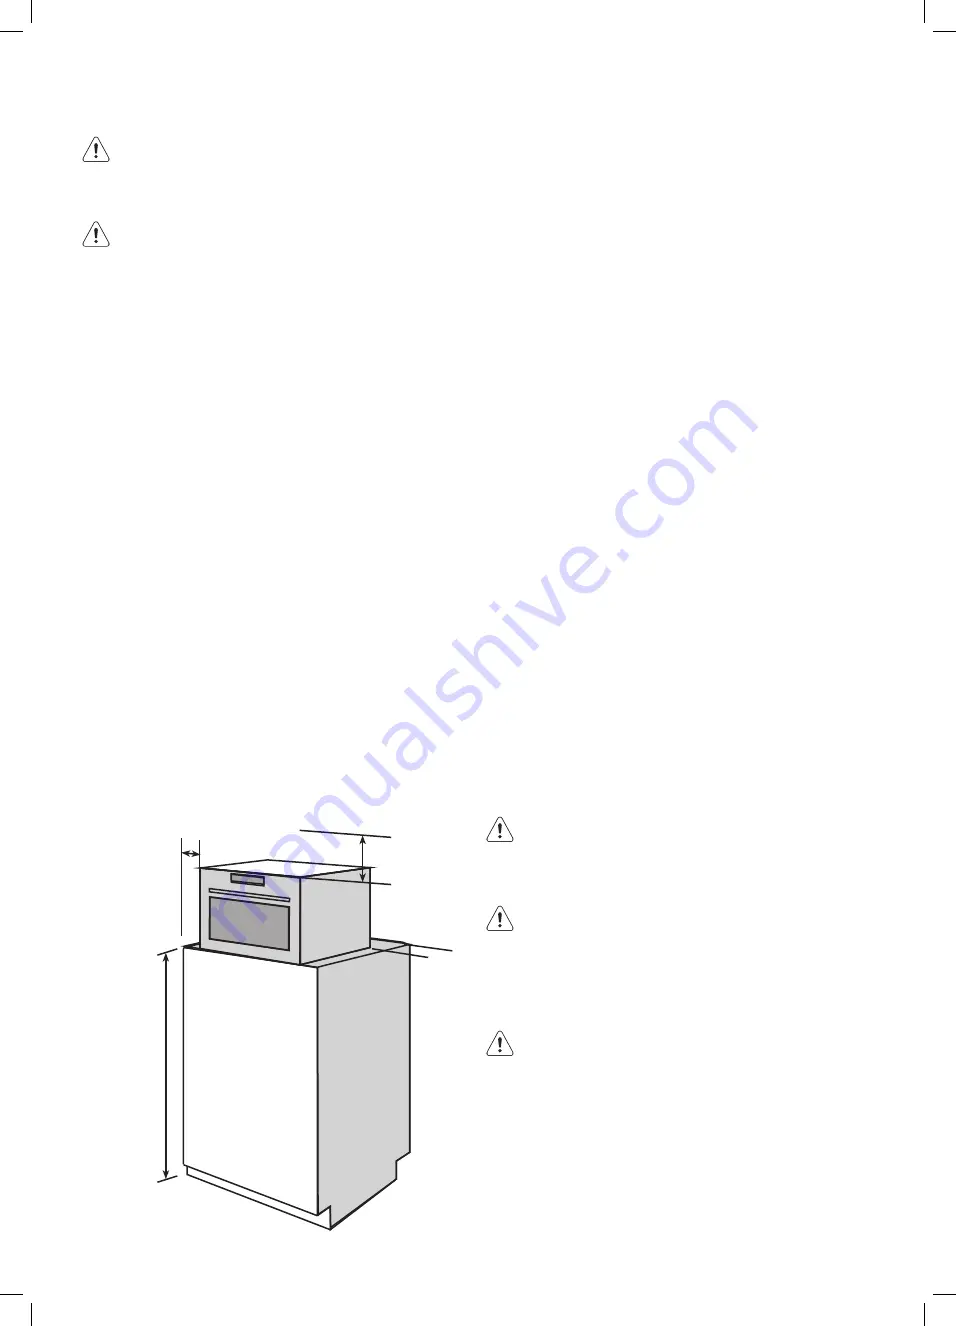
  Select a flat, level surface that provides enough open 

space for the intake and outlet vents and that is strong 
enough to bear the weight of the oven. A minimum 
clearance of 7.5cm is required between the oven and 
any adjacent walls. Leave a minimum clearance 30cm 
above the oven. 


Min. 85cm 

from floor 

to base of 

microwave 

oven.

7.5cm

7.5cm

30cm

Blocking the intake or outlet vents can damage the oven. 
If air vents are blocked during operation, the oven may 
overheat, and this may lead to malfunctioning. Hot air 
escapes from the vents, so be sure not to obstruct it or let 
curtains come between the oven and the rear wall.

NOTE: It is recommended to have greater than 7.5cm 
clearance on at least one of the sides to improve product 
performance and operation.

•   The oven should be placed in a stable position to 

avoid the possibility of causing vibration or noise.

•   Do not remove the legs from the bottom of the oven.
•   This oven should only be installed freestanding; not 

built-in or in a cabinet.

•   Keep the oven away from heat and water. Exposure 

to heat and water can lower the efficiency and lead to 
malfunctioning.

•   Place the oven as far away from radios and TV 

as possible. Operation of the oven may cause 
interference to your radio or TV reception.

•   When there is interference, it may be reduced or 

eliminated by taking the following measures:


-   Clean door and sealing surface of the  

microwave oven.


-   Reorient the receiving antenna of the radio  

and/or television.


-   Move the microwave oven away from the receiver.


-   Plug the microwave oven into a different outlet so 

that microwave oven and receiver are on different 
branch circuits.

•   Be sure the voltage and frequency where you connect 

the microwave oven is the same as specified on the 
rating plate on the microwave oven. If the microwave 
oven is connected to the socket via an extension cord, 
make sure the cord is earthed.

 WARNING!

If installed near or over a heat source, the microwave 
oven could be damaged. 

 WARNING!

This microwave oven must not be used on a non-earth 
protected power supply. Contact an electrician if you 
are uncertain regarding electrical connection of the 
oven or provision of earth protection of the supply. 

 WARNING!

If the power cord is damaged, it must be replaced 
by the manufacturer, its service agent or similarly 
qualified persons in order to avoid a hazard.

Summary of Contents for EMG20D38GB

Page 1: ...EMM23M38GB Installation User manual Freestanding microwave ...

Page 2: ...MBOLS WARNING This symbol indicates information concerning your personal safety CAUTION This symbol indicates information on how to avoid damaging the appliance IMPORTANT This symbol indicates tips and information about use of the appliance ENVIRONMENT This symbol indicates tips and information about economical and ecological use of the appliance INFORMATION ON DISPOSAL FOR USERS ENVIRONMENT Most ...

Page 3: ...se instructions or any other safety instructions incorporated in this book be ignored When heating food in plastic or paper containers keep an eye on the appliance due to the possibility of ignition The appliance is intended for heating food and beverages Drying of food or clothing and heating of warming pads slippers sponges damp cloth and similar may lead to risk of injury ignition or fire If sm...

Page 4: ... appliance from the mains supply Cut off the mains cable and discard it Electrical connection WARNING Risk of fire and electrical shock This appliance is supplied with a power cord and 10A power plug suitable for connection to standard 10A power socket If a power socket needs to be installed it must be done by a suitably qualified electrician The appliance must be earthed Make sure that the electr...

Page 5: ... PANEL Control panel Symbol Function Description 1 _ Display Shows the settings and current time 2 Function pads To set the microwave reheat defrost by weight and time Frozen meal beverage popcorn potato pizza meat fish 3 4 Start 30 sec To start the appliance or increase the cooking time for 30 seconds at full power 5 Setting pads 0 9 To set the time weight 6 7 Cancel To deactivate the appliance o...

Page 6: ...astic up to 200 C 3 Cardboard paper Clingfilm Roasting film with microwave safe closure 3 Roasting dishes made of metal e g enamel cast iron Baking tins black lacquer or silicon coated 3 Baking tray Browning cookware e g Crisp pan or Crunch plate Ready meals in packaging 3 1 With no silver gold platinum or metal plating decorations 2 Without quartz or metal components or glazes which contain metal...

Page 7: ... time 3 Press to confirm and start the appliance 4 For weight defrosting the display shows the set defrosting time Display Icon HI M HI MED M LO M LO Procedure Display Icon Control panel Function Defrost by time Defrost by weight 1 Connect to power 1 Connect to power 2 In the standby status press Defrost by weight to choose 3 Press numeric key to set weight 4 Press Start pad to start and LED will ...

Page 8: ... for a different one press function pad 4 Press to confirm and start the appliance Type Usage There are 5 choices 0 2kg 0 4kg 0 6kg 0 8kg 1kg There are 2 choices 1piece 2 pieces There are 3 choices 1 2 3 cups each cup is about 250 ml There are 1 choice 0 1kg There are 2 choices 0 45kg 0 65kg There are 2 choices 1 2 pieces each piece is about 150g There are 5 choices 0 1kg 0 2kg 0 3kg 0 4kg 0 5kg T...

Page 9: ... and the timer is set you can see the time left or clock if required Pressing 0 will toggle between function display timer display or clock display The timer display will revert back to function after approx 5 seconds The clock display will revert back to function after approx 10 seconds Timer still works when you open the door or pause the appliance Press to cancel Child Safety Lock The Child Saf...

Page 10: ... packed ready meals always follow the instructions written on the packaging Power setting table To get better results for rice use a flat wide dish Problem Remedy You cannot find details for the amount of food prepared Look for a similar food Increase or shorten the length of the cooking times according to the following rule Double the amount almost double the time Half the amount half the time Th...

Page 11: ...hat nothing blocks the door The lamp does not operate The lamp is defective The lamp has to be replaced Contact the customer service centre The display shows The Child Safety Lock is active Deactivate the Child Safety Lock Hold the Cancel button for 3 seconds There is sparking in the cavity There are metal dishes or dishes with metal trim Remove the dish from the appliance There are metal skewers ...

Page 12: ...ct it or let curtains come between the oven and the rear wall NOTE It is recommended to have greater than 7 5cm clearance on at least one of the sides to improve product performance and operation The oven should be placed in a stable position to avoid the possibility of causing vibration or noise Do not remove the legs from the bottom of the oven This oven should only be installed freestanding not...

Page 13: ...cable and main plug WARNING The microwave oven is fitted with a plug and must be only connected to a properly installed earthed socket In accordance with the appropriate regulations the socket must only be installed and the connecting cable must only be replaced by a qualified electrician If the plug is no longer accessible following installation an all pole isolating switch must be present on the...

Page 14: ...ree 1 800 10 845 CARE 2273 Consumer Care Hotline 63 2 845 CARE 2273 Electrolux Philippines Inc Unit B 12F Cyber Sigma Bldg Lawton Avenue McKinley West Taguig Philippines 1634 Trunkline 63 2 737 4757 Website www electrolux com ph Email wecare electrolux com Malaysia Consumer Care Center Tel 1300 88 11 22 Electrolux Home Appliances Sdn Bhd Corporate Office Address Unit T2 7 7th Floor Tower 2 PJ33 No...

Page 15: ...15 2018 Electrolux Home Products Pty Ltd EMAN_EMM23M38GB_Micro_Apr18 ...

Reviews: