10
7.
Installation
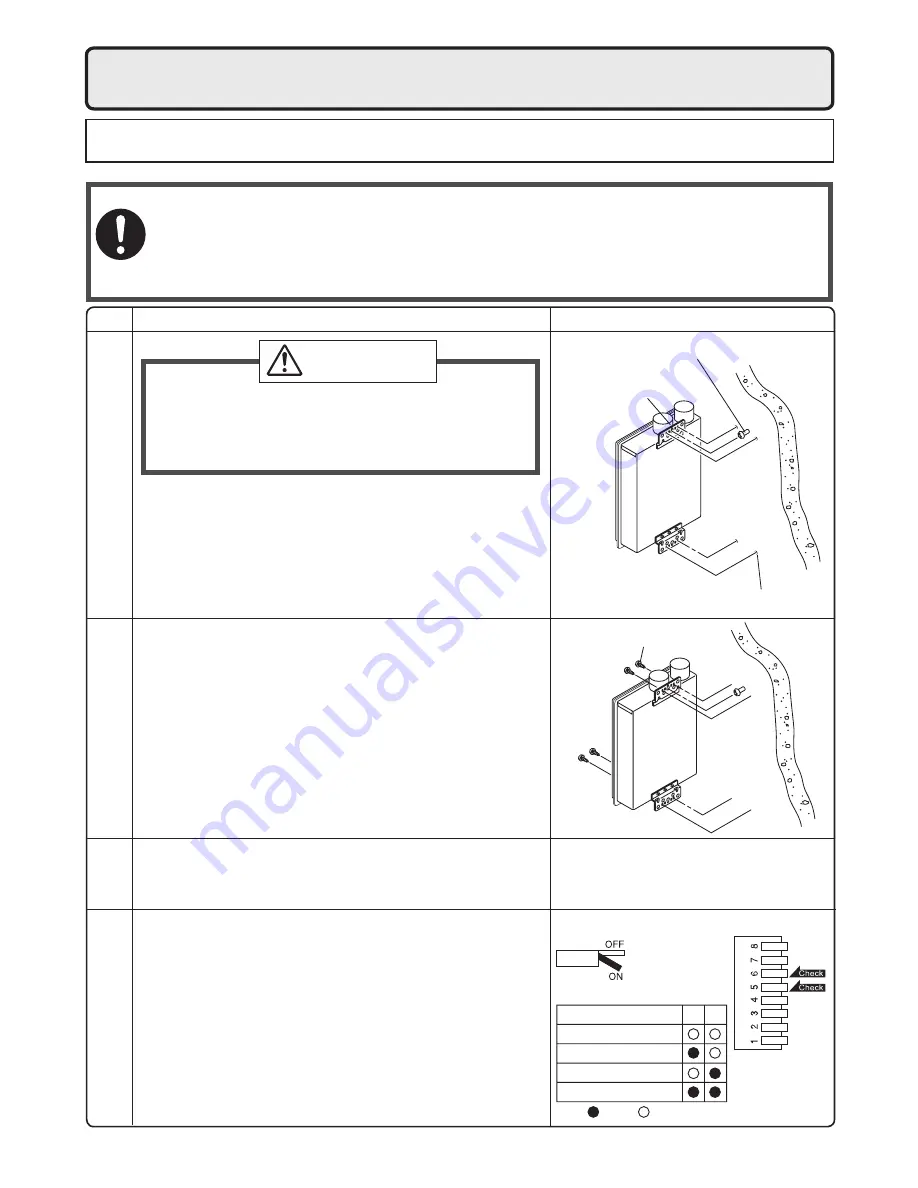
Securing to the wall
Illustration
$IFDL
%SJMMIPMFTGPSUIFSFNBJOJOHGPVSTDSFXT
)BOHUIFVOJUBHBJOCZUIFàSTUTDSFXBOEUIFO
insert and tighten the remaining four screws.
5BLFXBUFSQSPPàOHNFBTVSFTTPUIBUXBUFSEPFT
not enter the building from screws mounting the
device.
r.BLFTVSFUIFVOJUJTJOTUBMMFETFDVSFMZTPUIBUJUXJMM
OPUGBMMPSNPWFEVFUPWJCSBUJPOTPSFBSUIRVBLFT
%SJMMBTJOHMFTDSFXIPMFNBLJOHTVSFUPIJUBTUVE
*OTFSUBOEUJHIUFOUIFTDSFXBOEIBOHUIFVOJUCZ
UIFVQQFSXBMMNPVOUJOHCSBDLFU
3. Determine the positions for the remaining four screws
UXPGPSUIFUPQCSBDLFUBOEUXPGPSUIFCPUUPNBOE
remove the unit.
r5IFXFJHIUPGUIFEFWJDFXJMMCFBQQMJFEUPUIFXBMM*GUIFTUSFOHUIPGUIFXBMMJTOPU
sufficient, reinforcement must be done to prevent the transfer of vibration.
r%POPUESPQPSBQQMZVOOFDFTTBSZGPSDFUPUIFEFWJDFXIFOJOTUBMMJOH*OUFSOBMQBSUTNBZ
be damaged and may become highly dangerous.
r*OTUBMMUIFVOJUPOBWFSUJDBMXBMMBOEFOTVSFUIBUJUJTMFWFM
-PDBUJOH4DS
FX)PMFT
.PVOUJOH
Structur
e
r8IFOJOTUBMMJOHXJUICBSFIBOETUBLFDBVUJPOUP
not inflict injury.
r#FDBSFGVMOPUUPIJUFMFDUSJDBMXJSJOHHBTPSXBUFS
piping while drilling holes.
Item
CAUTION
Be sure to do
.PVOUJOH#SBDLFU
(upper)
-PDBUJPOPG4DSFX)PMF
-PDBUJOH4DSFX)PMFT
Installations at Elevations
"CPWFGU
r"EKVTUUIFEJQTXJUDIFTBTJMMVTUSBUFEJOUIFUBCMFUP
the right if this water heater is installed at an altitude
PGGU NPSIJHIFS
r%JTDPOOFDU QPXFS UP UIF XBUFS IFBUFS CFGPSF
DIBOHJOH UIF EJQ TXJUDIFT 'BJMVSF UP QFSGPSN UIJT
TUFQ XJMM SFTVMU JO B DPEF EJTQMBZFE PO UIF
remote controller and a cease in operation. If this
occurs, disconnect, then reconnect power to the
water heater to reset the system.
Note : Please refer to page 31 for the location of the
EJQTXJUDICBOL
Anchoring Screw
* Do not change any other dipswitches.
* High elevation adjustment.
6
5
2,001 - 4,000 ft (611 - 1,220m)
0 - 2,000 ft (0 - 610m)
ON=
OFF=
4,001 - 6,000 ft (1,221 - 1,830m)
6,001 - 8,000 ft (1,831 - 2,440m)


