background image

CARE AND CLEANING

Caution!

  Unplug the appliance before

carrying out any maintenance operation.

This appliance contains hydrocarbons in its
cooling unit; maintenance and recharging

must therefore only be carried out by authorized
technicians.

Defrosting of the refrigerator

Frost is automatically eliminated from the evapo-
rator of the refrigerator compartment every time
the motor compressor stops, during normal use.
The defrost water drains out through a trough in-
to a special container at the back of the appli-
ance, over the motor compressor, where it evap-
orates.
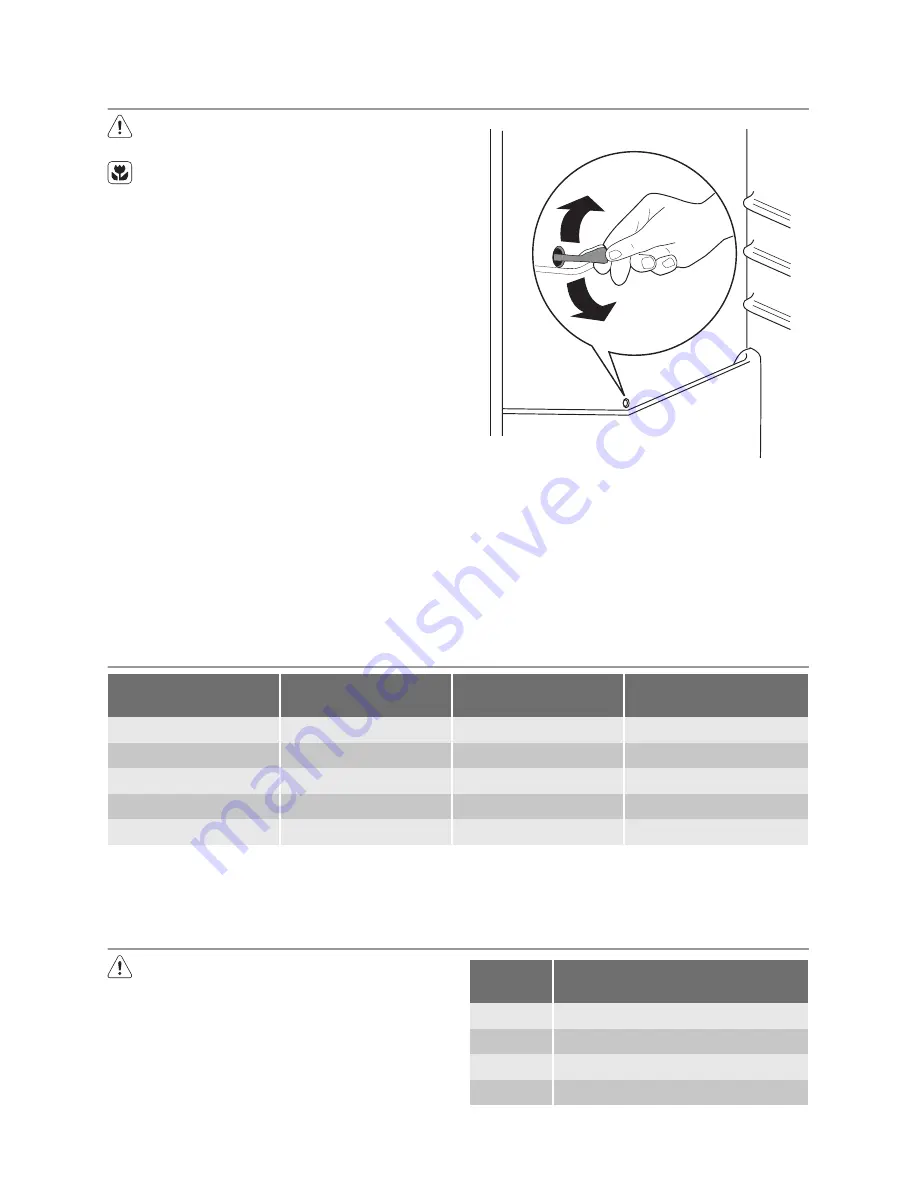
It is important to periodically clean the defrost wa-
ter drain hole in the middle of the refrigerator com-
partment channel to prevent the water overflow-
ing and dripping onto the food inside. Use the spe-
cial cleaner provided, which you will find already
inserted into the drain hole.

Defrosting of the freezer

The freezer compartment of this model, on the
other hand, is a "no frost" type. This means that
there is no buildup of frost when it is in operation,
neither on the internal walls nor on the foods.
The absence of frost is due to the continuous cir-
culation of cold air inside the compartment, driv-
en by an automatically controlled fan.

TECHNICAL DATA


ENA34733X

ENA34733W

ENA38733W

ENA38733X

Dimension


Height

1850 mm

2010 mm


Width

595 mm

595 mm


Depth

648 mm

648 mm

Rising Time


18 h

18 h

The technical information are situated in the rat-
ing plate on the internal left side of the appliance
and in the energy label.

INSTALLATION

Caution!

  Read the "Safety Information"

carefully for your safety and correct

operation of the appliance before installing the
appliance.

Positioning

Install this appliance at a location where the ambi-
ent temperature corresponds to the climate class
indicated on the rating plate of the appliance:

Climate

class

Ambient temperature

SN

+10°C to + 32°C

N

+16°C to + 32°C

ST

+16°C to + 38°C

T

+16°C to + 43°C

 electrolux

Summary of Contents for ENA34733X

Page 1: ...user manual istruzioni per l uso bruksanvisning Fridge Freezer Frigo Congelatore Kyl frys ENA34733X ENA38733X ENA38733W ...

Page 2: ...his will prevent it from be coming a death trap for a child General safety Caution Keep ventilation openings clear of obstruction The appliance is designed exclusively for do mestic use The appliance is intended for keeping foodstuff and or beverages in a normal household as ex plained in this instruction booklet Do not use a mechanical device or any artificial means to speed up the thawing proces...

Page 3: ...trical connection carefully follow the instructions given in specific paragraphs Unpack the appliance and check if there are damages on it Do not connect the appliance if it is damaged Report possible damages imme diately to the place you bought it In that case retain packing It is advisable to wait at least four hours before connecting the appliance to allow the oil to flow back in the compressor...

Page 4: ...hed For a correct storage of the food select the Eco mode function that guarantee the following tem peratures are set 5 C in the fridge 18 C in the freezer Wait until the inside compartment temperature reach 18 C before introducing the goods in the freezer compartment To select a different temperature see Temper ature regulation Switching off The appliance is shut off by pressing key A for more th...

Page 5: ...l the corre sponding icon appears You must confirm the choise by pressing key E within few sec onds You will hear the buzzer and the icon re mains lighted The Shopping function shuts off automatically af ter approximately 6 hours It is possible to de ac tivate the function at any time by pressing key D until the corresponding icon will flash and then key E Eco Mode Function Press the key D several...

Page 6: ...me seconds Then it returns on the normal operation showing the temperature of the selected compartment During the alarm phase the buzzer can be switch ed off by pressing key E FIRST USE Cleaning the interior Before using the appliance for the first time wash the interior and all internal accessories with luke warm water and some neutral soap so as to re move the typical smell of a brand new produc...

Page 7: ...t and vegetable compartments is preserved for longer When the ventilation slots are opened more air circulation results in a lower air moisture content in the fruit and vegetable compartments FreshZone drawer TheFreshZonedrawer is suitable for storing fresh food like fish meat seafood because the temper ature is lower here than in the rest of the fridge HELPFUL HINTS AND TIPS Normal Operating Soun...

Page 8: ...Defrosting of the freezer The freezer compartment of this model on the other hand is a no frost type This means that there is no buildup of frost when it is in operation neither on the internal walls nor on the foods The absence of frost is due to the continuous cir culation of cold air inside the compartment driv en by an automatically controlled fan TECHNICAL DATA ENA34733X ENA34733W ENA38733W E...

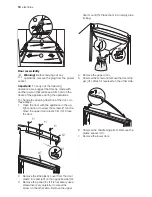
Page 9: ...e earthed The power sup ply cable plug is provided with a contact for this purpose If the domestic power supply socket is not earthed connect the appliance to a separate earth in compliance with current regulations con sulting a qualified electrician The manufacturer declines all responsibility if the above safety precautions are not observed This appliance complies with the E E C Directives Rear ...

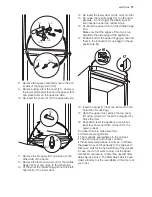
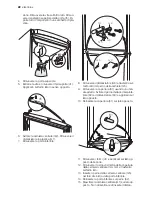
Page 10: ...ion Unscrew the screws t1 and re move the upper door plastic trim t2 Close the door t1 d7 t1 t1 t2 t3 2 Remove the little plastic cover from the door plastic trim and refit on the opposite side t3 3 Remove the panel t4 If it is necessary use a screwdriver very carefully Unscrew the screw on the other side Remove the upper door mount t5 Place them in an empty plas tic bag t5 t4 4 Remove the upper d...

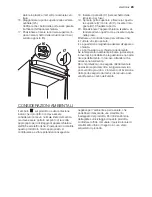
Page 11: ... doors run parallel to the side edge of the appliance 17 Position and fix the upper hinge you can find them in the instruction for use bag on the op posite side t6 t6 t7 18 Insert the panel t7 that can be found in the instruction for use bag 19 Open the upper door attach the top cover t2 using screws t1 Insert the magnet d7 Close the door 20 Reposition level the appliance wait for at least four ho...

Page 12: ... electronic equipment By ensuring this product is disposed of correctly you will help prevent potential negative consequences for the environment and human health which could otherwise be caused by inappropriate waste handling of this product For more detailed information about recycling of this product please contact your local council your household waste disposal service or the shop where you p...

Page 13: ...ossano subire scosse elettriche o chiudersi dentro l apparecchio Se questo nuovo apparecchio che è dotato di guarnizioni magnetiche nello sportello va a so stituirne uno più vecchio avente sportello o co perchio con chiusure a molla si deve rendere inutilizzabili tali chiusure prima di eliminare l ap parecchio sostituito per evitare che diventi una trappola mortale per i bambini Avvertenze di sicu...

Page 14: ...di plastica Non utilizzare mai asciugacapelli o altri apparec chi riscaldanti per accelerare lo sbrinamento Un calore eccessivo può danneggiare le parti in plastica interne e l umidità può penetrare nel sistema elettrico rendendolo sotto tensione Ispezionare regolarmente lo scarico dell acqua di sbrinamento Lo scarico deve essere sem pre perfettamente libero L ostruzione dello sca rico può causare...

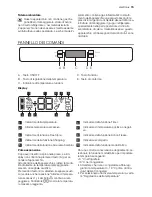
Page 15: ...catore di temperatura positiva o negati va 3 Indicatore di funzione FreeStore 8 Indicatore della funzione Action Freeze 4 Indicatore della funzione Shopping 9 Indicatore scomparto 5 Indicatore della funzione Sicurezza bambini 10 Indicatore della funzione modalità Eco Prima accensione Dopo aver inserito la spina nella presa se il di splay non si illumina premere il tasto A per ac cendere l apparecc...

Page 16: ...Do po 2 C appare la lettera H Premere il tasto E per confermare Il frigorifero funziona ora in modalità di risparmio per le vacanze Importante Il vano frigorifero deve essere vuoto quando si attiva la funzione Holiday Funzione Sicurezza bambini La funzione Sicurezza bambini si attiva premendo il tasto D se necessario più volte finché appare il simbolo Confermare la selezione premendo entro alcuni ...

Page 17: ...la selezione premendo entro alcuni secondi il tasto E Si avverte un segnale acusti co e il simbolo rimane acceso Con questa funzione si attiva un timer preimpo stato a 30 minuti che può essere regolato tra 1 e 90 minuti premendo il tasto B per selezionare i minuti desiderati Al termine del tempo selezionato appaiono le indi cazioni seguenti sull indicatore lampeggia il simbolo il simbolo lampeggia...

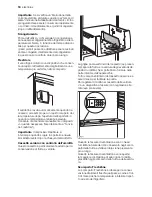
Page 18: ...re riferimento a Funzio ne FreeStore Importante Il dispositivo FreeStore si interrompe quando si apre lo sportello e riavvia immediatamente dopo la chiusura del suddetto Cassetto verdura con controllo dell umidità Questo cassetto è particolarmente adatto per la conservazione di frutta e verdura La griglia posta sul fondo del cassetto se presen te separa la frutta e la verdura dagli eventuali de po...

Page 19: ...sivamente da tecnici autorizzati Sbrinamento del frigorifero Durante l uso normale la brina è eliminata automa ticamente dall evaporatore del vano frigorifero ogni volta che il motocompressore si arresta L ac qua di sbrinamento è scaricata attraverso un con dotto in un contenitore speciale sul retro dell ap parecchio sopra il motocompressore dove eva pora È importante pulire periodicamente il foro...

Page 20: ...st ultimo e lo spigolo superiore dell apparecchio di almeno 100 mm Se possibile tuttavia evitare di installa re l apparecchio sotto un pensile Per consentire un perfetto livellamento dell apparecchio sono provvisti uno o più piedini regolabili Avvertenza Deve essere possibile scollegare l apparecchio dalla rete elettrica eseguire perciò l installazione facendo sì che la spina rimanga facilmente ac...

Page 21: ...C Reversibilità della porta Avvertenza Prima di eseguire le operazioni descritte estrarre la spina dalla presa Importante Per eseguire le seguenti operazioni si raccomanda di farsi aiutare da un altra persona che tenga ben ferme le porte dell apparecchiatura Per cambiare la direzione di apertura della porta procedere come segue 1 Aprire la porta con l apparecchiatura in posi zione verticale Estrar...

Page 22: ...ato del perno della cerniera m5 9 Rimuovere la copertura b1 usando un uten sile adatto Svitare il perno della cerniera infe riore b2 e il distanziatore b3 e applicarli sul lato opposto 10 Reinserire la copertura b1 sul lato opposto b1 b2 b3 11 Rimuovere i fermi d1 e applicarli sul lato op posto delle porte 12 Rimuovere il perno di sinistra della copertura della cerniera centrale m3 m4 e trasferirl...

Page 23: ...inverno è possibile che la guarnizione non ade risca perfettamente In tal caso attendere che aderisca naturalmente Per chi preferisca non eseguire direttamente le operazioni sopra descritte rivolgersi al servizio post vendita più vicino L intervento di inversione delle porte eseguito dai tecnici del servizio post vendita sarà a carico dell utente CONSIDERAZIONI AMBIENTALI Il simbolo sul prodotto o...

Page 24: ...eller löper risk att bli innestäng da Om denna produkt som har magnetiska dörr tätningar skall ersätta en äldre produkt som har en fjäderbelastad spärr i dörrarna var noga med att göra fjäderspärren obrukbar innan du kasserar den gamla produkten Då finns det ing en risk att produkten blir en dödsfälla för barn Allmän säkerhet Försiktighet Se till att ventilationsöppningarna inte blockeras eller tä...

Page 25: ...as på produktens botten Installation Viktigt För den elektriska anslutningen följ noga anvisningarna i respektive avsnitt Packa upp produkten och kontrollera att den inte har några utvändiga skador Anslut inte pro dukten om den är skadad på något sätt Rap portera omedelbart eventuella skador till din återförsäljare och spara i så fall förpacknings materialet Vi rekommenderar att du väntar minst fy...

Page 26: ...displayen visas den högsta uppnådda tem peraturen För korrekt förvaring av dina matvaror välj Eko funktionen som garanterar att följande temperatu rer ställs in 5 C i kylskåpet 18 C i frysen Vänta tills temperaturen når 18 C i frysen in nan du lägger in matvaror Se avsnittet Temperaturreglering om du vill välja en annan temperatur Stänga av produkten Håll strömbrytaren A intryckt i mer än en sekun...

Page 27: ...n ljudsignal och symbolen förblir tänd Shopping funktionen stängs av automatiskt efter cirka 6 timmar Du kan när som helst stänga av funktionen genom att trycka på knapp D tills mot svarande symbol börjar att blinka och sedan trycka på knapp E Eko funktionen Tryck på knapp D flera gånger vid behov tills motsvarande symbol visas på displayen Tryck på knappen E för att bekräfta valet Du hör en ljuds...

Page 28: ...napp E NÄR MASKINEN ANVÄNDS FÖRSTA GÅNGEN Invändig rengöring Innan du använder produkten första gången ren gör dess insida och alla invändiga tillbehör med ljummet vatten och en liten mängd neutral såpa för att ta bort den typiska lukten hos nya produk ter Eftertorka sedan noga Viktigt Använd inga starka rengöringsmedel el ler skurpulver eftersom sådana produkter skadar ytfinishen DAGLIG ANVÄNDNIN...

Page 29: ...ationsöppningarna är öppna högre luftcirkulation resulterar i en lägre fuktnivå i frukt och grönsakslådan FreshZone låda Lådan FreshZone är lämplig för förvaring av färs ka livsmedel som fisk kött skaldjur eftersom tem peraturen här är lägre än övriga delen av kylen RÅD OCH TIPS Normala ljud under drift Det kan höras ett svagt porlande och ett bubb lande ljud när köldmedlet pumpas genom spi ralrör...

Page 30: ...ömningshål i mitten av kylskåpsutrym met för att undvika att vattnet rinner över och drop par ned på matvarorna Använd medföljande spe cialverktyg som redan sitter i tömningshålet Avfrostning av frysen Frysavdelningen på denna modell är emellertid av frostfri typ Detta innebär att det inte bildas nå gon frost under drift varken på innerväggarna el ler matvarorna Att frost inte bildas beror på en k...

Page 31: ...tter Varning Det måste gå att koppla bort produkten från elnätet Stickkontakten måste därför vara lätt att komma åt när produkten har installerats A B mm mm min 100 20 Elektrisk anslutning Kontrollera före anslutning till ett eluttag att nät spänningen och nätfrekvensen överensstämmer med de värden som anges på typskylten Produkten måste jordas Nätkabelns stickkontakt är försedd med en kontakt för...

Page 32: ...de sätt för att ändra dörrarnas öpp ningsriktning 1 Öppna dörrarna med produkten i upprätt po sition Lossa skruvarna t1 och avlägsna den övre dörrens plastlist t2 Stäng dörren t1 d7 t1 t1 t2 t3 2 Lossa den lilla plastkåpan från plastlisten och sätt fast kåpan på motsatta sidan t3 3 Avlägsna panelen t4 Använd vid behov en skruvmejsel försiktigt Skruva loss skruven på andra sidan Avlägsna det övre d...

Page 33: ...6 Haka fast den övre dörren på det mellersta gångjärnet m5 Kontrollera att dörrkanterna löper parallellt med produktens kanter 17 Positionera och fäst det övre gångjärnet finns i påsen med bruksanvisningen på mot satta sidan t6 t6 t7 18 Sätt fast panelen t7 finns i påsen med bruks anvisningen 19 Öppna den övre dörren och montera den övre panelen t2 med skruvar t1 Sätt i mag neten d7 Stäng dörren 2...

Page 34: ...ng av el och elektronikkomponenter Genom att säkerställa att produkten hanteras på rätt sätt bidrar du till att förebygga eventuellt negativa miljö och hälsoeffekter som kan uppstå om produkten kasseras som vanligt avfall För ytterligare upplysningar om återvinning bör du kontakta lokala myndigheter eller sophämtningstjänst eller affären där du köpte varan 34 electrolux ...

Page 35: ...electrolux 35 ...
Page 36: ...210621399 A 262010 www electrolux com shop ...

Reviews: