15
OPERATION
Starting-up - Temperature Regulation
Turn the thermostat knob clockwise to the required
setting (beyond position «
O
»); the recommended set-
ting is between 2 and 4.
Temperature is regulated automatically and can be in-
creased by turning the knob to lower numbers, or de-
creased by turning it to higher numbers. However the
exact setting should be chosen keeping in mind that
the temperature inside the refrigerator depends on:
room temperature;
how often the door is opened;
the quantity of food stored in the refrigerator;
location of appliance.
To stop the appliance, simply turn the thermostat
knob to position «
O
».
When the refrigerator is set for the coldest temper-
ature, with a high surrounding room temperature
and a great quantity of foods, it will probably be in
constant use, with consequent frosting on the
back wall of the compartment. If this does in fact
occur, the knob should be set to obtain a slightly
higher temperature. In this way the refrigerator au-
tomatically defrosts, with a considerable energy
saving.
Refrigeration of foods and drinks
To achieve the best results with the refrigerator com-
partment, you should follow one or two very simple
rules:
Do not put warm foods or evaporating liquids in the
refrigerator.
Cover or wrap foods (particularly if they have a strong
smell or contain aromatic herbs).
Place the foods so that air can circulate free between
them.
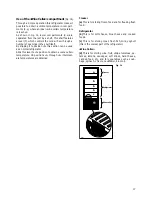
Fig. 14 shows how the foods should be positioned in-
side the refrigerator compartment:
Raw meat
(all types): it should be stored in plastic
bags and placed in position (c) (Fig. 14), where it can
be stored for one or two days at most.
Fruit and vegetables: they should be washed and
placed in the suitable compartments.
Movable shelves
The walls of the refrigerator are equipped with a series
of runners so that the shelves can be positioned as
desired.
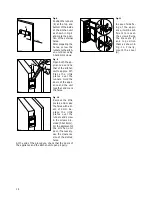
Fig. 12
Positioning the door shelves
To permit storage of food packages of various sizes,
the door shelves can be adjusted in height.
To make these adjustments proceed as follows:
Gradually pull the shelf in the direction of the arrows
until it comes off, then reposition as required.
Fig. 13
D040
D450


