background image

12

180°

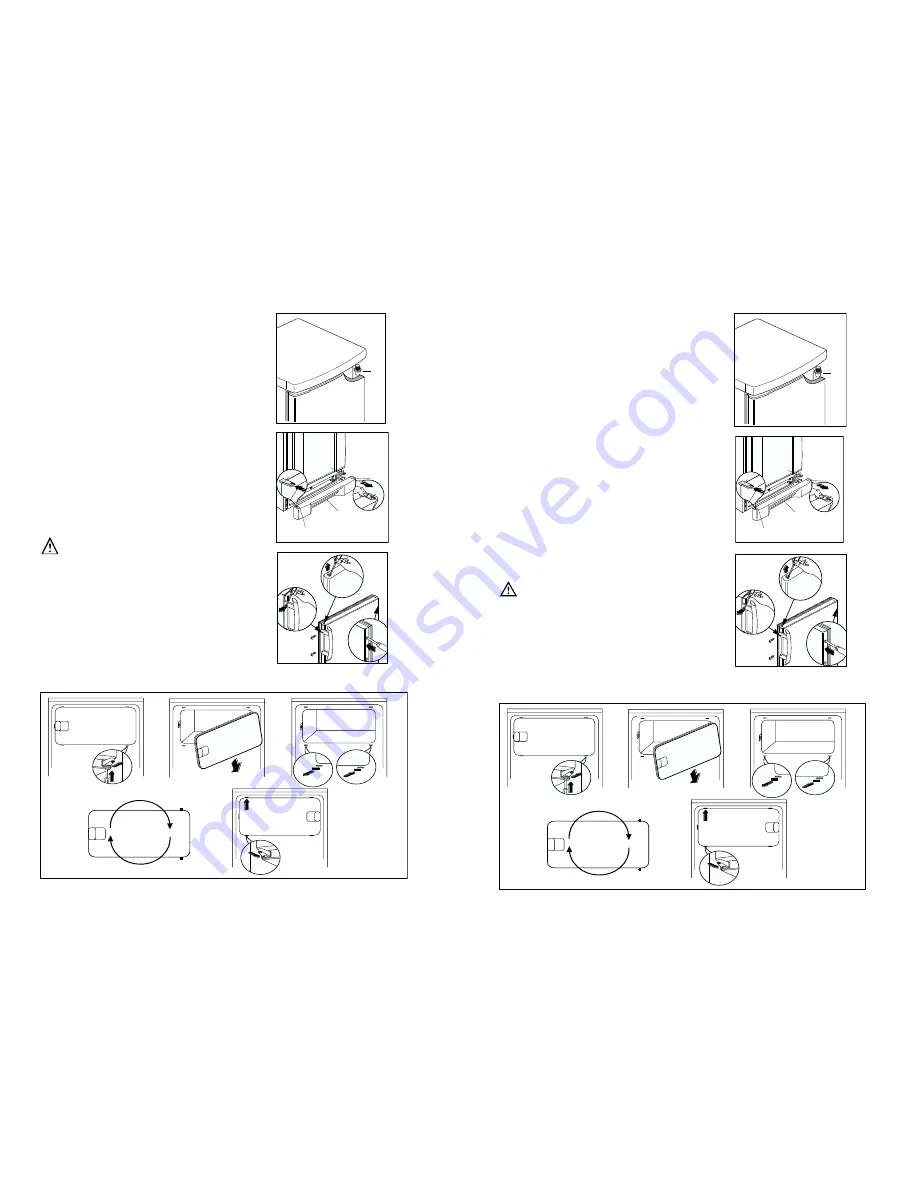
Anschlagwechsel Verdampferfachtür

G

Türanschlagwechsel

Bevor Sie nachstehende Arbeitsvorgänge durchführen,
Netzstecker unbedingt aus der Steckdose ziehen!
Den Wechsel auf folgende Weise ausführen:
1. Entlüftungsgitter (D) abnehmen. Unteres Scharnier (E)

abnehmen;

2. Tür vom oberen Stift (G) abnehmen.
3. Nachdem Sie die Stöpseln entternt haben, die auf der

gegenüberliegenden Seite wieder einzu-setzen sind,
nehmen Sie den oberen Stift und montieren Sie ihn an
der gegenüberliegenden Seite.

4. Tür wieder einsetzen.
5. Unteres Scharnier (E) auf gegenüberliegende Türseite

montieren und mittels der vorher entnommenen
Schrauben befestigen.

6. Abdeckung (F) vom Entlüftungsgitter (D)

herausschieben und auf gegenüberliegende Seite
montieren. Entlüftungsgitter wieder einsetzen.

7. Griffe abnehmen und auf gegeüberliegenden Seite

befestigen. Mit einem Senkstift die Plastikstöpsel auf
der gegenüberliegenden Seite des Griffes
durchlöchern. Mit dem im Beipack enthaltenen
Plastikstöpseln, die freibliebenen Löcher abdecken.

Achtung

Vergewissern Sie sich nach Ausführung des
Anschlagwechsels der Türen, daß alle Schrauben fest
angezogen sind und überprüfen Sie auch, ob die
Magnetdichtung am Möbel perfekt anliegt. Bei einer
niedrigen Raumtemperatur (z.B. im Winter) kann es
vorkommen, dass die Dichtung nicht perfekt am
Schrank haftet. Die Wiederherstellung der Dichtung
erfolgt automatisch nach gewisser Zeit. Wollen Sie
aber diesen Prozess beschleunige, so genögt es die
Dichtung mit einem Fön zu erwärmen.

F

D

F

F

E

F

33

Door reversibility

1. Unplug the appliance from the power supply

before carrying out the below-mentioned
operations.

2. pull off the ventilation grille (D) which is clipped

into place;

3. remove the bottom hinge (E) by unscrewing its

fixing screws;

4. Remove the door by releasing it from the top

hinge pin (G).

5. Remove the pin (G) from the top hinge , then

mount these on the opposite side, after having
removed the plugs which must be refitted on the
other side.

6. Replace the door.

7. reassemble the lower hinge (E) on the opposite

side, using the screws previously removed; slide
the hole cover (F) out of the ventilation grille (D)
by pushing it in the direction of the arrow and
reassemble it on the opposite side;

8. refit the ventilation grille (D), clipping it into

place.

8. Unscrew the handle. Refit it on the opposite side

after having pierced the plugs with a punch.
Cover the holes left open with the plugs
contained in the documentation pack.

Warning:

After having reversed the opening direction of
the door check that all the screws are properly
tightened and that the magnetic seal adheres to
the cabinet. If the ambient temperature is cold
(i.e. in Winter), the gasket may not fit perfectly to
the cabinet. In that case, wait for the natural
fitting of the gasket or accelerate this process by
heating up the part involved with a normal
hairdrier.

G

Inner door reversal

180°

F

D

F

F

E

F

Summary of Contents for ERC 2723

Page 1: ...h r a n k r e f r i g e r a t e u r f r i g o r i f e r o f r i d g e GEBRAUCHSANWEISUNGEN MODE D EMPLOI INSTRUCTION BOOK LIBRETTO ISTRUZIONI 2222 261 41 ERC 2723 I F D GB ELECTROLUX HOME PRODUCTS OPERATIONS EUROPE ...

Page 2: ... der Dichtung erfolgt automatisch nach gewisser Zeit Wollen Sie aber diesen Prozess beschleunige so genögt es die Dichtung mit einem Fön zu erwärmen F D F F E F 33 Door reversibility 1 Unplug the appliance from the power supply before carrying out the below mentioned operations 2 pull off the ventilation grille D which is clipped into place 3 remove the bottom hinge E by unscrewing its fixing scre...

Page 3: ...tuées par du personnel non qualifié peuvent provoquer des dommages Contactez le Service Après Vente le plus proche et n exigez que des pièces détachées originales Installation Assurez vous après avoir installé l appareil que celuici ne repose pas sur le câble d alimentation Important en cas de dommage au câble d alimentation il faudra le remplacer avec un câble spécial ou un ensemble disponibles c...

Page 4: ...igérant et ses matières isolantes de gaz réfrigérant nocifs à la couche d ozone L appareil ne doit pas être mis au rebut avec les ordures urbaines et la ferraille Il faut éviter d endom mager le circuit de réfrigérant surtout à l arrière de l appareil près de l énchangeur thermique Vous pouvez vous renseigner sur les centres de ramassage auprès de votre bureau municipal Les matériaux utilisés dans...

Page 5: ...tremarque qui en facilite l indentification PS SAN ABS 02 PE 05 PP 06 PS 30 CUSTOMER SERVICE AND SPARE PARTS If the appliance is not functioning properly check that the plug is firmly in the wall socket and the mains power switch is on there is an electricity supply find out by plugging in another appliance the thermostat knob is in the correct position If there are water drops on the bottom of th...

Page 6: ...e en régime continu Dans ce cas il y a un risque de formation excessive de givre sur la paroi postérieure à l intérieur de l appareil Pour éviter cet inconvénient placez le thermostat sur une position moins élevée de façon à permettre un dégivrage automatique et par conséquent des économies de courant UTILISATION Mise en service Enfoncez la fiche dans la prise de courant Tournez le bouton du therm...

Page 7: ...reezing To help you make the most of the freezing process here are some important hints the maximum quantity of food which can be frozen in 24 hrs is shown on the rating plate the freezing process takes 24 hours No further food to be frozen should be added during this period only freeze top quality fresh and thoroughly cleaned foodstuffs prepare food in small portions to enable it to be rapidly an...

Page 8: ... Conseils pour la congélation Règles à respecter pour la congélation le pouvoir max de congélation par 24 heures figure sur la plaque signalétique le processus de congélation prend 24 heures Il vaut mieux ne pas ajouter d autres aliments à congeler pendant ce laps de temps les produits destinés à la congélation doivent être frais bien nettoyés et d excellente qualité préparez de petites portions d...

Page 9: ...sive powders as these will damage the finish Temperature regulation The temperature is automatically regulated and can be increased to achieve a higher temperature warmer by rotating the thermostat knob toward lower settings or reduced colder rotating the knob towards higher settings However the exact setting should be chosen keeping in mind that the temperature inside the refrigerator depends on ...

Page 10: ...quer le code du modèle et le numéro d immatriculation qui se trouvent sur le certificat de garantie ou sur la plaque d immatriculation placée à l intérieur de l appareil à gauche et en bas PR151 25 CONTENTS Warnings 24 Use Cleaning the interior Operation Temperature regulation Fresh food refrigeration Freezing fresh food Storage of frozen food Thawing Ice cube production 26 Use Movable shelves Pos...

Page 11: ...st burns if consumed straight from the appliance Take utmost care when handling your appliance so as not to cause any damages to the cooling unit with consequent possible fluid leakages The appliance must not be located close to radiators or gas cookers Avoid prolonged exposure of the appliance to direct sunlight There must be adequate ventilation round the back of the appliance and any damage to ...

Page 12: ...rieures Dans le sac avec la documentation il y a deux entretoises qui dolvent être montées dans les deux coins supérieurs Desserrez les vis et introduisez les entretoises sous la tête de vis puis resserrer D594 23 Réversibilité de la porte Avant d effectuer les opérations ci dessous débranchez l appareil Pour l inversion procéder comme suit 1 Otez la grille d aération D qui est fixée par un ressor...

Reviews: