background image

16

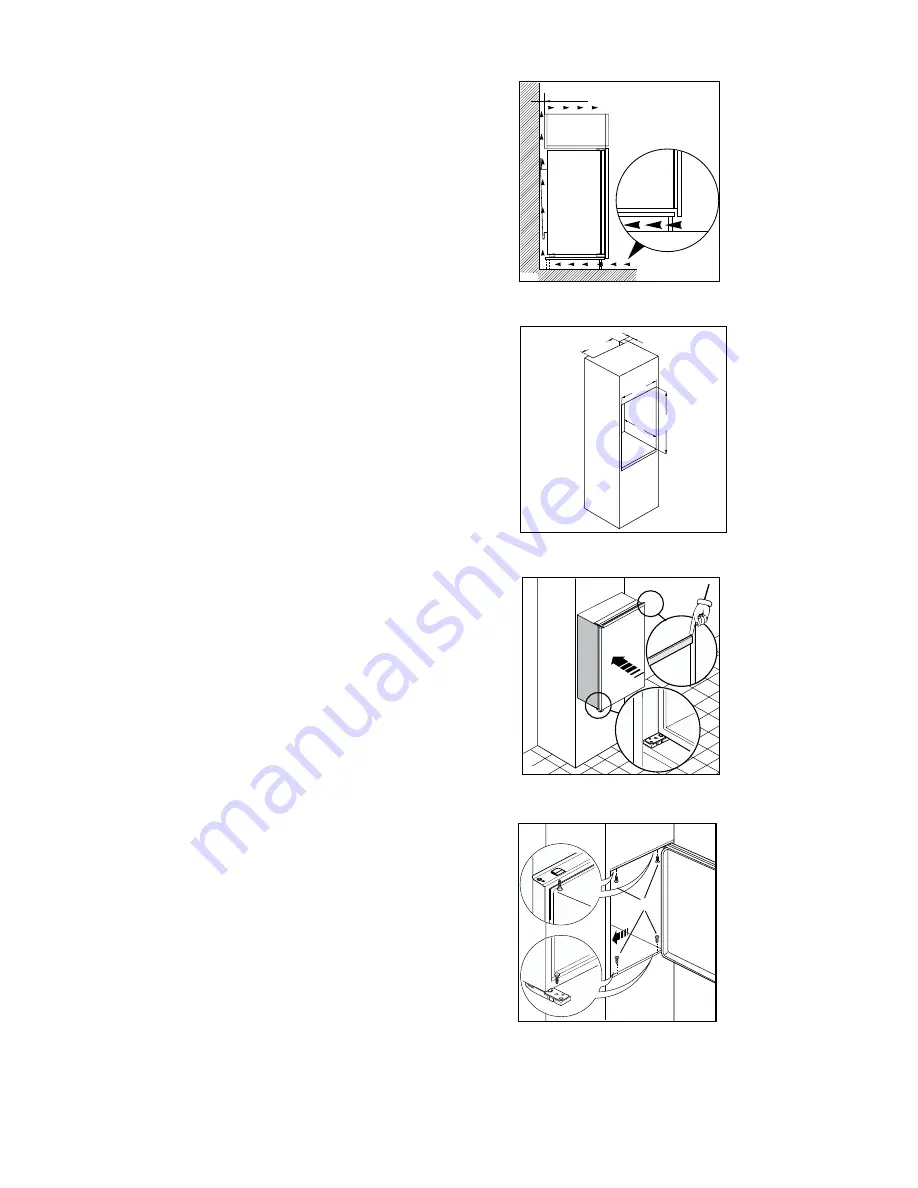
Fit the appliance in the niche by making sure that it
stands against the interior surface of the unit on the
side where the door hinges of the appliances are
fitted. Insert the appliance until the upper strip butts
up against the unit (1) and make sure that the lower
hinge is in line with the surface of the unit (2).

D022

1

2

I

Fasten the appliance with 4 screws provided in the
kit included with the appliance.

Recess dimensions 

Height (1)

880 

mm

Depth 

(2)  

550 mm

Width 

(3)  

560 mm

To ensure adequate ventilation, allow the clearances
shown in figure.

50 mm

min.

200 cm

2

200 cm

2

min.

D567

Furthermore, it is necessary that the cabinet has a
ventilation recess with the following dimensions:

depth 50 

mm

width          540 mm 

PR0

540

50

3

2 1

Summary of Contents for ERN 15300

Page 1: ...f r i d g e f r e e z e r INSTRUCTION BOOK 2222 747 55 ERN 1573 ...

Page 2: ...ose to radiators or boilers Avoid prolonged exposure of the appliance to direct sunlight Do not use other electrical appliances such as ice cream makers inside of refrigerating appliances unless they are approved for this purpose by the manufacturer During Use This appliance is designed for domestic use only specifically for the storage of edible foodstuffs only Frozen food must NOT be re frozen o...

Page 3: ...ecification 12 Installation 13 Positioning 13 Shelf holders 13 Electrical Connection 14 Door Reversal 15 Disposal of old Appliances The symbol on the product or on its packaging indicates that this product may not be treated as household waste Instead it shall be handed over to the applicable collection point for the recycling of electrical and electronic equipment By ensuring this product is disp...

Page 4: ...ring tapes Wash inside the appliance with lukewarm water and bicarbonate of soda 5 ml to 0 5 litre of water Do not use soap or detergent as the smell may linger Dry thoroughly Setting the temperature The temperature inside the appliance is regulated by a single thermostat with 6 temperature positions and an OFF O position Position 1 minimum coldness Position 6 maximum coldness Turn the thermostat ...

Page 5: ...erator correctly here are some more useful hints Raw meat beef pork lamb wild fowl wrap in polythene bags and place on top of the salad crispers Meat can only be stored safely in this way for one or two days at the most Fruit vegetables these should be thoroughly cleaned and placed in the bottom salad crispers Butter cheese these should be placed in special airtight containers or wrapped in alumin...

Page 6: ...void unnecessary frosting in the cabinet by packing all foodstuffs into airtight packages before placing them in the freezer Always leave warm food to cool down to room temperature before placing in the fridge or freezer Food which is to be frozen when cool should be placed in the fridge before being transferred to the freezer Thaw frozen food in the fridge This will ensure safer defrosting of foo...

Page 7: ...use for long periods disconnect from the electricity supply empty all foods and clean the appliance leaving the doors ajar to prevent unpleasant smells Changing the light bulb Should the interior light fail to work first switch off the appliance and disconnect from the electricity supply then replace the bulb as follows Unscrew the light cover and then pull it outward by pressing as shown in the f...

Page 8: ...efrost water overflowing into the fridge periodically clean the water discharge hole in the centre of the V shaped drip collector at the back of the refrigerator compartment behind the fruit and vegetable drawer Use the defrost cleaner provided which you will find already inserted into the discharge hole Remember to wash the defrost cleaner in hot soapy water at regular intervals Dry throughly bef...

Page 9: ...e thermostat control knob to give correct temperature control See Setting the temperature Check that the doors are closed Large quantities of food have recently been placed in the cabinet and or door is frequently opened Check that air ventilation is not obstructed Refer to normal operating sounds Check the drain hole is not blocked see Maintenance and Cleaning Important If you call out an enginee...

Page 10: ...rvice Force Centre you will need to give the following details 1 Your name address and post code 2 Your telephone number 3 Clear and concise details of the fault 4 The model and serial number of the appliance found on the rating plate 5 The purchase date Please note that a valid purchase receipt or guarantee documentation is required for in guarantee service calls For general enquiries concerning ...

Page 11: ... calls to put right an appliance which is improperly installed or calls to appliances outside the European Community EC or European Free Trade Area Appliances found to be in use within a commercial environment plus those which are subject to rental agreements Products of Electrolux manufacture which are not marketed by Electrolux European Guarantee If you should move to another country within Euro...

Page 12: ...AVERAGE DAILY UNITS ELECTRICITY 0 879 kWh GROSS CAPACITY Fridge 173 l Freezer 110 l NET CAPACITY Fridge 170 l Freezer 92 l STAR RATING This figure is based on standard test results in accordance with European Standard EN 153 Actual consumption will depend on how the appliance is used and where it is located ...

Page 13: ...diator or in a very cold room e g an outhouse If these temperatures are exceeded i e warmer or colder then the appliance may not operate correctly For building in and door reversal instructions please refer to the relevant instructions on the following pages Warning IF YOU ARE DISCARDING AN OLD APPLIANCE THAT HAS A LOCK OR CATCH ON THE DOOR YOU MUST ENSURE THAT IT IS MADE UNUSABLE TO PREVENT YOUNG...

Page 14: ...ug which is marked with the letter E or the earth symbol or coloured green and yellow Connect the blue neutral wire to the terminal in the plug which is marked with the letter N or coloured black Connect the brown live wire to the terminal in the plug which is marked with the letter L or coloured red The plug moulded onto the lead incorporates a fuse D207 GREEN YELLOW 13 AMP FUSE BROWN CORD CLAMP ...

Page 15: ...ng direction remove relevant pins at the top and at the bottom Inner door reversal Warning If the ambient temperature is cold i e in Winter the gasket may not fit perfectly to the cabinet In that case wait for the natural fitting of the gasket or accelerate this process by heating up the part involved with a normal hairdrier D163 B A 180 ...

Page 16: ...the lower hinge is in line with the surface of the unit 2 D022 1 2 I Fasten the appliance with 4 screws provided in the kit included with the appliance Recess dimensions Height 1 880 mm Depth 2 550 mm Width 3 560 mm To ensure adequate ventilation allow the clearances shown in figure 50 mm min 200cm2 200cm 2 min D567 Furthermore it is necessary that the cabinet has a ventilation recess with the fol...

Page 17: ...p vent grille B and hinge cover E into position PR266 Ha Hb Hc Hd Separate parts Ha Hb Hc Hd as shown in the figure B E C D Place guide Ha on the inside part of the furniture door up and down as shown in the figure and mark the position of external holes After having drilled holes fix the guide with the screws supplied 21 mm 21 mm ca 50 mm 90 90 ca 50 mm ...

Page 18: ...and mark the holes as indicated in the figure Ha 8mm K Remove the brackets and mark a distance of 8 mm from the outer edge of the door where the nail must be fitted K PR168 Hb Place the small square on the guide again and fix it with the screws supplied Should the lining up of the furniture door be necessary use the clearance of slots At the end of operations it is necessary to check if the door o...

Page 19: ...mbient temperature is cold i e in Winter the gasket may not fit perfectly to the cabinet In that case wait for the natural fitting of the gasket or accelerate this process by heating up the part involved with a normal hairdryer on a low setting PR167 1 Hd Hb Fix cover Hd on guide Hb until it clips into place ...

Page 20: ... Electrolux plc 2006 ...

Reviews: