background image

• Plastic items and pans with non-stick

coatings can retain water droplets. Plastic
items do not dry as well as porcelain and
steel items.

• Put light items in the upper basket. Make

sure that the items do not move.

Caution!

 Make sure that the spray arms

can move freely before you start a
washing program.

Warning!

 Always close the door after

you load or unload the appliance. An
open door can be dangerous.

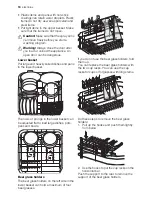
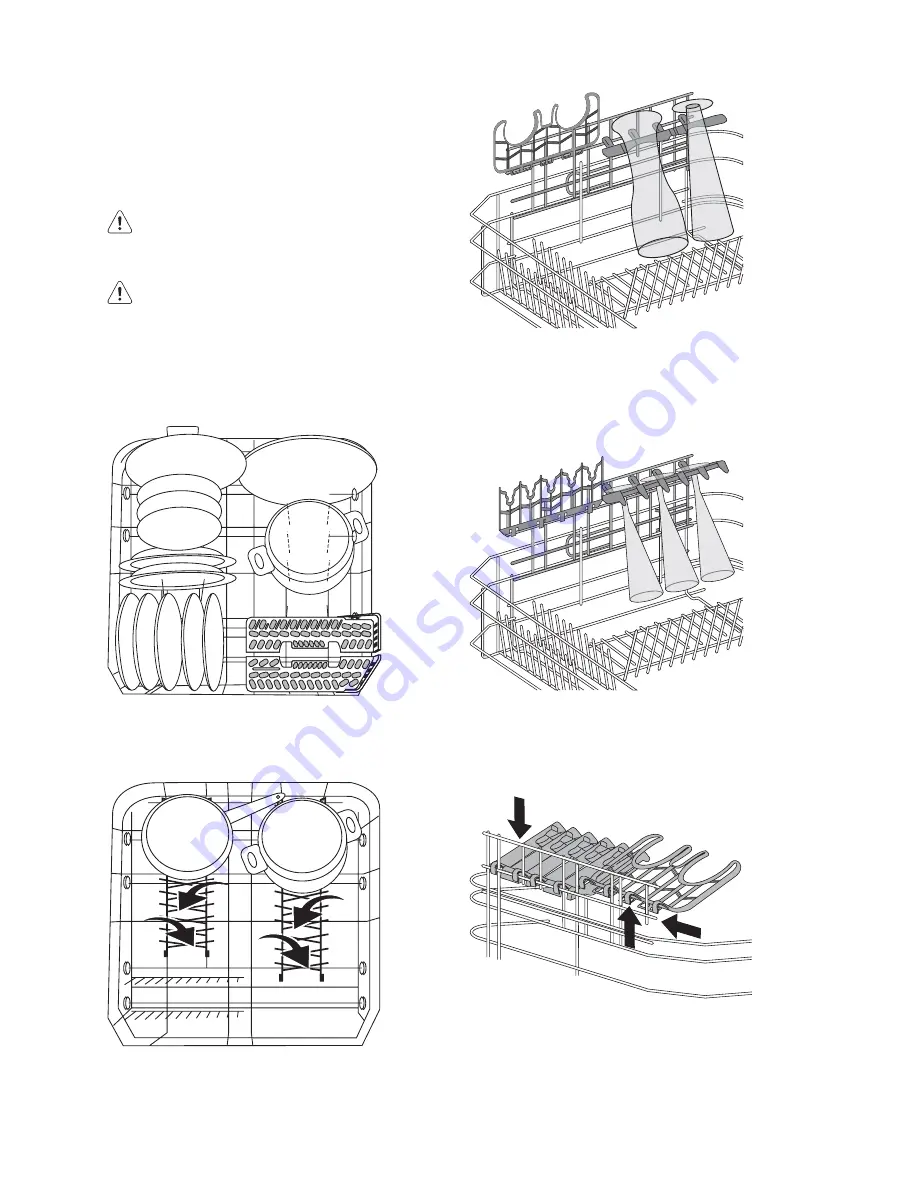
Lower basket

Put large and heavily soiled dishes and pans
in the lower basket.

The rows of prongs in the lower basket can
be adjusted flat to load large dishes, pots,
pans and bowls.

Beer glass holders

The beer glass holders on the left side in the
lower basket can hold a maximum of four
beer glasses.

If you do not use the beer glass holders, fold
them up.
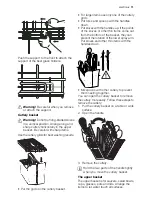
You can replace the beer glass holders with
the two cup racks. You can use the cup
racks for cups or for glasses with long stems.

Do these steps to remove the beer glass
holders:
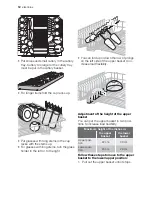
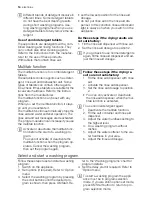
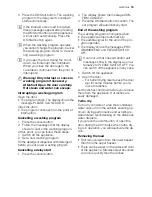
1. Pull up the hooks and push them lightly

from below.

2. Use the hooks to put the cup racks on the

horizontal bar.

Push the support to the rear to remove the
support of the beer glass holders.

10 

 electrolux

Summary of Contents for ESF 68040

Page 1: ...user manual Dishwasher ESF 68040 ...

Page 2: ...n escape Risk of skin burns Do not remove dishes from the dishwasher before the end of the washing program When the washing program is completed disconnect the mains plug from the mains socket and close the water tap Only an authorised service engineer can repair this appliance Use only original spare parts Do not do repairs yourself to prevent injury and damage to the appliance Always con tact th...

Page 3: ...n Do not change the specifications or modify this product Risk of injury and damage to the appliance Do not use the appliance if the mains cable or water hoses are damaged if the control panel worktop or plinth area are damaged so that you can get access to the inner side of the appli ance Contact your local Customer Care Centre Do not drill into the sides of the appliance to prevent damage to hyd...

Page 4: ...plate 8 Filters 9 Lower spray arm 10 Upper spray arm 11 Worktop This appliance has an internal light that comes on when the door opens and goes off when it is closed Internal light equipped with LED lamp CLASS 1 in accordance with IEC 60825 1 1993 A1 1997 A2 2001 If it is necessary to replace the light con tact your local Customer Care Centre 4 electrolux ...

Page 5: ...n to enter a menu of op tions For options available refer to option menu and submenu chart Follow these steps to set an option 1 Switch on the appliance 2 Press the option button 3 The display shows one of the these op tions DELAY START MULTITAB SETTINGS 4 Press one of the scroll buttons to select the required option 5 Press OK Start button to confirm and go into submenu 6 Press one of the scroll ...

Page 6: ... set level 10 CONTRAST You can increase or decrease the contrast of the display 10 levels available Factory set level 6 Display 1 Washing program and option row In this row of lights there are two sec tions The left section refers to the washing programs the right section to the options The washing programs lights come on gradually as the program progresses 2 Text row This row shows the name of th...

Page 7: ...ram Setting the water softener The water softener removes minerals and salts from the water supply Minerals and salts can have bad effect on the operation of the appliance Water hardness is measured in equivalent scales mg I millimol per litre ppm parts per million mmol l millimol per litre international unit for the hardness of water Adjust the water softener in to the water hardness in your area...

Page 8: ... litre of water only the first operation 3 Use the funnel to fill the salt container with salt 4 Remove the salt around the opening of the salt container 5 Turn the cap clockwise to close the salt container It is normal that water overflows from the salt container when you fill it with salt When the salt container is empty the display shows a message This mes sage does not show in the display whil...

Page 9: ... container is empty the display shows a message This mes sage does not show in the display while a washing program operates Loading cutlery and dishes Helpful hints and tips Caution Only use the appliance for household utensils that are suitable for dishwashers Do not use the appliance to clean objects that can absorb water sponges household cloths etc Before you load cutlery and dishes do these s...

Page 10: ...ower basket The rows of prongs in the lower basket can be adjusted flat to load large dishes pots pans and bowls Beer glass holders The beer glass holders on the left side in the lower basket can hold a maximum of four beer glasses If you do not use the beer glass holders fold them up You can replace the beer glass holders with the two cup racks You can use the cup racks for cups or for glasses wi...

Page 11: ... the handles up If the points of the knives or other thin items come out from the bottom of the basket they can prevent the rotation of the lower spray arm Put knives and other thin items with the handles down Mix spoons with other cutlery to prevent them nesting together You can open the cutlery basket to remove the cutlery more easily Follow these steps to remove the cutlery 1 Put the cutlery ba...

Page 12: ... the right You can fold up or down the row of prongs on the left side of the upper basket to in crease load flexibility Adjustment of the height of the upper basket You can put the upper basket in two posi tions to increase load flexibility Maximum height of the dishes in the upper basket the lower basket Upper posi tion 22 cm 30 cm Lower posi tion 24 cm 29 cm Follow these steps to move to the upp...

Page 13: ...uan tity of detergent to decrease pollution Follow these steps to fill the detergent dis penser 1 Open the lid of the detergent dispenser 2 Fill the detergent dispenser A with de tergent The marking shows the dosage 20 approximately 20 g of detergent 30 approximately 30 g of detergent A B 3 If you use a washing program with pre wash put more detergent in the prewash detergent compartment B 4 If yo...

Page 14: ...he multitab function automatically stops the rinse aid and water softener operation The rinse aid and salt messages are deactivated The program duration can increase if you use the multitab function Activate or deactivate the multitab func tion before the start of a washing pro gram You cannot activate or deactivate the multitab function when the program op erates Cancel the washing program then s...

Page 15: ...t a new washing program Cancelling a delay start 1 Press the cancel button 2 The display shows the message CON FIRM CANCEL 3 Press the OK Start button to confirm The set program will automatically start End of the washing program The washing program is complete when The appliance stops automatically The audible signal for the end of the pro gram operates The display shows the messages PRO GRAMME E...

Page 16: ...e serving or removes dust from dishes which have not been used for a long time 1 hot rinse PREWASH Any Partial load to be completed later in the day 1 cold rinse to prevent food scraps to bond Detergent is not necessary with this programme 1 During the AUTOMATIC program the soil level of the dishes is given by how cloudy the water is The program duration and consumptions can change This depends if...

Page 17: ...ter in litres 45 GLASS 0 8 0 9 14 15 PLATE WARMER 0 8 4 PREWASH 0 1 4 1 The display shows the program duration The pressure and temperature of the water the variations of power supply and the quantity of dishes can change these values electrolux 17 ...

Page 18: ...e hole 6 Remove the coarse filter from the micro filter 7 Remove the flat filter C from the bottom of the appliance 8 Clean the filters below running water 9 Put the flat filter C in the bottom of the appliance 10 Put the coarse filter A in the microfilter B and push the filters together 11 Put the filter system in position 12 To lock the filter system turn the handle on the microfilter B clockwis...

Page 19: ...d or restricted with limescale Clean the water tap The water tap is closed Open the water tap The filter in the water inlet hose is blocked Clean the filter The installation of the water inlet hose is not correct The hose can be kinked or squashed Make sure that the installation is correct the display shows the message DRAIN BLOCKED The appliance will not drain There is a blockage in the sink spig...

Page 20: ...ner is adjusted on a wrong level The salt container cap is not closed correctly The dishes are wet and dull No rinse aid has been used The rinse aid dispenser is empty There are streaks milky spots or a bluish coating on glasses and dishes Decrease the rinse aid dosage Dry water drop signs on glasses and dishes Increase rinse aid dosage The detergent can be the cause Technical data Dimensions Widt...

Page 21: ...The appliance must be easily accessible to the technician if a repair is necessary Adjusting the level of the appliance Make sure that the appliance is level to close and seal the door correctly If the level of the appliance is correct the door does not catch on the sides of the cabinet If the door does not close correctly loosen or tighten the ad justable feet until the appliance is level Water c...

Page 22: ... safety valve through the kitchen cabinets an opening of at least 45mm x 90mm is needed Water drain hose The highest point of the drain hose must be no more than 60 cm from the floor and must have a continuous fall to the plumbing con nection The drain hose can be lengthened using ad ditional lengths and connectors These must be purchased from Electrolux Spare Parts The extension length must not e...

Page 23: ...le container at the community waste disposal facilities Warning To discard the appliance follow the procedure Pull the mains plug out of the socket Cut off the mains cable and mains plug and discard them Discard the door catch This prevents children closing themselves inside the appliance and endangering their lives Old appliance Make sure that the appliance goes to the ap plicable collection poin...

Page 24: ... from your home or business If you are outside an Electrolux service area you will bear these costs For information about whether you are within an Electro lux service area please phone 13 13 49 in Australia or 0800 10 66 10 in New Zealand 7 Proof of purchase is required before you can make a claim under this warranty 8 You may not make a claim under this warranty unless the defect claimed is due ...

Page 25: ... is reasonably foreseeable Privacy You acknowledge that in the event that you make a warranty claim it will be necessary for Electrolux and its Authorised Service Centres to exchange information in relation to you to enable Electrolux to meet its obligations un der this warranty Important Notice Before Calling a Service Technician please check carefully the operating instructions service booklet a...

Page 26: ...26 electrolux ...

Page 27: ...electrolux 27 ...

Page 28: ...117960640 00 112008 www electrolux com www electrolux com au ...

Reviews: