background image

If the drying results are not satisfac-
tory we suggest that you:

1. Fill up the rinse aid dispenser with

rinse aid.

2. Activate the rinse aid dispenser.
3. Set the rinse aid dosage to position

2.

• The activation/deactivation of the

rinse aid is only possible with the Mul-
titab function active.

Activation/deactivation of the rinse aid
dispenser

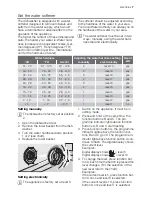
1. Switch on the appliance. It must be in

setting mode.

2. Press and hold, at the same time, the

function buttons B and C. The pro-
gramme indicator lights above function
buttons A, B and C start flashing

3. Press function button B, the programme

indicator lights above function buttons A
and C go off. The programme indicator
light above function button B continues
to flash. The digital display shows the cur-
rent setting.

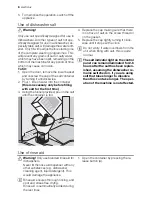
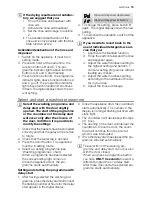
Rinse aid dispenser deactivated

Rinse aid dispenser activated

4. To change the setting, press button B

again. The digital display shows the new
setting.

5. To memorize the operation, switch off the

appliance.

If you decide to revert back to the
use of individual detergents we ad-
vise that you:

1. Deactivate the Multitab function.
2. Fill up the salt container and the rinse

aid dispenser again.

3. Adjust the water hardness setting to

the highest setting and perform 1
normal washing programme without
loading any dishes.

4. Adjust the water hardness setting

according to the hardness of the wa-
ter in your area.

5. Adjust the rinse aid dosage.

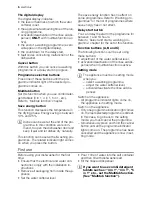
Select and start a washing programme

Select the washing programme and
delay start with the door slightly
opened. The start of the programme
or the countdown of the delay start
will occur only after the closure of
the door. Until then it is possible to
modify the settings

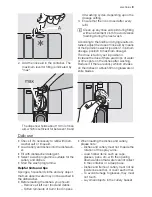
1. Check that the baskets have been loaded

correctly and that the spray arms are free
to rotate.

2. Check that the water tap is opened.
3. Press the on/off button. The appliance

must be in setting mode.

4. Select a washing programme (see

'Washing programmes' chart).
When a programme has been selected
the corresponding light comes on.
Close the appliance door, the pro-
gramme starts automatically.

Setting and starting the programme with
delay start

1. After having selected the washing pro-

gramme, press the delay start button until
the flashing number of hours for the delay
start appear in the digital display.

2. Close the appliance door, the countdown

starts automatically. The number in the
display is no longer flashing but fixed with
static light.

3. The countdown will decrease with steps

of 1 hour.

4. The opening of the door will interrupt the

countdown. Close the door; the count-
down will continue from the point at
which it was interrupted.

5. Once the delay start has elapsed the pro-

gramme will start automatically.

The selection of the washing pro-
gramme and delay start can occur also
with the door closed.
When you press a programme button
you have 

ONLY 3 seconds

 to select a

different programme or a delay start.
After these 3 seconds, the selected pro-
gramme starts automatically.

electrolux 

 15

Summary of Contents for ESF47000

Page 1: ...user manual Dishwasher ESF 47000 ...

Page 2: ...n appli ance use and safety Correct use This dishwasher is only intended for wash ing household utensils suitable for ma chine washing Do not put any solvents in the dishwasher This could cause an explosion Knives and other items with sharp points must be loaded in the cutlery basket with their points down or placed in a horizontal position in the upper basket Only use products detergent salt and ...

Page 3: ...eep children well away from the dish washer when the door is open Installation Check your dishwasher for any transport damage Never connect a damaged ma chine If your dishwasher is damaged con tact your supplier All packaging must be removed before use Any electrical and plumbing work required to install this appliance must be carried out by a qualified and competent person For safety reasons it i...

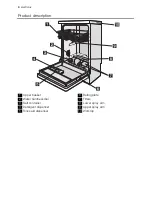
Page 4: ...Product description 1 Upper basket 2 Water hardness dial 3 Salt container 4 Detergent dispenser 5 Rinse aid dispenser 6 Rating plate 7 Filters 8 Lower spray arm 9 Upper spray arm 10 Worktop 4 electrolux ...

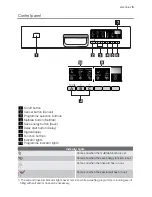
Page 5: ... 9 Indicator lights 10 Programme indicator lights Indicator lights Comes on when the multitab function is set Comes on when the save energy function is set 1 Comes on when the rinse aid has run out 1 Comes on when the special salt has run out 1 The salt and rinse aid indicator lights never come on while a washing programme is running even if filling with salt and or rinse aid is necessary electrol...

Page 6: ...has or not effect Delay start button You can delay the start of the programme for between 1 and 19 hours Refer to Select and start a washing pro gramme chapter for the set of this function Function buttons A B and C The following functions can be set using these buttons adjustment of the water softener level activation deactivation of the rinse aid dis penser when multitab function is active Setti...

Page 7: ...yes 15 18 26 32 2 6 3 2 1 level 4 yes 11 14 19 25 1 9 2 5 1 level 3 yes 4 10 7 18 0 7 1 8 1 level 2 yes 4 7 0 7 1 level 1 no Setting manually The dishwasher is factory set at position 2 1 Open the dishwasher door 2 Remove the lower basket from the dish washer 3 Turn the water hardness dial to position 1 or 2 see chart 4 Replace the lower basket Setting electronically The appliance is factory set a...

Page 8: ...he salt until the container is full 4 Replace the cap making sure that there is no trace of salt on the screw thread or on the gasket 5 Replace the cap tightly turning it clock wise until it stops with a click Do not worry if water overflows from the unit when filling with salt this is quite normal The salt indicator light on the control panel can remain illuminated for 2 6 hours after the salt ha...

Page 9: ...r a bluish film on glassware or knife blades Daily use Check if it s necessary to refill with dish washer salt or rinse aid Load cutlery and dishes into the dishwash er Fill with dishwasher detergent Select a wash programme suitable for the cutlery and dishes Start the wash programme Helpful hints and tips Sponges household cloths and any object that can absorb water may not be washed in the dishw...

Page 10: ... platters Items made from synthetics fibres Only wash stoneware in the dishwasher if it is specially marked as being dishwasher safe by the manufacturer Glazed patterns may fade if machine washed frequently Silver and aluminium parts have a tendency to discolour during washing Residues e g egg white egg yolk and mustard often cause dis colouring and staining on silver Therefore al ways clean left ...

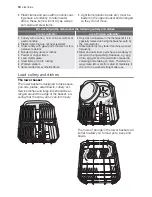
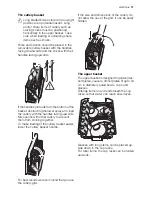
Page 11: ...tlery with the handles facing upwards Mix spoons with other cutlery to prevent them from sticking together To make loading of the cutlery basket easier lower the cutlery basket handle For best results we recommend that you use the cutlery grid If the size and dimensions of the cutlery do not allow the use of the grid it can be easily hidden The upper basket The upper basket is designed for plates ...

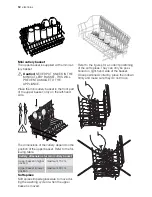
Page 12: ...on of the upper basket Refer to the fol lowing table Cutlery dimensions for mini cutlery basket Upper basket in higher position maximum 15 cm Upper basket in lower position maximum 20 cm Soft spikes Soft spikes impede glassware to move dur ing the washing cycle or when the upper basket is moved Refer to the figures for a correct positioning of the soft spikes They can only be posi tioned on right ...

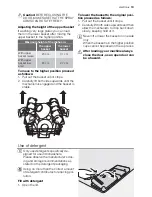
Page 13: ...s stable To lower the basket to the original posi tion proceed as follows 1 Pull out the basket until it stops 2 Carefully lift both sides upwards and then allow the mechanism to drop back down slowly keeping hold of it Never lift or lower the basket on one side only When the basket is in the higher position cups cannot be placed on the cup racks After loading your machine always close the door as...

Page 14: ...which kind of tablets you choose 3 in 1 4 in 1 5 in 1 etc Check whether these detergents are suitable for your water hardness See the manufac turers instructions Once this function is selected it will remain active for all following wash programmes With the selection of this function the inflow of rinse aid and salt from each respective supply container is automatically deactivated and also the in...

Page 15: ...se aid dosage Select and start a washing programme Select the washing programme and delay start with the door slightly opened The start of the programme or the countdown of the delay start will occur only after the closure of the door Until then it is possible to modify the settings 1 Check that the baskets have been loaded correctly and that the spray arms are free to rotate 2 Check that the wate...

Page 16: ...e improved If the save energy function is set dishes can be wet at the end of the programme We recommend to leave the appliance door ajar so that dishes can dry naturally Standby mode If you do not switch off the appliance at the end of the washing programme the appli ance automatically goes into standby mode The standby mode decreases energy con sumption Three minutes after the end of the pro gra...

Page 17: ...e programme duration and consumptions can change This depends if the appliance is fully or not and on the level of soil on the dishes The appliance adjusts automatically the temperature of the water during the main wash 3 This is the perfect daily programme to clean a not fully load Ideal for a family of 4 persons who only want to load breakfast and dinner crockery and cutlery 4 Test programme for...

Page 18: ...cktail stick External cleaning Clean the external surfaces of the machine and control panel with a damp soft cloth If necessary use only neutral detergents Never use abrasive products scouring pads or sol vent acetone trichloroethylene etc Internal cleaning Ensure that the seals around the door the detergent and rinse aid dispensers are cleaned regularly with a damp cloth We recommend every 3 mont...

Page 19: ...en correctly laid or it is kinked or squashed Check the water drain hose connection digital display shows Anti flood device is activated Close the water tap and contact your local Service Force Centre Malfunction Possible cause and solution The programme does not start The dishwasher door has not been properly closed Close the door The main plug is not plugged in Insert the main plug The fuse has ...

Page 20: ...etergent may be the cause Contact the detergent manufacturer con sumer care line If after all these checks the problem persists contact your local Service Force Centre Technical data Dimensions Width Height Depth 45 cm 85 cm 63 cm Electrical connection Voltage Overall power Fuse Information on the electrical connection is given on the rating plate on the inner edge of the dishwasher door Water sup...

Page 21: ...t Installation Warning Any electrical and or plumbing work required to install this appliance should be carried out by a qualified electrician and or plumber or competent person Fitting under a counter kitchen worktop or sink Remove all packaging before positioning the machine If possible position the machine next to a water tap and a drain electrolux 21 ...

Page 22: ...e and sealing of the door When the appliance is correctly levelled the door will not catch on either side of the cab inet If the door does not close correctly loosen or tighten the adjustable feet until the ma chine is perfectly level Water connection Water inlet connection This appliance can be connected to either a hot max 60 or cold water supply With a hot water supply you can have a sig nifica...

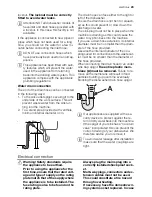
Page 23: ...k into the machine If you use a drain hose extension its internal diameter must be no smaller than the diam eter of the hose provided Likewise the internal diameter of the cou plings used for connections to the waste out let must be no smaller than the diameter of the hose provided When connecting the drain hose to an under sink trap spigot the entire plastic mem brane A must be removed Failure to...

Page 24: ...tential negative consequences for the environment and human health which could otherwise be caused by inappropriate waste handling of this product For more detailed information about recycling of this product please contact your local council your household waste disposal service or the shop where you purchased the product Packaging material The packaging materials are environmentally friendly and...

Page 25: ...electrolux 25 ...

Page 26: ...26 electrolux ...

Page 27: ...electrolux 27 ...

Page 28: ...117959260 00 102008 www electrolux com ...

Reviews: