background image

Welcome to the world of Electrolux

You’ve chosen a first class product from Electrolux,
which hopefully will provide you with lots of pleasure in
the future. Electrolux ambition is to offer a wide variety of
quality products that would make your life even more
comfortable. You can look at some examples on the
cover in this manual. But now it’s time to study this
manual and start using and enjoying the benefits from
your new machine. We promise that it’ll make your life a
little easier. Good luck!

The following symbols are used in this user manual:

Important information concerning your personal safety and information on
how to avoid damaging the appliance.
General information and tips

Environmental information

11

797

284

0 - 12

20

07

electrolux  

 3

Summary of Contents for ESI 66050X

Page 1: ...user manual Dishwasher ESI 66050 ...

Page 2: ...We were thinking of you when we made this product ...

Page 3: ...e You can look at some examples on the cover in this manual But now it s time to study this manual and start using and enjoying the benefits from your new machine We promise that it ll make your life a little easier Good luck The following symbols are used in this user manual Important information concerning your personal safety and information on how to avoid damaging the appliance General inform...

Page 4: ... of rinse aid 13 Daily use 14 Load cutlery and dishes 15 Use of detergent 19 Multi tab function 20 Select and start a washing programme 22 Unloading the dishwasher 24 Washing programmes 24 Care and cleaning 26 What to do if 28 Technical data 31 Hints for test institutes 31 Installation 32 Water connection 33 Electrical connection 36 Environment concerns 36 4 electrolux ...

Page 5: ...ishwashers Avoid opening the door whilst the ap pliance is in operation hot steam may escape Do not take any dishes out of the dishwasher before the end of the washing cycle After use isolate the appliance from the power supply and turn off the wa ter supply This product should be serviced only by an authorized service engineer and only genuine spare parts should be used Under no circumstances sho...

Page 6: ... and plumbing work re quired to install this appliance must be carried out by a qualified and compe tent person For safety reasons it is dangerous to alter the specifications or attempt to modify this product in any way Never use the dishwasher if the elec trical supply cable and water hoses are damaged or if the control panel work top or plinth area are damaged such that the inside of the applian...

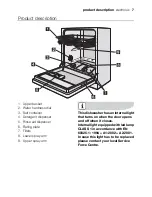
Page 7: ...8 Lower spray arm 9 Upper spray arm This dishwasher has an internal light that turns on when the door opens and off when it closes Internal light equipped with led lamp CLASS 1 in accordance with EN 60825 1 1994 A1 2002 A2 2001 In case this light has to be replaced please contact your local Service Force Centre product description electrolux 7 ...

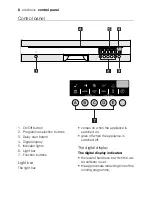
Page 8: ...t bar 7 Function buttons Light bar The light bar comes on when the appliance is switched on goes off when the appliance is switched off The digital display The digital display indicates the level of hardness to which the wa ter softener is set the approximate remaining time of the running programme 8 electrolux control panel ...

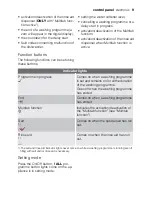
Page 9: ... is active Indicator lights Programme in progress Comes on when a washing programme is set and remains on for all the duration of the washing programme Goes off when the washing programme has ended End Comes on when a washing programme has ended Multitab function Indicates the activation deactivation of the Multitab function see Multitab function Salt 1 Comes on when the special salt has run out R...

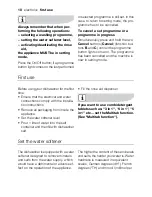
Page 10: ...using your dishwasher for the first time Ensure that the electrical and water connections comply with the installa tion instructions Remove all packaging from inside the appliance Set the water softener level Pour 1 litre of water into the salt container and then fill with dishwasher salt Fill the rinse aid dispenser If you want to use combi detergent tablets such as 3 in 1 4 in 1 5 in 1 etc set t...

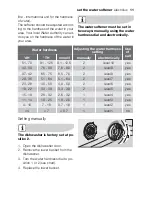
Page 11: ...lly electronically 51 70 91 125 9 1 12 5 2 level 10 yes 43 50 76 90 7 6 9 0 2 level 9 yes 37 42 65 75 6 5 7 5 2 level 8 yes 29 36 51 64 5 1 6 4 2 level 7 yes 23 28 40 50 4 0 5 0 2 level 6 yes 19 22 33 39 3 3 3 9 2 level 5 yes 15 18 26 32 2 6 3 2 1 level 4 yes 11 14 19 25 1 9 2 5 1 level 3 yes 4 10 7 18 0 7 1 8 1 level 2 yes 4 7 0 7 1 level 1 no Setting manually The dishwasher is factory set at po ...

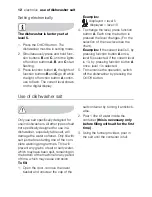
Page 12: ...by pressing function button A once level 1 is selected 5 To memorise the operation switch off the dishwasher by pressing the On Off button Use of dishwasher salt Only use salt specifically designed for use in dishwashers All other types of salt not specifically designed for use in a dishwasher especially table salt will damage the water softener Only fill with salt just before starting one of the ...

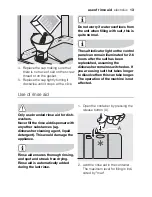
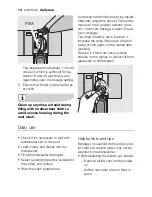
Page 13: ...d on If you are using salt that takes longer to dissolve then this can take longer The operation of the machine is not affected Use of rinse aid Only use branded rinse aid for dish washers Never fill the rinse aid dispenser with any other substances e g dishwasher cleaning agent liquid detergent This would damage the appliance Rinse aid ensures thorough rinsing and spot and streak free drying Rins...

Page 14: ... position 4 Increase the dose if there are drops of water or lime spots on the dishes after washing Reduce it if there are sticky whitish streaks on the dishes or a bluish film on glassware or knife blades Daily use Check if it s necessary to refill with dishwasher salt or rinse aid Load cutlery and dishes into the dishwasher Fill with dishwasher detergent Select a wash programme suitable for the ...

Page 15: ...r mother of pearls handles Plastic items that are not heat resist ant Older cutlery with glued parts that are not temperature resistant Bonded cutlery items or dishes Pewter or copper items Lead crystal glass Steel items prone to rusting Wooden platters Items made from synthetics fibres Only wash stoneware in the dishwasher if it is specially marked as being dishwasher safe by the manufacturer Gla...

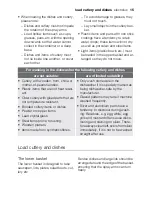
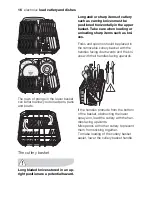
Page 16: ...ding or unloading sharp items such as kni ves Forks and spoons should be placed in the removable cutlery basket with the handles facing downwards and the kni ves with their handles facing upwards If the handles protrude from the bottom of the basket obstructing the lower spray arm load the cutlery with the han dles facing upwards Mix spoons with other cutlery to prevent them from sticking together...

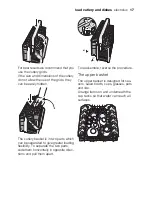
Page 17: ...h can be separated to give greater loading flexibility To separate the two parts slide them horizontally in opposite direc tions and pull them apart To reassemble reverse the procedure The upper basket The upper basket is designed for sau cers salad bowls cups glasses pots and lids Arrange items on and underneath the cup racks so that water can reach all surfaces load cutlery and dishes electrolux...

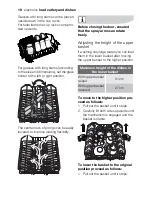
Page 18: ...djusting the height of the upper basket If washing very large plates you can load them in the lower basket after moving the upper basket to the higher position Maximum height of the dishes in the lower basket With upper basket raised 31 cm With upper basket lowered 27 cm To move to the higher position pro ceed as follows 1 Pull out the basket until it stops 2 Carefully lift both sides upwards unti...

Page 19: ... be a hazard Use of detergent Only use detergents specifically de signed for use in dishwashers Please observe the manufacturer s dosing and storage recommenda tions as stated on the detergent packaging Using no more than the correct amount of detergent contributes to reducing pollution Fill with detergent 1 Open the lid 2 Fill the detergent dispenser 1 with detergent The marking indicates the dos...

Page 20: ... place Detergent tablets from different manufacturers dissolve at different rates For this reason some deter gent tablets do not attain their full cleaning power during short wash ing programmes Therefore please use long washing programmes when using detergent tablets to en sure the complete removal of deter gent residuals Multi tab function This appliance is equipped with the Multitab function th...

Page 21: ...ting and then deactivate the Multitab func tion In this case you have to set a washing programme and desired options again Activation deactivation of the Multitab function Simultaneously press and hold the two Multitab buttons function buttons D and E until the Multitab indicator light comes on This means that the function is ac tive To deactivate the function press the same buttons again until th...

Page 22: ...e and delay start with the door slightly opened The start of the programme or the countdown of the delay start will occur only after the closure of the door Until then it is possible to modify the settings 1 Check that the baskets have been loaded correctly and that the spray arms are free to rotate 2 Check that the water tap is opened 3 Press the On Off button The dishwasher must be in setting mo...

Page 23: ...which you can choose another programme or select a delay start after which the selected programme will start automatically Interrupt or cancel a washing pro gramme in progress ONLY if it s absolutely necessary Attention Hot steam may escape when the door is opened Open the door carefully Cancel a delay start or a washing programme in progress Simultaneously press and hold the two Cancel buttons fu...

Page 24: ...come cooler than the dishes When the washing programme has finished it is recommended that the dishwasher is unplugged and the water tap turned off Washing programmes Programme Degree of soil Type of load Programme description Intensive Heavy soil Crockery cutlery pots and pans Prewash Main wash up to 70 C 2 intermediate rinses Final rinse Drying 1 Any Crockery cutlery pots and pans Prewash Main w...

Page 25: ... the water is automatically adjusted between 45 C and 70 C 2 Ideal for washing a partially loaded dishwasher This is the perfect daily programme made to meet the needs of a family of 4 persons who only wish to load breakfast and dinner crockery and cutlery 3 Test programme for test institutes Consumption values Programme Programme du ration in minutes Energy con sumption in kWh Water consump tion ...

Page 26: ...le about 1 4 a turn an ticlockwise and remove the filter sys tem 4 Take hold of the coarse filter A by the handle with the hole and remove from the microfilter B 5 Clean all filters thoroughly under run ning water 6 Remove the flat filter from the base of the washing compartment and clean both faces thoroughly 7 Put the flat filter back in the base of the washing compartment and en sure that it fi...

Page 27: ...e cleaned regularly with a damp cloth We recommend every 3 months to run the wash programme for heavy soiled dishes using detergent but without dishes Prolonged periods of non operation If you are not using the machine for any prolonged period of time you are ad vised to 1 Unplug the appliance and then turn off the water 2 Leave the door ajar to prevent the formation of any unpleasant smells 3 Lea...

Page 28: ...ean the water tap The water tap is turned off Turn the water tap on The filter where present in the threa ded inlet hose is blocked Clean the filter in the threaded hose The water inlet hose has not been correctly laid or it is kinked or squashed Check the water inlet hose connec tion continuous flashing of the light of the running programme appears in the digital display The dishwasher will not d...

Page 29: ...appliance The programme will continue from the point at which it was interrupted If the malfunction or fault code reap pears contact your local Service Force Centre For other fault codes not described in the above chart please contact your lo cal Service Force Centre Contact your local Service Force Centre quoting the model Mod product num ber PNC and serial number S N This information can be foun...

Page 30: ...ales deposits on the dishes the salt container is empty or incorrect level of the water softener has been set The drain hose connection is not correct The salt container cap is not properly closed The dishes are wet and dull Rinse aid was not used The rinse aid dispenser is empty There are streaks milky spots or a blu ish coating on glasses and dishes Decrease rinse aid dosage Water drops have dri...

Page 31: ...Weight 43 5 kg Hints for test institutes Testing in accordance with EN 60704 must be carried out with appliance fully loaded and using the test programme see Consumption values Test in accordance with EN 50242 must be carried out when the salt container and rinse aid dispenser have been filled with salt and rinse aid respectively and using the test programme see Consumption values Full load 12 sta...

Page 32: ...s position A Arrangement lower basket Arrangement cutlery basket Installation Any electrical and or plumbing work required to install this appliance should be carried out by a qualified electrician and or plumber or com petent person 32 electrolux installation ...

Page 33: ...evelling is essential for correct closure and sealing of the door When the appliance is correctly levelled the door will not catch on either side of the cabinet If the door does not close correctly loosen or tighten the adjustable feet until the machine is perfectly level Water connection Water supply connection This dishwasher may be fed with either hot max 60 or cold water Neverthe less we advis...

Page 34: ...r pressure while the water is running If the water inlet hose starts to leak during this operation the safety valve cuts off the running water Please take care when installing the wa ter inlet hose The electrical cable for the safety valve is in the double walled water inlet hose Do not immerse the water inlet hose or the safety valve in water If water inlet hose or the safety valve is damaged rem...

Page 35: ...ings used for connections to the waste outlet must be no smaller than the diameter of the hose provided When connecting the drain hose to an under sink trap spigot the entire plas tic membrane A must be re moved Failure to remove all the mem brane will result in food particles building up over time eventually blocking the dishwasher drain hose spigot Our appliances are supplied with a security dev...

Page 36: ...ts no liability for failure to observe the above safety precautions Environment concerns The symbol on the product or on its packaging indicates that this product may not be treated as household waste Instead it should be taken to the appropriate collection point for the recycling of electrical and electronic equipment By ensuring this product is disposed of correctly you will help prevent potenti...

Page 37: ...g used Pull the plug out of the socket Cut off the cable and plug and dis pose of them Dispose of the door catch This prevents children from trapping themselves inside and endanger ing their lives environment concerns electrolux 37 ...

Page 38: ...38 electrolux ...

Page 39: ......

Page 40: ...117972840 122007 www electrolux com ...

Reviews: