background image

Technical data

Dimensions

Width cm

59,6


Height cm

81,8 - 89,8


Depth cm

57,5

Electrical connection - Voltage -
Overall power - Fuse

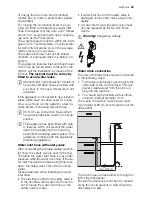
Information on the electrical connection is given on the rating plate
on the inner edge of the dishwasher door.

Water supply pressure

Minimum

0,05 MPa (0,5 bar)


Maximum

0,8 MPa (8 bar)

Capacity

Place settings

12

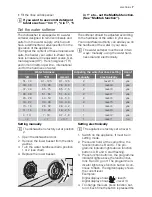
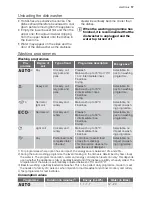
Hints for test institutes

Testing in accordance with 

EN 60704 

 must

be carried out with appliance fully loaded and
using the test programme (refer to 'Washing
programmes').
Test in accordance with 

EN 50242 

 must be

carried out when the salt container and rinse

aid dispenser have been filled with salt and
rinse aid respectively and using the test pro-
gramme (refer to 'Washing programmes').

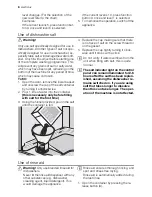
Full load: 12 standard place settings

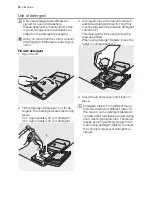
Amount of detergent required:

5 g + 25 g (Type B)

Rinse aid setting

position 4 (Type III)

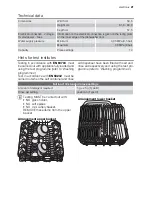
Testing MUST be carried out with:
• NO  glass  holder,
• NO soft spikes
• NO mini cutlery basket.
REMOVE these items from the upper
basket.

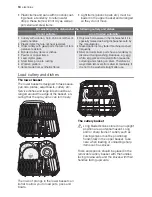
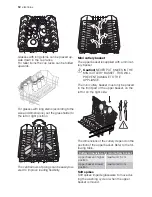
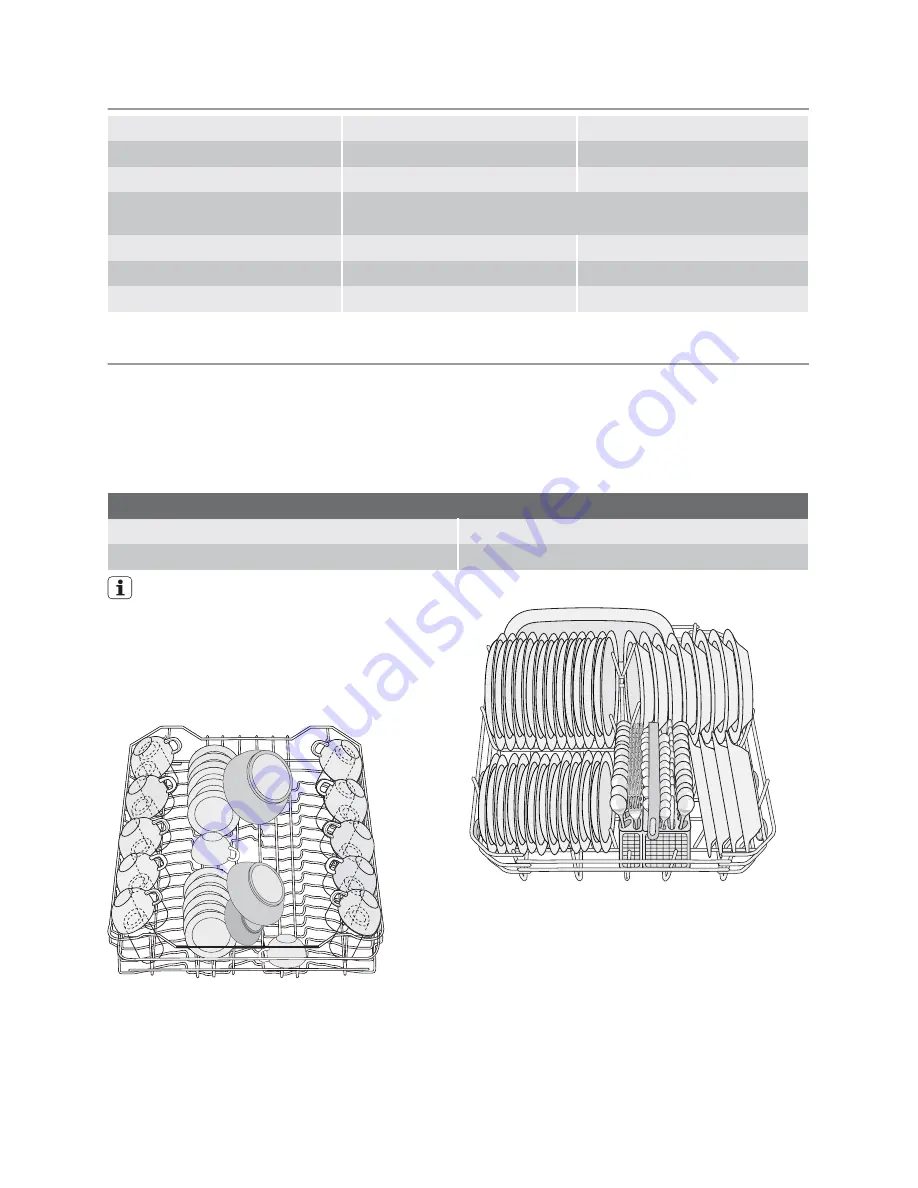
Arrangement upper basket

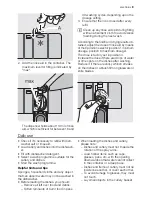
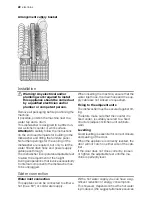
Arrangement lower basket

electrolux 

 21

Summary of Contents for ESI 67050

Page 1: ...user manual Dishwasher ESI 67050 ...

Page 2: ...n appli ance use and safety Correct use This dishwasher is only intended for wash ing household utensils suitable for ma chine washing Do not put any solvents in the dishwasher This could cause an explosion Knives and other items with sharp points must be loaded in the cutlery basket with their points down or placed in a horizontal position in the upper basket Only use products detergent salt and ...

Page 3: ...eep children well away from the dish washer when the door is open Installation Check your dishwasher for any transport damage Never connect a damaged ma chine If your dishwasher is damaged con tact your supplier All packaging must be removed before use Any electrical and plumbing work required to install this appliance must be carried out by a qualified and competent person For safety reasons it i...

Page 4: ...7 Filters 8 Lower spray arm 9 Upper spray arm This dishwasher has an internal light that turns on when the door opens and off when it closes Internal light equipped with led lamp CLASS 1 in accordance with EN 60825 1 1994 A1 2002 A2 2001 In case this light has to be replaced please contact your local Service Force Centre 4 electrolux ...

Page 5: ...gy button 6 Delay start button 7 Digital display 8 Light bar 9 Function buttons 10 Indicator lights 11 Programme indicator lights Indicator lights Multitab Comes on when the multitab function is set Save energy Comes on when the save energy function is set Rinse aid 1 Comes on when the rinse aid has run out electrolux 5 ...

Page 6: ...programme activation deactivation of the rinse aid dis penser ONLY with multitab function ac tive the end of a washing programme a zero will appear in the digital display the countdown for the delay start fault codes concerning malfunction of the dishwasher Light bar Switch on the appli ance Light bar comes on Switch off the appli ance Light bar goes off Function buttons A B and C The following fu...

Page 7: ...1 125 9 1 12 5 2 level 10 yes 43 50 76 90 7 6 9 0 2 level 9 yes 37 42 65 75 6 5 7 5 2 level 8 yes 29 36 51 64 5 1 6 4 2 level 7 yes 23 28 40 50 4 0 5 0 2 level 6 yes 19 22 33 39 3 3 3 9 2 level 5 yes 15 18 26 32 2 6 3 2 1 level 4 yes 11 14 19 25 1 9 2 5 1 level 3 yes 4 10 7 18 0 7 1 8 1 level 2 yes 4 7 0 7 1 level 1 no Setting manually The dishwasher is factory set at position 2 1 Open the dishwas...

Page 8: ...the container this is necessary only before filling with salt for the first time 3 Using the funnel provided pour in the salt until the container is full 4 Replace the cap making sure that there is no trace of salt on the screw thread or on the gasket 5 Replace the cap tightly turning it clock wise until it stops with a click Do not worry if water overflows from the unit when filling with salt thi...

Page 9: ...r a bluish film on glassware or knife blades Daily use Check if it s necessary to refill with dish washer salt or rinse aid Load cutlery and dishes into the dishwash er Fill with dishwasher detergent Select a wash programme suitable for the cutlery and dishes Start the wash programme Helpful hints and tips Sponges household cloths and any object that can absorb water may not be washed in the dishw...

Page 10: ... Silver and aluminium parts have a tendency to discolour during washing Residues e g egg white egg yolk and mustard often cause dis colouring and staining on silver Therefore al ways clean left overs from silver immediately if it is not to be washed straight after use Load cutlery and dishes The lower basket The lower basket is designed to take sauce pan lids plates salad bowls cutlery etc Service...

Page 11: ...tlery grids If the size and dimensions of the cutlery do not allow the use of the grids they can be easily hidden The cutlery basket is in two parts which can be separated to give greater loading flexibili ty To separate the two parts slide them hor izontally in opposite directions and pull them apart To reassemble reverse the procedure The upper basket The upper basket is designed for saucers sal...

Page 12: ...t lery basket Caution NEVER PUT KNIVES IN THE MINI CUTLERY BASKET THIS WILL PREVENT DAMAGE TO THE APPLIANCE The mini cutlery basket must only be placed in the front part of the upper basket on the left or on the right side The dimensions of the cutlery depend on the position of the upper basket Refer to the fol lowing table Cutlery dimensions for mini cutlery basket Upper basket in higher position...

Page 13: ...e dishes in the lower basket With upper basket raised 31 cm With upper basket lowered 27 cm To move to the higher position proceed as follows 1 Pull out the basket until it stops 2 Carefully lift both sides upwards until the mechanism is engaged and the basket is stable To lower the basket to the original posi tion proceed as follows 1 Pull out the basket until it stops 2 Carefully lift both sides...

Page 14: ...tely 30 g of detergent 1 2 3 All programmes with prewash need an additional detergent dose 5 10 g that must be placed in the prewash detergent chamber 2 This detergent will be used during the prewash phase When using detergent tablets place the tablet in compartment 1 4 Close the lid and press until it locks in place Detergent tablets from different manu facturers dissolve at different rates For t...

Page 15: ...nser with rinse aid 2 Activate the rinse aid dispenser 3 Set the rinse aid dosage to position 2 The activation deactivation of the rinse aid is only possible with the Mul titab function active Activation deactivation of the rinse aid dispenser 1 Switch on the appliance It must be in setting mode 2 Press and hold at the same time the function buttons B and C The pro gramme indicator lights above fu...

Page 16: ... door is opened Open the door carefully Interrupt a washing programme in progress Open the dishwasher door the pro gramme will stop Close the door the pro gramme will start from the point at which it was interrupted Press the On Off all indicator lights will go off Press the On Off button again the pro gramme will start from the point at which it was interrupted Cancel a delay start or a washing p...

Page 17: ...rogramme 4 Normal soil Crockery and cutlery Prewash Main wash up to 50 C 1 intermediate rinse Final rinse Drying Selectable im pact on washing programme Light soil Crockery and cutlery Main wash up to 55 C 1 intermediate rinse Final rinse Selectable no impact on wash ing programme Any Partial load to be completed later in the day 1 cold rinse to avoid food scraps from sticking This programme does ...

Page 18: ...that the machine is switched off 1 Open the door remove the lower basket 2 The dishwasher filter system comprises a coarse filter A a microfilter B and a flat filter Unlock the filter system using the handle on the microfilter 3 Turn the handle about 1 4 a turn anti clockwise and remove the filter system 4 Take hold of the coarse filter A by the handle with the hole and remove from the microfilter...

Page 19: ...ost precautions Avoid placing the machine in a location where the temperature is below 0 C If this is unavoidable empty the machine close the appliance door disconnect the water inlet pipe and empty it Moving the machine If you have to move the machine moving house etc 1 Unplug it 2 Turn the water tap off 3 Remove the water inlet and discharge hoses 4 Pull the machine out together with the hoses A...

Page 20: ...he dishwasher door So that you always have these numbers at hand we recommend you to make a note of them here Mod PNC S N The wash results are not satisfactory The dishes are not clean The wrong programme has been selected The dishes are arranged in such a way as to stop water reaching all parts of a surface The baskets must not be overloaded The spray arms do not rotate freely due to incorrect ar...

Page 21: ...t with appliance fully loaded and using the test programme refer to Washing programmes Test in accordance with EN 50242 must be carried out when the salt container and rinse aid dispenser have been filled with salt and rinse aid respectively and using the test pro gramme refer to Washing programmes Full load 12 standard place settings Amount of detergent required 5 g 25 g Type B Rinse aid setting ...

Page 22: ...lve accessibility to internal components the dishwasher has to be unplugged When inserting the machine ensure that the water inlet hose the drain hose and the sup ply cable are not kinked or squashed Fixing to the adjacent units The dishwasher must be secured against tilt ing Therefore make sure that the counter it is fixed under is suitably secured to a fixed structure adjacent kitchen unit cabin...

Page 23: ...e appliance from returning back into the drinking water system This appliance complies with the applicable plumbing regulations Water inlet hose with safety valve After connecting the double walled water in let hose the safety valve is next to the tap Therefore the water inlet hose is only under pressure while the water is running If the wa ter inlet hose starts to leak during this oper ation the ...

Page 24: ...fety standards require the appliance to be earthed Prior to using the appliance for the first time ensure that the rated volt age and type of supply on the rating plate match that of the supply where the appliance is to be installed The fuse rating is also to be found on the rating plate Always plug the mains plug into a correctly installed shockproof sock et Multi way plugs connectors and ex tens...

Page 25: ...mentally friendly and can be recycled The plastic components are identified by markings e g PE PS etc Please dispose of the packaging materials in the appropriate con tainer at the community waste disposal fa cilities Warning When a unit is no longer being used Pull the plug out of the socket Cut off the cable and plug and dispose of them Dispose of the door catch This pre vents children from trap...

Page 26: ...26 electrolux ...

Page 27: ...electrolux 27 ...

Page 28: ...117959690 00 112008 www electrolux com ...

Reviews: