background image

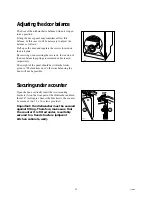
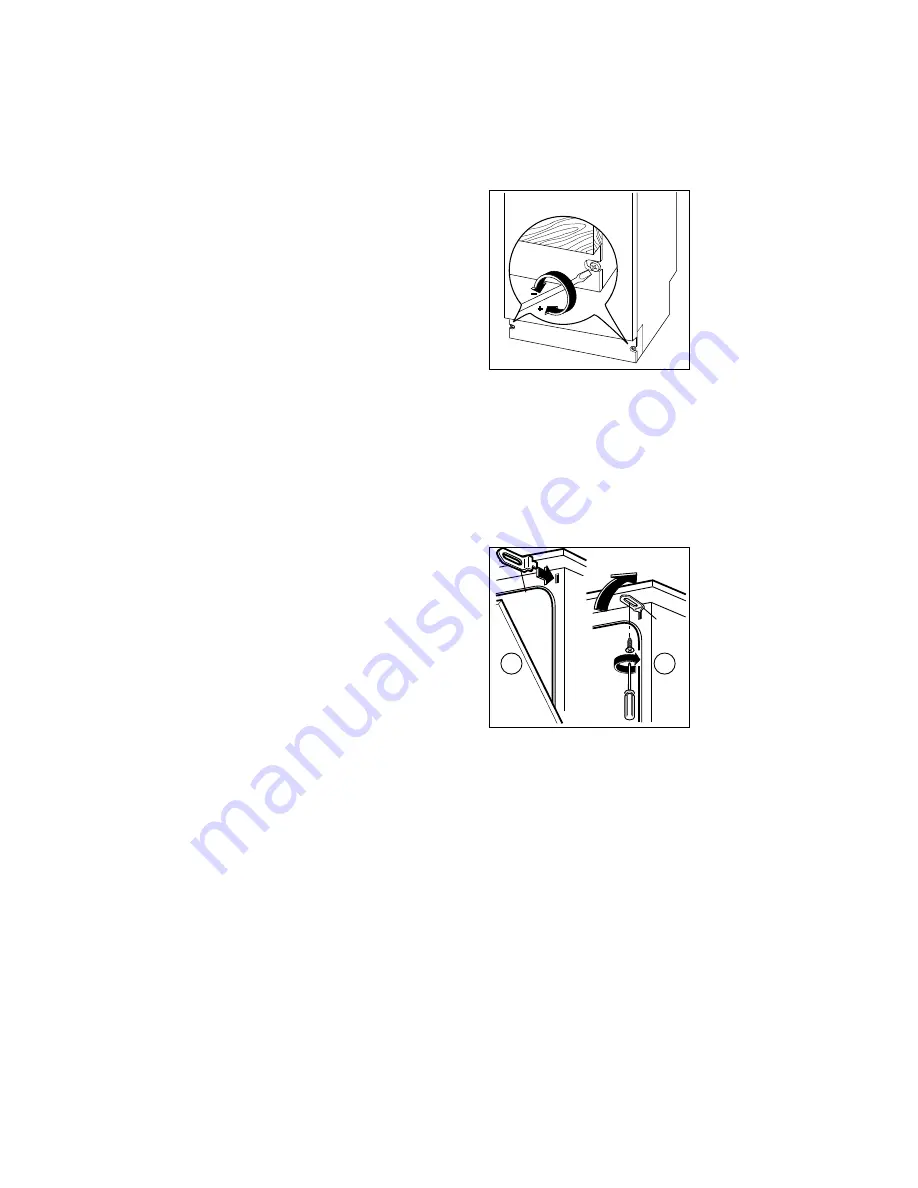
Adjusting the door balance

The door of the dishwasher is balanced when it is open
in any position.

Fitting the decor panel may sometimes affect this
balance. In this case it will be necessary to adjust the
balance as follows:

Half-open the door and regulate the screws located on
the kick plate.

By screwing or unscrewing these screws, the tension of
the door balancing springs is increased or decreased
respectively.

The weight of the panel should be within the limits
given in "The furniture door" otherwise balancing the
door will not be possible.

Securing under a counter

Open the door; vertically insert the two mounting
brackets (A) on the front part of the dishwasher and turn
them 90° (see figure). Secure the brackets to the counter
by means of two 3.5 x 16 screws provided.

Important: the dishwasher must be secured
against tilting. Therefore, make sure that
the counter it is fitted under, is suitably
secured to a fixed structure (adjacent
kitchen cabinets, wall).

28

PFI08UK

II08

1

2

A

90

°

II18

A

Summary of Contents for ESL 614

Page 1: ...152991 82 0 GB D i s h w a s h e r INSTRUCTION BOOK COP04 Model ESL 614 0 0398 ...

Page 2: ... in this dishwasher Under no circumstances should you open the door whilst the appliance is in operation Always turn off the appliance before opening the door Only use detergent specifically designed for use in dishwashers Long blades knives stored in an upright position are a potential hazard Long and or sharp items of cutlery such as carving knives must be positioned horizontally in the upper ba...

Page 3: ...d periods of non operation 16 Frost precautions 16 Moving the machine 16 Something not working 17 Service and spare parts 18 Gurantee Conditions 19 Electrolux Service Force 20 For the installer Installation instruction 22 Technical specifications 22 Water supply connections 23 Water outlet hose connection 24 Electrical connection 25 Building in 26 Levelling 26 The furniture door 27 Adjusting the d...

Page 4: ... hardness adjustment Upper basket stop Large filter Salt container Detergent dispenser Rinse aid dispenser Upper basket Upper spray arm Lower spray arm Central filters Lower basket Cutlery basket Rating plate Control panel Levelling spacers IN46 ...

Page 5: ...f 2 Programme guide This is a summary of the Washing programmes chart which will help you select the correct programme 3 Programme marker 4 Programme selector To select a programme rotate the programme selector to the right clockwise making sure that the programme number you wish to select corresponds with the programme marker on the control panel At the end of the programme the machine will stop ...

Page 6: ...our area The dishwasher is factory set at level 2 If this level is not suitable for your area the softener should be adjusted To adjust the water softener Level 1 If your water is level 1 it is already soft and therefore there is no need to use salt Levels 3 and 5 water softener adjustment If your water is level 3 or 5 proceed as follows slide out the lower basket and unscrew the cap of the salt c...

Page 7: ...bout 1 litre of water inside the container or until it is full this is necessary only before filling with salt for the first time 3 Then using the funnel provided pour in the salt until the container is full approx 1 5 1 8 kg Do not worry if water over flows from the unit when filling with salt this is quite normal 4 Replace the cap making sure that there is no trace of salt on the screw thread or...

Page 8: ...nse aid when the indicator B becomes clear Ensure that the lid is closed after every refill Do not put liquid detergent in the rinse aid department Clean up any rinse aid spilt during filling with an absorbent cloth to avoid excess foaming during the next wash Adjusting the dose According to the finish and drying results obtained adjust the dose of rinse aid by means of the 6 position selector C p...

Page 9: ...ser lid by pulling the catch D 2 Add the detergent according to the recommendations in the programme chart As all detergents are not the same you should also consult the instructions on the packet To help correctly dose the right amount of detergent inside the container there are two reference marks MIN 15 ml MAX 30 ml 3 Always close the lid 4 If the programme has a prewash add the required deterg...

Page 10: ...The cutlery basket Long bladed knives stored in an upright position are a potential hazard Long and or sharp items of cutlery such as carvings knives must be positioned horizontally in the upper basket Take care when loading or unloading sharp items such as knives Cutlery should be placed in the removable cutlery basket with the handles facing downwards If the handles protrude from the bottom of t...

Page 11: ...oor ensure that the spray arms can rotate freely Adjusting the height of the upper basket If washing very large plates over 27 cm and up to 31 cm in diameter you can load them in the lower basket after moving the upper basket to the higher position To move to the higher position proceed as follows 1 Move the front runner stops A of the upper basket outward and slide the basket out 2 Refit the bask...

Page 12: ... improved Empty the lower basket first and then the upper one this will avoid water dripping from the upper basket onto the dishes in the lower one Items not suitable for dishwashers The following items should not be washed in the dishwasher unless they are sold as dishwasher proof Cutlery with wooden or horn handles or glued parts bronze cutlery saucepans with wooden handles aluminium ware crysta...

Page 13: ... 5 g 25 g 25 g Cold prewash Main wash up to 65 C 2 cold rinses 1 hot rinse up to 65 C Main wash up to 65 C 2 cold rinses 1 cold rinse Main wash up to 65 C 2 cold rinses 1 hot rinse up to 65 C Testing programme according to IEC 436 DIN 44990 Standard place settings 12 Rinse aid selector on position 3 Recommended quantity of detergent 25 g in the dispenser 5 g on the dispenser lid This is a special ...

Page 14: ...urn the programme selector dial clockwise until the number of the programme you wish to select corresponds with the programme marker on the control panel 8 Start the programme Depress the On Off pushbutton and close the door the machine will start 9 At the end of the washing programme At the end of the washing programme the dishwasher stops automatically 10 Switch off the dishwasher Open the door ...

Page 15: ...ng up the outer one B pulling the central funnel upwards the smaller filter C can be removed by pressing the two tongues D Once cleaned refit the filters by pressing them down until they click into place Cleaning the large filter Once a month Clean the large filter A on both sides under running water using a brush To take it out remove the spray arm by pressing the two tongues E turn the ring F an...

Page 16: ...the rinse aid dispenser 3 Leave the door ajar to prevent the formation of any unpleasant smells 4 Leave the inside of the machine clean Frost precautions Avoid placing the machine in a location where the temperature is below 0 C If this is unavoidable empty the machine close the appliance door disconnect the water inlet pipe and empty it Moving the machine If you have to move the machine moving ho...

Page 17: ...r to Loading your machine The spray arms are knocking against the dishes The door is difficult to close The dishwasher is not level or not properly built in The dishes are not clean poor wash The baskets are too full The dishes have not been arranged properly The spray arms do not rotate The spray arms are clogged The filters are clogged The filters are not in position Not enough detergent has bee...

Page 18: ...fore calling out an engineer please ensure you have read the details under the heading Something Not Working and have the modelnumber and purchase date to hand Please note that it will be necessary to provide proof of purchase for any in guarantee service calls In guarantee customers should ensure that the checks under the heading Something Not Working have been made as the engineer will make a ch...

Page 19: ...curred for calls to put right an appliance which is improperly installed or calls to appliances outside the United Kingdom Appliances found to be in use within a commercial environment plus those which are subject to rental agreements Products of Electrolux manufacture which are not marketed by Electrolux European Guarantee If you should move to another country within Europe then your guarantee mo...

Page 20: ...land ZE1 0PE SHETLAND Bolts Shetland Ltd 26 North Road Lerwick OWN SALES Shetland ZE1 0PE WHALSAY Leask Electrical Harlsdale Symbister Whalsay OWN SALES Shetland ZE2 9AA NORTHERN IRELAND BELFAST Owenmore House M27 Kilwee Industrial Estate Upper Dunmury Lane Belfast BT17 0HD WALES CARDIFF Guardian Industrial M28 Estate Clydesmuir Road Tremorfa Cardiff CF2 2QS CLYWD Unit 6 7 Coed Parc M14 Abergele R...

Page 21: ...d Tonbridge Kent TN9 1RA SOUTH WEST BARNSTAPLE P O Box 12 M30 Barnstaple North Devon EX31 2YB BOURNEMOUTH 63 65 Curzon Road M26 Bournemouth Dorset BH1 4PW BRIDGEWATER 6 Hamp Industrial M35 Estate Bridgewater Somerset TA6 3NT BRISTOL 11 Eldon Way M25 Eldonwall Trading Bristol Avon BS4 3QQ EMSWORTH 266 Main Road M33 Southbourne Emsworth PO10 8JL ISLE OF WIGHT Unit 8 M34 Enterprise Court Ryde Busines...

Page 22: ...n Technical specifications Installation instructions 22 PTS04UK DIMENSIONS Width 59 6 cm Height 81 8 87 8 cm Max depth 55 5 cm Max depth with open door 111 4 cm ELECTRICAL CONNECTION Voltage 220 240 V 50 Hz MOTOR RATING DURING WASH 200 W POWER OF HEATING ELEMENT 2570 W OVERALL POWER 2770 W WATER SUPPLY PRESSURE Minimum 50 kPa 0 5 bar Maximum 800 kPa 8 bar CAPACITY STANDARD IEC PLACE SETTINGS 12 CO...

Page 23: ...ter pressure must be within the limits given in the technical specifications Your local Water Authority will advise you on the average mains pressure in your area The dishwasher features fill and drain hoses which can be turned either to the left or the right to suit the installation The locknut must be correctly fitted to avoid water leaks Avoid bends or kinks in the hose which could prevent or s...

Page 24: ...the dishwasher Ensure the hose is not bent or squashed as this could prevent or slow down the discharge of water C If you use a drain hose extension it must be no longer than 2 metres and its internal diameter must be no smaller than the diameter of the hose provided Likewise the internal diameter of the couplings used for connections to the waste outlet must be no smaller than the diameter of the...

Page 25: ... is marked with the letter E or the earth symbol or coloured green and yellow 2 Connect the Blue neutral wire to the terminal in the plug which is marked with the letter N or coloured black 3 Connect the Brown live wire to the terminal in the plug which is marked with the letter L or coloured red The plug moulded onto the lead incorporates a 13amp BSI362 fuse Only ASTA or BSI fuses should be used ...

Page 26: ... connect it When inserting the machine ensure that the water inlet and drain hoses are not kinked or squashed The recess height may be anywhere between 820 and 880 mm from the floor since the dishwasher incorporates adjustable feet max 60 mm A distance of 2 mm should be allowed between the top of the dishwasher and the counter top Levelling Good levelling is essential for correct closure and seali...

Page 27: ...ith a handle as the dishwasher handle will be hidden by the panel Drill the panel with a Ø 2 x 12 bit according to the dimensions indicated in the figure Fix the cross bar onto the panel using four 3 5 x 16 screws provided Reduce the length of fixing screw according to thickness of panel Mount the decor panel by inserting the two pivots of the cross bar into the slotted holes of the door Lift the ...

Page 28: ...creased respectively The weight of the panel should be within the limits given in The furniture door otherwise balancing the door will not be possible Securing under a counter Open the door vertically insert the two mounting brackets A on the front part of the dishwasher and turn them 90 see figure Secure the brackets to the counter by means of two 3 5 x 16 screws provided Important the dishwasher...

Page 29: ...ade on the plinth The dimensions a and b of the table are those most frequently used in the kitchen furnitures 29 PFI06UK II59 a b II15 170 160 150 140 130 120 110 100 136 131 125 118 110 100 93 85 135 131 125 118 110 102 92 85 137 132 125 118 110 102 94 85 138 134 128 120 110 104 95 85 139 130 124 115 105 98 88 138 129 120 110 100 90 135 125 115 105 95 40 50 60 70 80 90 100 Height a Depth b X X 6...

Page 30: ......

Page 31: ......

Page 32: ......

Reviews: