background image

10

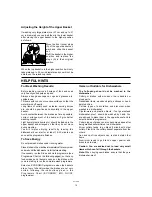
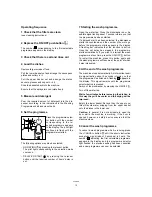
Adjusting the Height of the Upper Basket

If washing very large plates (over 27 cm and up to 31
cm in diameter) you can load them in the lower basket
after moving the upper basket to the higher position
as follows: 

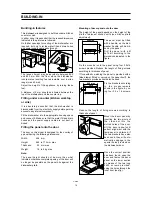
Move the front runner stops
(A) of the upper basket out-
ward and slide the basket
out. 
Refit the basket in the higher
position and replace the
stops (A) in their original 
position. 

When the top basket is in the higher position it will only
take plates up to 20 cm in diameter and you will not be
able to use the raised cup racks. 

PCL11GB

For Best Washing Results:

Before loading, remove all scraps of food and soak
very heavily soiled pots and pans. 
Always arrange saucepans, cups and glasses etc.
upside-down. 
Tilt items with convex or concave surfaces so that the
water drains off easily.
Long items of cutlery such as ladles, carving knives
etc. should be positioned horizontally in the upper
basket. 
Avoid contact between the dishes as far as possible;
correct arrangement of the items will give better
washing results. 
Light items (plastic bowls etc.) should be loaded in the
upper basket and arranged so that they do not move
during washing. 
You will improve drying results by leaving the 
dishwasher door ajar for at least 15-30 minutes as
soon as the programme finishes. 

To Save Energy

Do not prewash dishes under running water. 

Place dishes in the machine immediately after every meal
and wait until the dishwasher is full before washing. 

If necessary run the Rinse and Hold programme (see
Programme Chart on the following pages), so that any
food scraps do not become caked on the dishes while
you are waiting to run the complete wash programme. 

Select an ECONOMIC programme when the baskets
are not very full and/or when the dishes are not very
soiled, following the instructions given in the 
Programme Chart (ECONOMY, BIO, QUICK 
programmes). 

Items not Suitable for Dishwashers

The following should not be washed in the 
dishwasher: 
Cutlery or dishes with wooden or horn handles or
glued parts. 
Handmade items, wooden objects, antiques or hand-
painted china. 
Certain types of decoration can discolour when
washed in a dishwasher. 
Crystal-ware and plastic objects, if not guaranteed
dishwasher-proof, should be washed by hand. You
are advised to place them in the upper basket and to
select a delicate programme. 
Certain types of glass can also become opaque after
being washed several times in a dishwasher. 
Silver cutlery tends to go black if mixed with steel 
cutlery. Place it in the cutlery basket separate from the
others. 
Iron and cast iron objects can rust and stain other
items. 
Aluminium tends to go black; copper, pewter and
brass tend to stain. 

Caution: You are advised not to load very small
items which can fall through the baskets. 

Note: When buying new dishes, ensure that they are
dishwasher-proof. 

A

RC01

HELPFUL HINTS

Summary of Contents for ESL499

Page 1: ...I N S T R U C T I O N B O O K L E T M A N U A L D E I N S T R U C C I O N E S L I V R O D E I N S T R U Ç Õ E S DISHWASHER ESL 499 LAVAVAJILLAS ESL 499 MÁQUINA DE LAVAR LOIÇA ESL 499 I N F O ...

Page 2: ... the large filter internal and external cleaning page 13 Prolonged periods of Non Operation page 13 Servicing page 14 Building in page 16 TECHNICAL SPECIFICATIONS DIMENSIONS Width cm 44 6 Height cm 82 88 Max depth cm 55 5 Max depth with door open cm 115 ELECTRICAL CONNECTION Voltage 220 V 50Hz MOTOR RATING DURING WASHING 200 W POWER OF HEATING ELEMENT 2800 W OVERALL POWER 3000 W WATER SUPPLY PRESS...

Page 3: ...rol paint steel or iron debris corrosive acidic or alkaline chemicals are not to be washed in a dishwasher Under no circumstances should you open the door whilst the appliance is in operation Always turn off the appliance before opening the door However the dishwasher features a special safety device which cuts off the water inlet should the door be accidentally opened thus avoiding water leaks Ne...

Page 4: ...t or to a purpose made quick coupling tap such as the Press Block The water pressure must be within the limits given in the technical specifications as it will not function correctly if pressure is outside these specifications The water supply hose is fitted with a safety device which prevents water from entering the machine should the inner hose split due to wear The problem is signalled by a red...

Page 5: ... signals are heard To reactivate the audible signals press both buttons together again for about 3 seconds until the short instruction accepted signal is heard 1 ON OFF button On Press this button to preset the dishwasher to accept settings selection of wash programmes drying options delayed start etc The salt pilot light 3 and the rinse aid light 2 comes on if salt or rinse aid are low and the pr...

Page 6: ...o select the number of hours by which you wish to delay the programme start up to a maximum of 9 E g if you have selected number the wash pro gramme will start in 2 hours time To cancel the delayed start set press the button until the number appears Close the dishwasher door to start the countdown a long audible signal about one second informs you that the function is active If you open the door a...

Page 7: ...s of salt i e table cooking salt contain high percentages of other substances which may reduce the efficiency of the softener To fill with salt unscrew the cap of the salt container Pour about half a litre of water inside the container or until it is full this is necessary only before filling with salt for the first time Then using the funnel pro vided pour in the salt until the container is full ...

Page 8: ...rgent inside the con tainer there are two refe rence marks MIN 15 ml MAX 30 ml All the programmes with prewash required a small extra amount of detergent of approximately 5 g to be poured over the dis penser s lid as shown in the picture For Intensive Programme If this programme suitable for particularly dirty pans and dishes is selected an extra 10g of detergent must be placed over the lid of the...

Page 9: ...the cutlery with the handles facing upward Mix spoons with the other cutlery to prevent them sticking together Place teaspoons and other small cutlery on special cut lery rack on one side of the cutlery basket The two rear rows of prongs on the lower basket can be easily lowered to allow you to load pots pans and bowls To lower the prongs slightly pull them upward and let them drop down see pictur...

Page 10: ...ishes under running water Place dishes in the machine immediately after every meal and wait until the dishwasher is full before washing If necessary run the Rinse and Hold programme see Programme Chart on the following pages so that any food scraps do not become caked on the dishes while you are waiting to run the complete wash programme Select an ECONOMIC programme when the baskets are not very f...

Page 11: ...ssert spoonful 5 g Half dessert spoonful 5 g 1 heaped dessert spoonful 15 g 1 heaped dessert spoonful 15 g 1 heaped dessert spoonful 15 g 1 heaped dessert spoonful 15 g 1 heaped dessert spoonful 15 g 1 level dessert spoonful 10 g 1 level dessert spoonful 10 g 2 level dessert spoonfuls 20 g Cold prewash Main wash up to 50 C 1 cold rinse 1 hot rinse up to 65 C Hot air drying Cold prewash Main wash u...

Page 12: ...rts the countdown and the number of hours to go before the programme starts appears in the display A flashing dot indicates that the function is active Once the set delay has elapsed the programme starts automatically If you wish to interrupt the wash programme at any time press the ON OFF button To restart the machine press this button again and the wash programme will resume at the point at whic...

Page 13: ...ove the bottom spray arm release it from its securing catches and pull it out Clean the external surfaces of the machine and control panel with a soft damp cloth If necessary use only neutral detergents Never use abrasive products scouring pads or solvents acetone trichloroethylene etc The upper spray arm The upper spray arm should not be removed for gen eral cleaning however if a blockage occurs ...

Page 14: ... Service Centre The discharge pipe extension is not correct Carefully follow the instructions for Connection to the drain Switch off the dishwasher switch it back on and start the wash programme If the alarm reappears call the Service Centre The wall drain connection has no breather Consult a qualified engineer ALARM C L H General Switch off the dishwasher switch it back on and start a wash progra...

Page 15: ... spare parts can be purchased from Service Centres In guarantee customers should ensure that the above checks have been made as the engineer will make a charge if the fault is not a mechanical or electrical breakdown Please note that proof of purchase is required for any guarantee service calls Protection against flooding In order to prevent water floods the dishwasher has been provided with two a...

Page 16: ...complete opening of the door will no longer be possible as the panel hits against the dishwasher plinth Mounting of decor panel onto the door The height of the panel depends on the height of the plinth of adjacent kitchen units see kitchen plinth adjustment The panel must be fitted with a handle as the dish washer handle will be hid den by the panel Drill the panel with a Ø 2x12 bit according to t...

Page 17: ...anel should be within the limits given in the dimensions of the panel otherwise balancing the door will not be possible Levelling Make sure that the dishwasher door closes properly without rubbing on sides Otherwise level the machine by slightly screwing or unscrewing the two front feet until perfect closure of the door is reached Kitchen plinth adjustment To allow correct opening of the door it i...

Reviews: