


PIN15GB
4
Remove all packaging before positioning the
machine.
Positioning
If possible, position the machine next to a water tap
and a drain.
This dishwasher is designed to be fitted under a
kitchen counter or sink (see “Building-in).
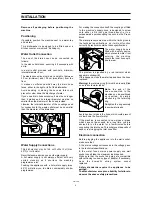
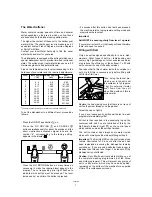
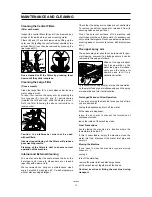
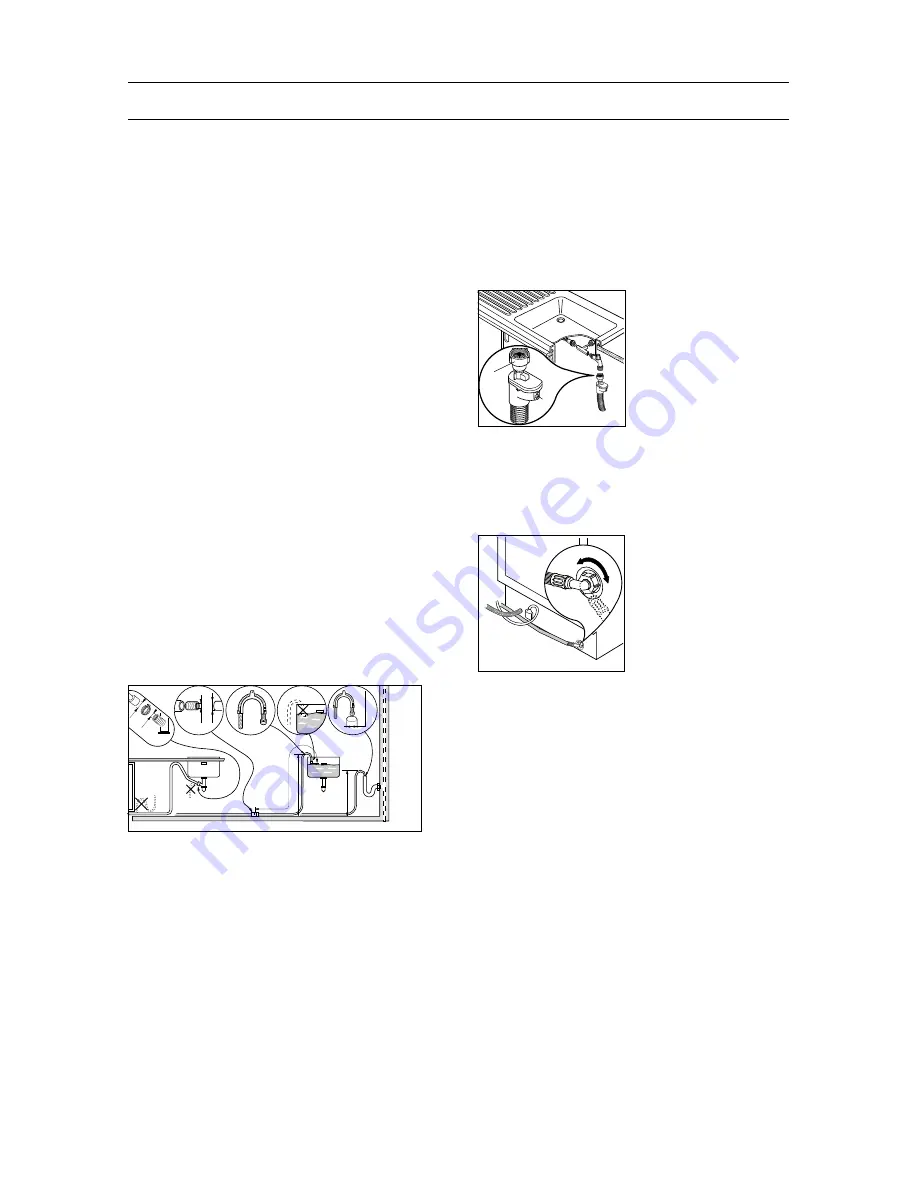
Water Outlet Connection
The end of the drain hose can be connected as
follows:
to the sink outlet siphon, securing it if necessary with
a clip;
to a wall outlet provided with vent-hole, minimum
internal diameter 4 cm;
The waste connection must be at a height of between
30 cm (minimum) and 100 cm (maximum) from the
floor.
It makes no difference which way the drain hose
faces, either to the right or left of the dishwasher.
Avoid bending or kinking the hose as this could
prevent or slow down the discharge of water.
If you use a drain hose extension it must be no longer
than 2 metres and its internal diameter must be no
smaller than the diameter of the hose provided.
Likewise the internal diameter of the couplings used
for connection to the waste outlet must be no smaller
than the diameter of the drain hose.
Water Supply Connections
This dishwasher may be fed with either hot (max.
60°C) or cold water.
Nevertheless we advise you a cold water supply.
A hot water supply is not always efficient with very
soiled crockery as it shortens the washing
programmes a lot.
Feeding the appliance with a hot water supply (max.
60°C) will allow you to obtain considerably shorter
programmes.
For making the connection itself, the coupling nut fitted
to the machine's supply hose is designed to screw
onto either a 3/4 inch gas thread spout, or to a
purpose-made quick-coupling tap such as the Press-
Block.
The water pressure must be within the limits given in
the technical specifications, as it will not function
correctly if pressure is outside these specifications.
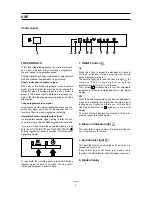
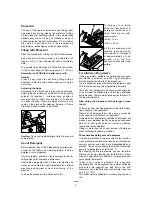
The water supply hose is
fitted with a safety device,
which prevents water from
entering the machine
should the inner hose split,
due to wear.
The problem is signalled by a red indicator which
appears in window (B).
If this happens, close the water tap and have the hose
replaced.
Warning: the retaining ring (A) must be properly fitted
so as to avoid water leaks.
Note: the end of the
hose connected to the
machine can be positioned
as required, by simply
slackening the retaining
ring.
Re-tighten the ring securely
to avoid water leaks.
Avoid bends or kinks in the hose, which could prevent
or slow down the flow of water.
If the machine is connected to new pipes or pipes
which have not been used for a long time, you are
advised to run the water for a few minutes before
connecting the inlet hose. This will prevent deposits of
sand or rust clogging the inlet hose filter.
Electrical connection
Before plugging the appliance into the wall socket,
make sure that:
1. the mains voltage corresponds to the voltage given
in the technical specifications;
2. the meter, fuses, mains power supply and wall
socket can all take the maximum load required.
Make sure that the socket and plug are compatible
without having to use any type of adapter. If necessary,
have the domestic wiring system socket
replaced.
Safety standards require the appliance to be
earthed.
The Manufacturer accepts no liability for failure to
observe the above safety precautions.
B
A
CA01
min 30 cm
max 100 cm
max 100 cm
+ 2 m max
min 4 cm
21
Ø 18
Ø 18
Ø 21
CA06
INSTALLATION


