

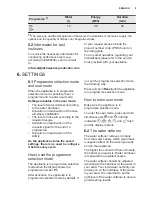


XtraDry is a permanent option for all
programmes other than
. It is
automatically activated in next cycles.
This configuration can be changed at any
time.
Every time
is
activated, XtraDry is off and
needs to be chosen
manually.
Activating XtraDry deactivates
TimeManager and vice versa.
How to activate XtraDry
Press
.
The related indicator is on.
The display shows the updated
programme duration.
7.2 TimeManager
The TimeManager allows to reduce the
duration of a selected programme by
approximately 50%.
The washing results are the same as
with the normal programme duration. The
drying results can decrease.
This option increases the pressure and
the temperature of the water. The
washing and the drying phases are
shorter.
By default, TimeManager is off, but it is
possible to activate it manually. This
option cannot be combined with XtraDry.
How to activate TimeManager
Press .
The related indicator is on.
The display shows the updated
programme duration.
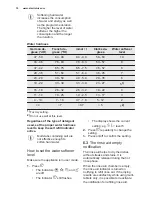
8. BEFORE FIRST USE
1. Make sure that the current level of
the water softener agrees with the
hardness of the water supply. If
not, adjust the level of the water
softener.
2. Fill the salt container.
3. Fill the rinse aid dispenser.
4. Open the water tap.
5. Start a programme to remove any
processing residuals that can still be
inside the appliance. Do not use
detergent and do not put dishes in
the baskets.
After starting the programme, the
appliance recharges the resin in the
water softener for up to 5 minutes. The
washing phase starts only after this
procedure is complete. The procedure is
repeated periodically.
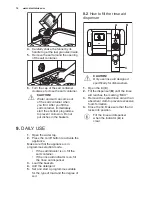
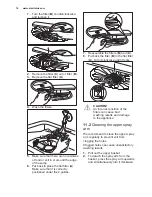
8.1 The salt container
CAUTION!
Use rough salt designed for
dishwashers only. Fine salt
increases the risk of
corrosion.
The salt is used to recharge the resin in
the water softener and to assure good
washing results in daily use.
How to fill the salt container
1. Turn the cap of the salt container
counterclockwise and remove it.
2. Put 1 litre of water in the salt
container (only for the first time).
3. Fill the salt container with dishwasher
salt (until it is full).
ENGLISH
13
Summary of Contents for ESL8550RA
Page 1: ...ESL8550RA EN Dishwasher User Manual ...
Page 25: ...ENGLISH 25 ...
Page 26: ...www electrolux com 26 ...
Page 27: ...ENGLISH 27 ...


