background image

13

Summary of Contents for EU 6136 U

Page 1: ...2222740 51 I N F O I N S T R U C T I O N B O O K L E T EU 6136 U FREEZER ...

Page 2: ...delines 6 Defrosting 7 Maintenance and Cleaning 8 Internal cleaning 8 Periodic cleaning 8 When the appliance is not in use 8 Something not Working 9 Service and Spare Parts 10 Customer Care Departments 10 Guarantee Conditions 11 Electrolux Service Force 12 Instructions for the Installer Technical Specifications 14 Installation 14 Positioning 14 Electrical Connection 15 Building in instructions 16 ...

Page 3: ...en flames and sources of ignition thoroughly ventilate the room in which the appli ance is situated Child Safety Do not allow children to tamper with the controls or play with the product There is a risk of suffocation Keep packaging material away from children During Use This appliance is designed for domestic use only specifically for the storage of edible foodstuffs only It is not intended for ...

Page 4: ...ator light Pushbutton for fast freezing Before use Remove all securing tapes Wash inside the appliance with lukewarm water and bicarbonate of soda 5 ml to 0 5 litre of water Do not use soap or deter gent as the smell may linger Dry thoroughly Freezer calendar Freezer control Compartment for frozen food storage Compartment for freezing fresh food Thermometer ...

Page 5: ...y a small amount of food always use the top compart ment Once the food is completely frozen which could take up to 24 hours press the fast freeze switch to deactivate the fast freeze mode the yellow light goes off Distribute the frozen food packages in the other compartments so that the top compartments can be used for a further freezing operation Only freeze top quality fresh and thoroughly clean...

Page 6: ...be small enough to ensure that it is used in one go Small packs freeze more quickly and uniformly and give better results Frozen food once thawed must not be refrozen Lean food keeps better and longer than fatty food salt reduces the storage time Wrap the food in polythene or aluminium freezing bags or foil so that they adhere to the food and provide an airtight seal Packaging which is swollen or ...

Page 7: ... setting and after letting the appliance run for at least two hours in the fast freeze mode replace the previously removed food into the compartments Important A temperature rise of the frozen food packs during defrosting may shorten their storage life Never use sharp metal tools to scrape off frost from the evaporator as you could dam age the appliance beyond repair Important In the event of a po...

Page 8: ...RONG SMELL Important Do not use abrasive products Periodic cleaning The appliance is equipped with a ventilation grid Keep clean to guarantee good ventilation and good working order of the appliance An accumulation of dust will affect the performance of the appliance and cause excessive electricity con sumption The structure of the appliance permits cleaning of the rear zone close to the wall usin...

Page 9: ...itions Check the ambient temperature is within the appliances operating limits of 10 C to 32 C Has door just been opened If so leave for a few minutes to allow the air pressure to equalise Adjust the thermostat control knob to give correct temperature control See page 5 Check that the door is closed Large quantities of food have recently been placed in the cabinet and or door is frequently opened ...

Page 10: ...pur chase date to hand Please note that it will be necessary to provide proof of purchase for any in guarantee service calls In guarantee customers should ensure that the checks under the heading Something Not Working have been made as the engineer will make a charge if the fault is not a mechanical or electrical breakdown CUSTOMER CARE DEPARTMENT For general enquiries concerning your Electrolux a...

Page 11: ...osts incurred for calls to put right an appliance which is improperly installed or calls to appliances outside the United Kingdom Appliances found to be in use within a commercial environment plus those which are subject to rental agreements Products of Electrolux manufacture which are not marketed by Electrolux European Guarantee If you should move to another country within Europe then your guara...

Page 12: ...12 ...

Page 13: ...13 ...

Page 14: ...with European Standard EN153 Actual con sumption will depend on how the appliance is used and where it is located TECHNICAL SPECIFICATIONS Positioning For this appliance to work efficiently it should be located away from heat sources e g cookers radia tors boilers direct sunlight etc best performance is obtained with ambient temperature between 10 C and 32 C For building in and door reversibility ...

Page 15: ... coloured green and yellow Connect the blue neutral wire to the terminal in the plug which is marked with the letter N or coloured black Connect the brown live wire to the terminal in the plug which is marked with the letter L or colured red The plug moulded onto the lead incorporates a fuse For replacement use a 13amp BS1362 fuse Only ASTA or BSI approved fuses should be used The plug must not be...

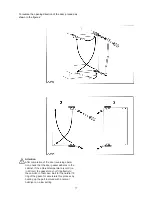
Page 16: ...pulling it towards you with hands 2 Remove the left side A of the grid cutting it from the rear see figure To reposition the grid on the appliance proceed as fol lows Apply the grid to the base of the appliance by pushing the clasps a until they click N B The grid is to be assembled after having fixed the appliance in the niche with the brackets DO002 A DO001 a a ...

Page 17: ...versing opera tion check that the door gasket adheres to the cabinet If the ambient temperature is cold i e in Winter the gasket may not fit perfectly to the cabinet In that case wait for the natural fit ting of the gasket or accelerate this process by heating up the part involved with a normal hairdryer on a low setting ...

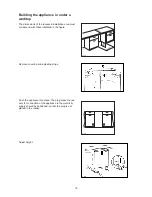
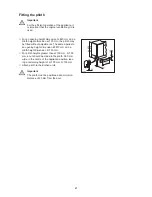
Page 18: ...respond with those indicated in the figure Remove covering and adjusting strips Push the appliance into place The plug socket neces sary for connection of the appliance to the electricity supply should be positioned so that the plug is not placed in the recess Adjust height DO013 600 550 min 600 S I 005 ...

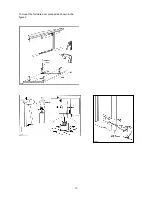
Page 19: ...19 To mount the furniture door proceed as shown in the figures ...

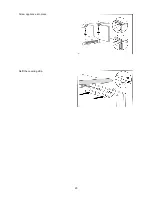
Page 20: ...Screw appliance into place Refit the covering strip 20 ...

Page 21: ...ments The same applies to an opening height dimension B 870 mm and a plinth height dimension b 150 mm For plinth heights greater than a 100 mm b 150 mm a cut should be made in the plinth 580 mm wide in the centre of the appliance position leav ing a remaining height of a 100 mm b 150 mm Attach plinth to the kitchen units Important The plinth must be positioned at a minimun distance of 25 mm from t...

Page 22: ......

Page 23: ......

Page 24: ... Electrolux Household Appliances Limited 2000 ...

Reviews: