background image

8

Unplug the appliance before carrying out any
maintenance operation.

Warning

This appliance contains hydrocarbons in its

cooling unit maintenance and recharging must
therefore only be carried out by authorised
technicians.

Defrosting

The freezer compartment will become progressively
covered with frost. This should be removed with the
special plastic scraper provided, whenever the
thickness of the frost exceeds 1/4".

During this operation it is not necessary to switch off
the power supply or to remove the foodstuffs.
However, when the ice becomes very thick on the
inner liner, complete defrosting should be carried out
and it is advisable to carry out this operation when the
appliance is empty.
To carry out complete defrosting proceed as follows:

1. Remove any stored food, wrap it in several layers

of newspaper and put it in a cool place.

2. Turn the thermostat control 

to the «

» setting.

3. Leave the door open.

4. Remove the three large drawers.

5. When defrosting is completed, remove the water

that has collected in the small bottom drawer and
dry the interior thoroughly.

Keep the scraper for future use.

Warning

Never use metal objects for defrosting your

appliance as it may get damaged.
Do not use a mechanical device or any
artificial means to speed up the thawing
process other than those recommended by
the manufacturer.
A temperature increase of the frozen food
shortens its safe storage period.

Periodic cleaning

Never use metal objects for cleaning your appliance
as it may get damaged. Clean the inside with warm
water and bicarbonate of soda. Rinse and dry
thoroughly.

MAINTENANCE

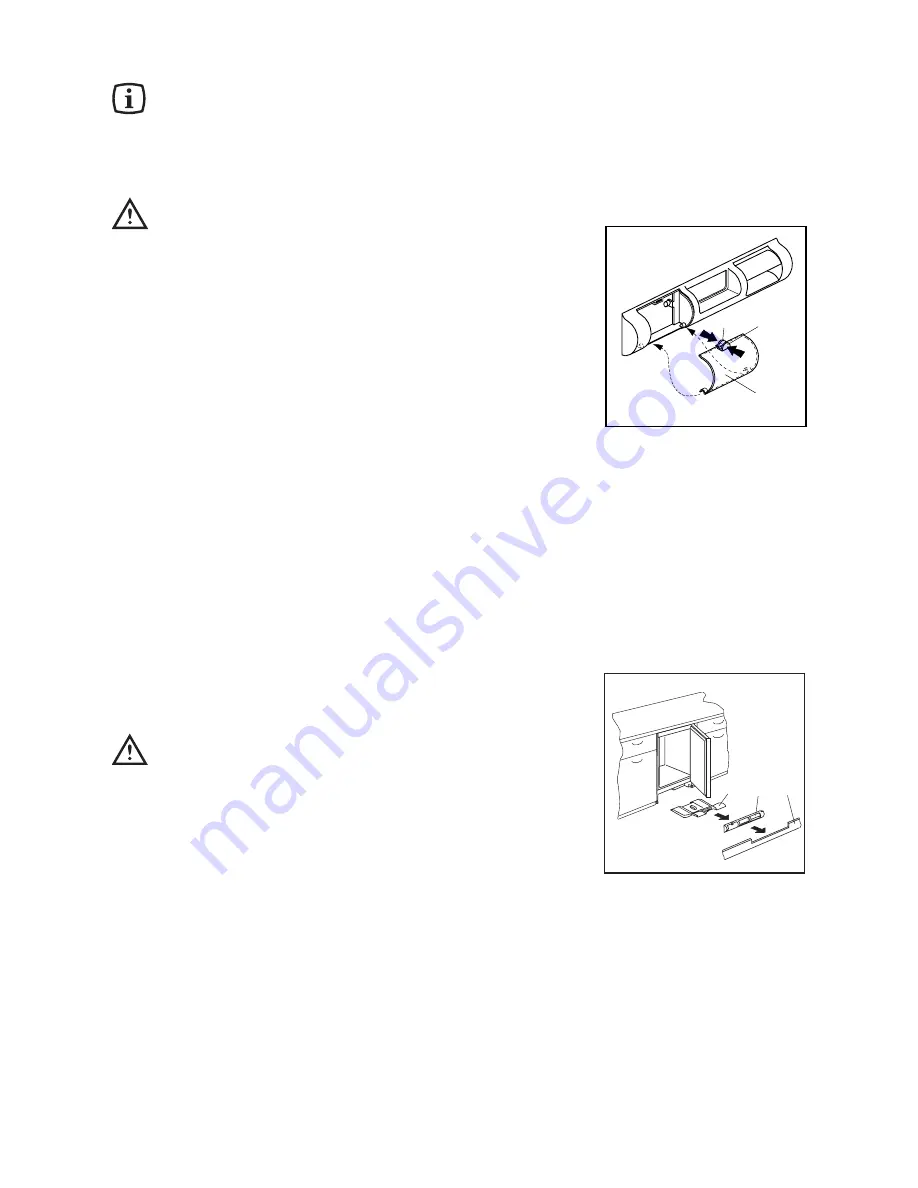
The appliance is equipped with an air inlet filter (1)
and an air outlet duct (2) on the ventilation grid. Keep
clean to guarantee good ventilation and good working
order of the appliance.

The filter can be removed and washed with water, as
follows:
1. Pinch flaps (a) and (b) with fingers
2. Pull the filter down.
3. Pull the filter out.
To replace the filter reverse the process.

An accumulation of dust will affect the performance of
the appliance and cause excessive electricity
consumption.
The structure of the appliance permits cleaning of the
rear zone close to the wall, using a vacuum cleaner.

1. Remove the plinth (1), then the ventilation grid (2);
2. Carefully pull the air deflector out (3).

Periods of non-operation

When the appliance is not in use for long periods,
take the following precautions:
remove the plug from the wall socket;
remove all food:
defrost and clean the interior and all accessories;
leave the door ajar to allow air to circulate to prevent
unpleasant smells.

S.I.012

2

1

a

b

S.I.013

3

2

1

Summary of Contents for EU 6221 U

Page 1: ...INSTRUCTION MANUAL KÄYTTÖOHJE BRUKSANVISNING РУКОВОДСТВО ПО ЭКСПЛУАТАЦИИ 2222 736 32 EU 6221 U f r e e z e r p a k a s t i n k a a p p i f r y s s k å p морозильник GB FIN S RUS ...

Page 2: ...ds 6 Storage of commercially frozen food 6 Thawing 6 Ice cube production 6 Tips 7 Tips for freezing fresh foods 7 Tips for storage of commercially frozen food 7 Maintenance 8 Defrosting 8 Periodic cleaning 8 Periodios of non operation 8 Something not Working 9 Instructions for the installer Technical specifications 9 Installation 10 Positioning 10 Electrical connection 10 Grid preparation 10 Door ...

Page 3: ...cifically for the storage of edible foodstuffs only Frozen food must not be re frozen once it has been thawed out Manufacturers storage recommendations should be strictly adhered to Refer to relevant instructions The inner lining of the appliance consists of channels through which the refrigerant passes If these should be punctured this would damage the appliance beyond repair and cause food loss ...

Page 4: ...ansported horizontally it is possible that the oil contained in the compressor flows in the refrigerant circuit It is advisable to wait at least two hours before connecting the appliance to allow the oil to flow back in the compressor Environment Protection This appliance does not contain gasses which could damage the ozone layer in either its refrigerant circuit or insulation materials The applia...

Page 5: ...he freezer is marked with the symbol which means that the compartment is suitable for freezing fresie food and long term storage of frozen food Control panel Symbol for acoustic alarm Fast freeze switch and for stopping the acoustic alarm warning light on Fast freeze light yellow Warning light red Pilot light green Push button ON OFF Thermostat control knob Temperature regulation Turn knob beyond ...

Page 6: ...ld be used within a short time a temperature increase of the frozen food shortens its safe storage period Freezing of fresh foods To quick freeze foods when the appliance has not been in use switch on the freezer and let it run on the quick freeze setting for at least three hours before putting the food to be frozen in the compartment If instead the appliance is already in operation it should run ...

Page 7: ...rinks in the freezer as they might well burst In addition never put hot foods or liquids in the freezer compartment and take care not to fill recipients up to the brim if they are covered with a lid It is a good idea to mark the packs with the date on which freezing started so that you can keep a check on storage periods Tips for storage of commercially frozen food To get the best out of your free...

Page 8: ...not use a mechanical device or any artificial means to speed up the thawing process other than those recommended by the manufacturer A temperature increase of the frozen food shortens its safe storage period Periodic cleaning Never use metal objects for cleaning your appliance as it may get damaged Clean the inside with warm water and bicarbonate of soda Rinse and dry thoroughly MAINTENANCE The ap...

Page 9: ...ns socket is defective Mains malfunctions are to be corrected by an electrician Temperature is not properly adjusted please refer to the section Temperature regulation Door was open for a long time only leave the door open as long as necessary Within the last 24 hours a large quantity of warm foods were loaded press the fast freeze button Appliance is next to a source of warmth please refer to the...

Page 10: ...pply cable plug is provided with a contact for this purpose If the domestic power supply socket is not earthed connect the appliance to a separate earth in compliance with current regulations consulting a specialist technician The Manufacturer declines all responsibility if the above safety precautions are not observed This appliance complies with EEC directive number 87 308 of 2 6 87 relative to ...

Page 11: ...f the previously removed bottom hinge 2 in the upper hole G of the door therefore fix the hinge on the top in position B Building in the appliance under a worktop The dimensions of the recessed installation area must correspond with those indicated in the figure The appliance could be inserted between two units a or as an end unit b Important It must be possible to disconnect the appliance from th...

Page 12: ...50mm PR166 Place guide A on the inside part of the furniture door in the upper and lower positions as shown in the figure and mark the position of external holes Having drilled the holes fix the guide with the screws supplied Fix cover C on guide A until it clips into place Open the appliance door and the furniture door at 90 Insert the small square B into guide A Put together the appliance door a...

Page 13: ...e it is important that the original ventilation grid is used For an opening height dimension A 820 mm and a plinth height dimension a 100 mm the plinth may be fitted without adjustments The same applies to an opening height dimension B 870 mm and a plinth height dimension b 150 mm For plinth heights greater than a 100 mm b 150 mm a cut should be made in the plinth 580 mm wide in the centre of the ...

Page 14: ...Electrolux HemProdukter AB S 105 45 Stockholm www electrolux se ...

Reviews: