background image

14

ELECTRICAL CONNECTION

WARNING:

THIS APPLIANCE MUST BE EARTHED.
The manufacturer declines any liability
should this safety measure not be
observed.

If the plug that is fitted to your appliance is not
suitable for your socket outlet, it must be cut off and
the appropriate plug fitted.

Remove the fuse from the cut off plug.
The cut off plug should then be disposed of to prevent
the hazard of shocks in case it should be plugged into
a 13amp socket in another part of your home.

Important

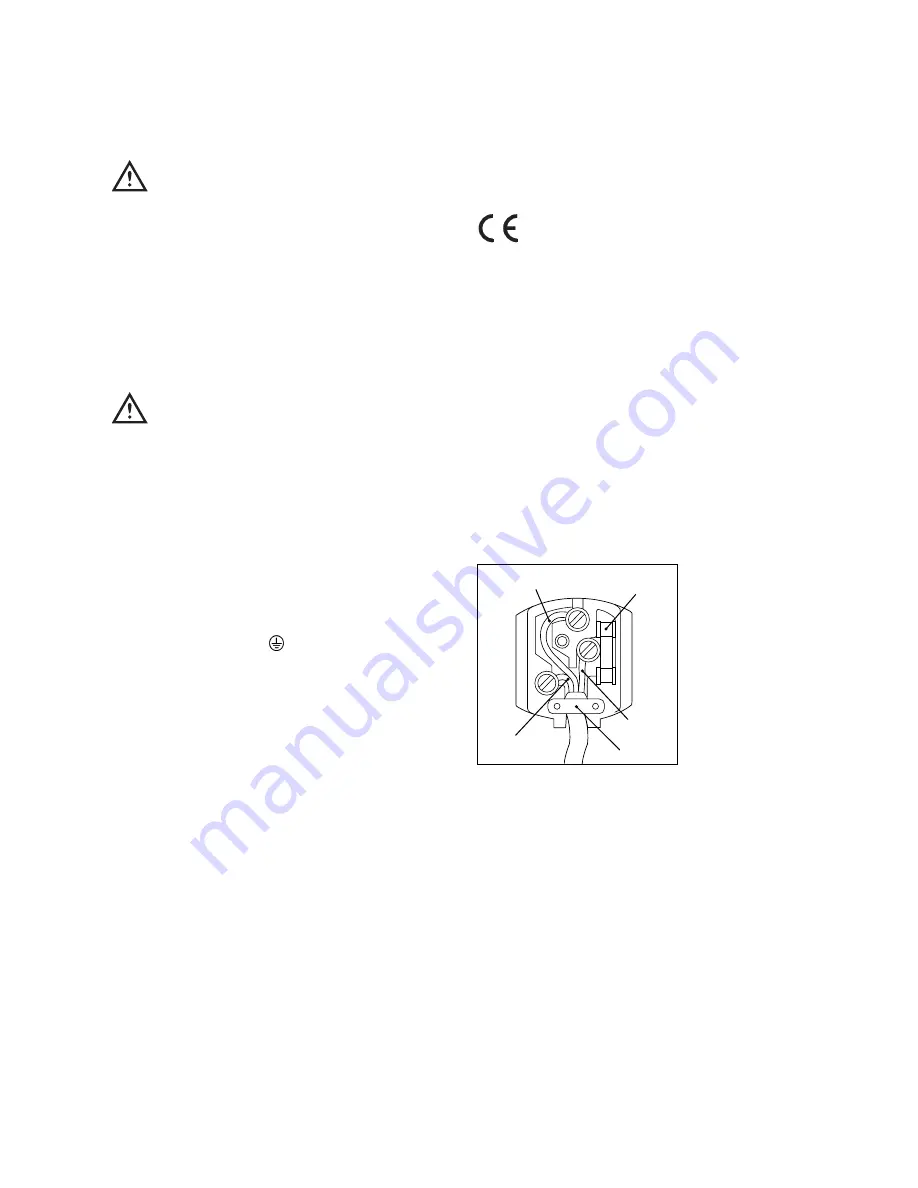
The wires in the mains lead are coloured in
accordance with the following code:

Green and Yellow

- Earth

Blue

- Neutral

Brown

- Live

If you fit your own plug, the colours of the wires in the
mains lead of your appliance, may not correspond
with the markings identifying the terminals in your
plug, proceed as follows:

Connect the Green and the Yellow (earth) wire to the
terminal in the plug which is marked with the letter
«E» or the earth symbol 

, or coloured green and

yellow.

Connect the blue (neutral) wire to the terminal in the
plug which is marked with the letter «N» or coloured
black.

Connect the brown (live) wire to the terminal in the
plug which is marked with the letter «L» or coloured
red.

The plug moulded onto the lead incorporates a fuse.
For replacement, use a 13amp BS1362 fuse. Only
ASTA or BSI approved fuses should be used.

The plug must not be used if the fuse cover/carrier is
lost. The cover/carrier is indicated by the coloured
insert at the base of the plug.
A replacement cover/carrier must be obtained from
your local Service Force Centre.

This appliance complies with the E.E.C. Directive
No. 87/308 of 2.6.87 relative to radio interference
suppression.

This appliance complies with the following 
E.E.C. Directive:

- 73/23 EEC of 19.2.73 (Low Voltage Directive) and

subsequent amendments.

- 89/336 EEC of 3.5.89 (Electromagnetic

Compatibility Directive) and subsequent
amendments.

Please ensure that when the appliance is installed
it is easily accessible for the engineer in the event
of breakdown.

D207

GREEN & YELLOW

13 AMP. FUSE

BROWN

CORD CLAMP

BLUE

13 AMP

Summary of Contents for EU 6233

Page 1: ...INSTRUCTION BOOKLET 2222 753 51 EU 6233 I f r e e z e r UK ...

Page 2: ...ar 6 Thawing 6 Making ice cubes 7 Normal Operating Sound 7 Health and Safety Guidelines 7 Defrosting 8 Maintenance and Cleaning 9 Internal cleaning 9 When the appliance is not in use 9 Something Not Working 10 Service and Spare Parts 11 Customer Care Department 11 Guarantee Conditions 12 Instructions for the Installer Technical Specifications 13 Installation 13 Positioning 13 Door reversal 13 Elec...

Page 3: ...ecome damaged avoid open flames and sources of ignition thoroughly ventilate the room in which the appli ance is situated Child Safety Do not allow children to tamper with the controls or play with the product There is a risk of suffocation Keep packaging material away from children General Safety This appliance contains hydrocarbons in its cooling unit maintenance and recharging must therefore on...

Page 4: ...ut by inexperienced persons may cause injury or serious malfunctioning Contact your local Service Force Centre At the end of the Appliance Life When disposing of your appliance use an authorised disposal site Remove the plug and ensure that any locks or catches are removed to prevent young children being trapped inside MAX min Freezer controls Compartment for freezing fresh food frozen food storag...

Page 5: ... these factors have to be considered and some experimentation may be necessary Push button for fast freezing Fast freezing indicator light yellow Warning light red Before use Remove all securing tapes Wash inside the appliance with lukewarm water and bicarbonate of soda 5 ml to 0 5 litre of water Do not use soap or detergent as the smell may linger Dry thoroughly Pilot light green Thermostat contr...

Page 6: ...tore to the consumer in the shortest possible time a temperature increase of the frozen food could shorten its storage period It is also advisable not to exceed the storage period indicated by the producer of the food Finally do not open the door frequently or leave it open longer than is absolutely necessary Important Do not put carbonated liquids fizzy drinks etc in the freezer compartment Ice l...

Page 7: ... not store food uncovered The best way to defrost food is to put it in the refrigerator to thaw slowly Ensure that food placed in the freezer is dated and labelled and used in date order to ensure that food is consumed at its best It is important that food is used before its best before date Always wash your hands with soapy water and dry them with a clean towel before handling food Keep work surf...

Page 8: ... future use Turn the thermostat control knob to a medium setting and after letting the appliance run for at least two hours in the fast freeze mode replace the previously removed food into the compartments Important A temperature rise of the frozen food packs during defrosting may shorten their storage life Never use sharp metal tools to scrape off frost from the evaporator as you could damage the...

Page 9: ... PERFUMED CLEANING PRODUCTS OR WAX POLISHES TO CLEAN THE INTERIOR AS THESE WILL DAMAGE THE SURFACE AND LEAVE A STRONG SMELL Important Do not use abrasive products Once or twice a year remove the ventilation grille and dust the air channels at the base of the appliance with a brush or vacuum cleaner You MUST ensure that the appliance is switched OFF An accumulation of dust will affect the performan...

Page 10: ...bient conditions Check the ambient temperature is within the appliances operating limits of 10 C to 32 C Relocate the appliance if necessary Has door just been opened If so leave for a few minutes to allow the air pressure to equalise Adjust the thermostat control knob to give correct temperature control See page 5 Check that the door is closed Large quantities of food have recently been placed in...

Page 11: ...ct the Service Force Centre you will need to give the following details 1 Your name address and post code 2 Your telephone number 3 Clear and concise details of the fault 4 The model and serial number of the appliance found on the rating plate 5 The purchase date Please note that a valid purchase receipt or guarantee documentation is required for in guarantee service calls CUSTOMER CARE DEPARTMENT...

Page 12: ...osts incurred for calls to put right an appliance which is improperly installed or calls to appliances outside the United Kingdom Appliances found to be in use within a commercial environment plus those which are subject to rental agreements Products of Electrolux manufacture which are not marketed by Electrolux European Guarantee If you should move to another country within Europe then your guara...

Page 13: ...lding in and door reversal instructions please refer to the relevant instructions on the following pages TECHNICAL SPECIFICATIONS 13 POWER SUPPLY VOLTAGE AND FREQUENCY 220 240 V 50 Hz TOTAL POWER ABSORBED 100 W AVERAGE DAILY UNITS ELECTRICITY 0 70 kWh GROSS CAPACITY 110 l NET CAPACITY 94 l STAR RATING This figure is based on standard test results in accordance with European Standard EN153 Actual c...

Page 14: ...ymbol or coloured green and yellow Connect the blue neutral wire to the terminal in the plug which is marked with the letter N or coloured black Connect the brown live wire to the terminal in the plug which is marked with the letter L or coloured red The plug moulded onto the lead incorporates a fuse For replacement use a 13amp BS1362 fuse Only ASTA or BSI approved fuses should be used The plug mu...

Page 15: ...min cm2 200 200 cm 2 min D526 540 50 560 550 880 PR 32 3 Press in the joint covers between the appliance and the kitchen furniture D132 A D022 2 Push the appliance into the housing until stop strip A touches the kitchen unit 4 Open the door and push the appliance against the side of kitchen furniture opposite to that of appliance hinges Fasten the appliance with 4 screws provided in the kit includ...

Page 16: ... the furniture door and mark the holes as indicated in the figure Remove the squares and drill holes with Ø 2 mm at 8 mm from the outer edge of the door Place the small square on the guide again and fix it with the screws supplied PR168 PR167 1 D B 11 Fix cover D on guide B until it clips into place PR33 2 C A 20mm A 50mm PR166 7 Place guide A on the inside part of the furniture door upper and low...

Page 17: ......

Page 18: ......

Page 19: ......

Page 20: ... Electrolux Household Appliances Limited 2001 ELECTROLUX HOME PRODUCTS OPERATIONS EUROPE ...

Reviews: