background image

IMPORTANT SAFETY INFORMATION

It is most important that this instruction book should be retained with the appliance for future refer-

ence. Should the appliance be sold or transferred to another owner, or should you move house and

leave the appliance, always ensure that the book is left with the appliance in order that the new owner

can get to know the functioning of the appliance and the relevant safety information.
This information has been provided in the interest of safety. You MUST read it carefully before

installing or using the appliance.

Installation

¥ This appliance is heavy. Care should be taken

when moving it.

¥ It is dangerous to alter the specifications or attempt

to modify this product in any way.

¥ Care must be taken to ensure that the appliance

does not stand on the electrical supply cable. 

Important:

if the supply cable is damaged, it must

be replaced by a special cable available from your

local Electrolux Service Force Centre.

¥ Any electrical work required to install this appliance

should be carried out by a qualified electrician or

competent person.

¥ Parts which heat up should not be exposed.

Whenever possible, the back of the appliance

should be close to a wall but leaving the required

distance for ventilation as stated in the installation

instructions.

¥ The appliance should be left for 2 hours after instal-

lation before it is turned on, in order to allow the

refrigerant to settle.

Child Safety

¥ Do not allow children to tamper with the controls or

play with the product.

¥ Keep all packaging well away from children.

General Safety

¥

Take utmost care when handling your appliance

so as not to cause any damages to the cooling

unit with consequent possible fluid leakages.

¥

The appliance must not be located close to radi-

ators or boilers.

¥

Avoid prolonged exposure of the appliance to

direct sunlight.

¥

Do not use other electrical appliances (such as

ice cream makers) inside of refrigerating appli-

ances.

During Use

¥ This appliance is designed for domestic use only,

specifically for the storage of edible foodstuffs only.

¥ Frozen food must NOT be re-frozen once it has

thawed out.

¥ Do not place carbonated or fizzy drinks in the freez-

er.

¥ Do not remove items from the freezer if your

hands are damp/wet, as this could cause skin

abrasions or frost/freezer burns.

¥ Ice lollies can cause Ôfrost/freezer burnsÕ if con-

sumed straight from the freezer. 

¥ ManufacturersÕ storage recommendations should

be strictly adhered to. Refer to relevant instruc-

tions. 

¥ The cooling plate or refrigerated freezer shelves

in this appliance contain channels through which

the refrigerant passes. If these are punctured this

will cause substantial damage to the appliance

and result in food loss. DO NOT USE SHARP

INSTRUMENTS to scrape off frost or ice. Under

NO circumstances should solid ice be forced off

the lining or shelves. Solid ice should be allowed

to thaw, when defrosting the appliance. See

Defrost Instructions.

Maintenance and Cleaning

¥ Switch off and unplug the appliance before carry-

ing out any cleaning or maintenance work.

Servicing

¥ This product should be serviced by an authorised

engineer and only genuine spare parts should be

used. 

¥ Under no circumstances should you attempt to

repair the machine yourself. Repairs carried out

by inexperienced persons may cause injury or

serious malfunctioning. Refer to your local

Electrolux Service Force Centre and always

insist on genuine spare parts.

At the end of the

Appliance Life

¥ When disposing of your appliance, use an autho-

rised disposal site. 

¥ Remove the plug and ensure that any locks or

catches are removed, to prevent young children

being trapped inside.

2

15

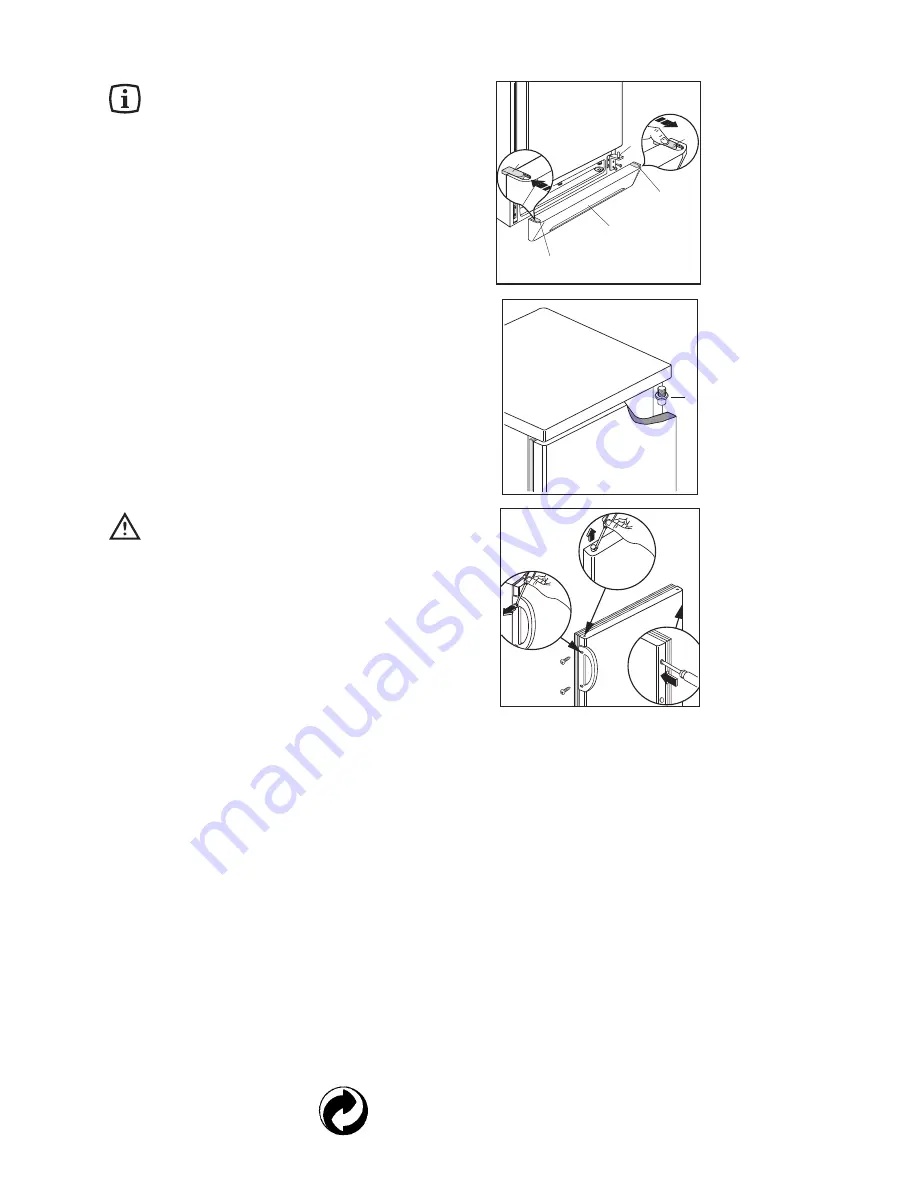
Door reversal directions

1. Disconnect from the electricity supply.
2. Gently lay the fridge/freezer on its back with the

top held away from the floor by 5-8 cm (2-3 inch-

es) of packing;

3. Remove the ventilation grill (D).
4. Unscrew the bottom hinge (E).
5. Slide out the fridge door from pin (G), unscrew

the latter and then refit it on the opposite side;

6. Remove the two screws which mask the holes for

fixing the hinge from the left hand side;

7. Replace the door and bottom hinge (E) on the

opposite side.

8. Remove the plug (F) from the ventilation grill (D)

and replace it on the opposite side. Re-assemble

the ventilation grill (D).

9. Unscrew the handle. Refit it on the opposite side

after having pierced the plugs with a punch.

Cover the holes left open with the plugs con-

tained in the documentation pack. 

Attention

After completion of the door reversiing operation,

check that the door gasket adheres to the cabinet. If

the ambient temperature is cold (i.e. in Winter), the

gasket may not fit perfectly to the cabinet. In that

case, wait for the natural fitting of the gasket or

accelerate this process by heating up the part

involved with a normal hairdryer on a low setting.

G

PR228

E

F

D

F

F

F

Printed on recycled paper

Summary of Contents for EU 6938 C

Page 1: ...f r e e z e r INSTRUCTION BOOK 2222 128 95 EU 6938 C ...

Page 2: ...ance must not be located close to radi ators or boilers Avoid prolonged exposure of the appliance to direct sunlight Do not use other electrical appliances such as ice cream makers inside of refrigerating appli ances During Use This appliance is designed for domestic use only specifically for the storage of edible foodstuffs only Frozen food must NOT be re frozen once it has thawed out Do not plac...

Page 3: ...rage 6 Thawing 6 Making ice cubes 6 Cold accumulator 6 Hints and Tips 7 Maintenance and Cleaning 8 Internal cleaning 8 External cleaning 8 When the appliance is not in use 8 Defrosting 8 Something Not Working 9 Service and Spare Parts 10 Customer Care Department 10 Guarantee Conditions 11 Instructions for the Installer Technical Specification 12 Installation 13 Positioning 13 Rear Spacers 13 Elect...

Page 4: ...4 A Freezer controls B Pizza box drawer C Freezing fresh foods D Frozen food storage D B C A 10 10 10 10 3 3 3 3 3 4 1 ON SUPER ALARM MAX min DESCRIPTION OF THE APPLIANCE ...

Page 5: ...ature to stablise before making further changes To obtain a lower temperature turn the thermostat control towards max to obtain a higher temperature turn the control towards min For easier turning of this control use a small coin Control Panel A Alarm light If the alarm light illuminates it indicates that the temperature within the freezer has reached a level where the safe food storage is no long...

Page 6: ... has elapsed place the food to be frozen in the two top compartments of the freezer as these are the coldest parts Once the food is completely frozen which could take up to 24 hours return the fast freeze button to the normal position by pressing it the yellow light B goes off Distribute the frozen food packages in the other compartments so that the top compartments can be used for a further freez...

Page 7: ...pes of frozen goods The numbers indicate storage times in months for the appropriate types of frozen goods Whether the upper or lower value of the indicated storage time is valid depends on the quality of the foods and pre treating before freezing Energy Saving Advice Do not install the appliance close to sources of heat such as a boiler or radiator Locate the appliance in a cool well ventilated r...

Page 8: ...s and clean the appliance leaving the doors ajar to prevent unpleasant smells Defrosting When the frost has reached a thickness of up to 4mm it can be removed using the ice scraper provided with the appliance During this operation it is not necessary to disconnect the appliance from the mains and remove the food Never use metal tools for this operation For complete defrosting once or twice a year ...

Page 9: ...that the door is closed Large quantities of food have recently been placed in the cabinet and or door is frequently opened Check that air ventilation is not obstructed Ensure the door is not left open Check that nothing is preventing the door from closing Is the door gasket intact and clean Has advised periodic defrosting been carried out Refer to normal operating sounds Important If you call out ...

Page 10: ... Working Õ When you contact the Service Force Centre you will need to give the following details 1 Your name address and post code 2 Your telephone number 3 Clear and concise details of the fault 4 The model and serial number of the appliance found on the rating plate 5 The purchase date Please note that a valid purchase receipt or guarantee documentation is required for in guarantee service calls...

Page 11: ... calls to put right an appliance which is improperly installed or calls to appliances outside the European Community EC or European Free Trade Area Appliances found to be in use within a commercial environment plus those which are subject to rental agreements Products of Electrolux manufacture which are not marketed by Electrolux European Guarantee If you should move to another country within Euro...

Page 12: ...240 V 50 Hz TOTAL POWER ABSORBED 90 W AVERAGE DAILY UNITS ELECTRICITY 0 66 kWh GROSS CAPACITY Freezer 190 l NET CAPACITY Freezer 160 l STAR RATING This figure is based on standard test results in accordance with European Standard EN 153 Actual consumption will depend on how the appliance is used and where it is located ...

Page 13: ...ace underneath The back of the cabinet may be placed close to the wall but must not touch it DO NOT install in places with restricted ventilation Adjust the level of the appliance by screwing out the adjustable foot or feet at the bottom of the cabinet using your fingers D200 D594 100 mm 10 mm 10 mm A B NP006 Warning IF YOU ARE DISCARDING AN OLD APPLIANCE THAT HAS A LOCK OR CATCH ON THE DOOR YOU M...

Page 14: ...which is marked with the letter ÇEÈ or the earth symbol or coloured green and yellow Connect the blue neutral wire to the terminal in the plug which is marked with the letter ÇNÈ or coloured black Connect the brown live wire to the terminal in the plug which is marked with the letter ÇLÈ or coloured red D207 GREEN YELLOW 13 AMP FUSE BROWN CORD CLAMP BLUE 13 AMP The plug moulded onto the lead incor...

Page 15: ...move the plug F from the ventilation grill D and replace it on the opposite side Re assemble the ventilation grill D 9 Unscrew the handle Refit it on the opposite side after having pierced the plugs with a punch Cover the holes left open with the plugs con tained in the documentation pack Attention After completion of the door reversiing operation check that the door gasket adheres to the cabinet ...

Page 16: ... Electrolux Household Appliances Limited 2002 ...

Reviews: