background image

4

OPERATION

Before using

Remove all securing tapes. Wash inside the
appliance with lukewarm water and bicarbonate of
soda (5 ml to 0.5 litre of water).

Do not use soap or detergent as the smell may
linger. Dry thoroughly.

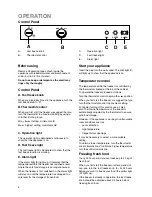
Control Panel

min

MAX

C

A

B

D E

ALARM

SUPER

ON

N S

A -

Fast freeze knob

B -

Thermostat control

C -

Operation light

D -

Fast freeze light

E -

Alarm light

Start your appliance

Insert the plug into the wall socket. The pilot light (C)
will light up to show that the appliance is on.

Temperature control

The temperature within the freezer is controlled by
the thermostat situated at the top of the cabinet.

To operate the freezer proceed as follows:

Turn the thermostat control beyond the «

» position.

When you first start the freezer, we suggest that you
turn the thermostat control to a medium setting.

For easier turning of this control, use a small
coin.The internal temperature of the freezer is
automatically adjusted by the thermostat to ensure
safe food storage.

However, if the appliance is working in unfavourable
room conditions such as

-  poor ventilation, 

-

high temperature, 

-

frequent door openings, 

it may be necessary to select a more suitable
setting.

To obtain a lower temperature, turn the thermostat
control towards max; to obtain a higher temperature
turn the control towards min.

Control Panel

A. Fast freeze knob

When you place fresh food in the appliance, turn the
fast freeze knob to “S”.

B. Thermostat control

When you first start the freezer we suggest that you
turn the thermostat to a medium setting by using a
coin that fits the groove.

Min = lowest setting, minimum cold

Max = highest setting, maximum cold

C. Operation light

The operation light is illuminated continuously, to
show that the appliance is on.

D. Fast freeze light

The fast freeze light is illuminated, to show that the
fast freeze function is working.

E. Alarm light

If the alarm light (E) lights up, it indicates that the
temperature within the freezer has reached a level
where the safe food storage is no longer ensured.

When the freezer is first switched on, the alarm light
will stay on until the temperature has dropped to a
safe level for the storage of frozen food.

Freezing fresh food

In any 24 hour period you can freeze up to 22 kg of
fresh food.

When you first start the freezer or after a period of
non-use, turn the  fast freeze knob  to «S» 24 hours
before you want to freeze your food (the yellow light
(D) lights up).

If the freezer is already in operation, the fast-freeze
knob should be activated about 2-3 hours before
freezing fresh food.

13

INSTALLATION

Positioning

This appliance should only be installed at a location
where the ambient temperature corresponds to the
climate classification indicated on the rating plate,
which is located at the left on the inside of the
appliance.

The following table shows which ambient
temperature is correct for each climate classification:

SN    +10°C  to  + 32°C

N      +16°C  to   + 32°C

ST    +18°C  to   + 38°C

T       +18°C  to  + 43°C

It should be located in a dry atmosphere, out of

direct sunlight and away from extreme temperature
e.g. not next to a boiler or radiator, or in a very cold
room e.g. an outhouse, where the temperatures may
fall below 10°C (50°F). If these temperatures are
exceeded i.e. colder or warmer, then the appliance
may not operate correctly.

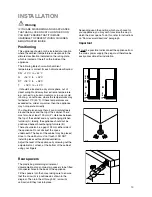
You should also ensure that air can circulate freely
around the back and the top of the cabinet. There
must also be at least 100 mm (4”) distance between
the top of the cabinet and any overhanging kitchen
furniture (A). Ideally, the appliance should not be
positioned beneath overhanging furniture (B).

There should also be a gap of 25 mm either side of
the appliance. Do not obstruct the space
underneath. The back of the cabinet may be placed
close to the wall but must not touch it. DO NOT
install in places with restricted ventilation.

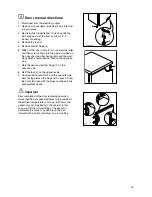
Adjust the level of the appliance by screwing out the
adjustable foot, or feet, at the bottom of the cabinet
using your fingers.

D200

100 mm

10 mm

10 mm

A

B

NP00

Warning

IF YOU ARE DISCARDING AN OLD APPLIANCE
THAT HAS A LOCK OR CATCH ON THE DOOR,
YOU MUST ENSURE THAT IT IS MADE
UNUSABLE TO PREVENT YOUNG CHILDREN
BEING TRAPPED INSIDE.

Rear spacers

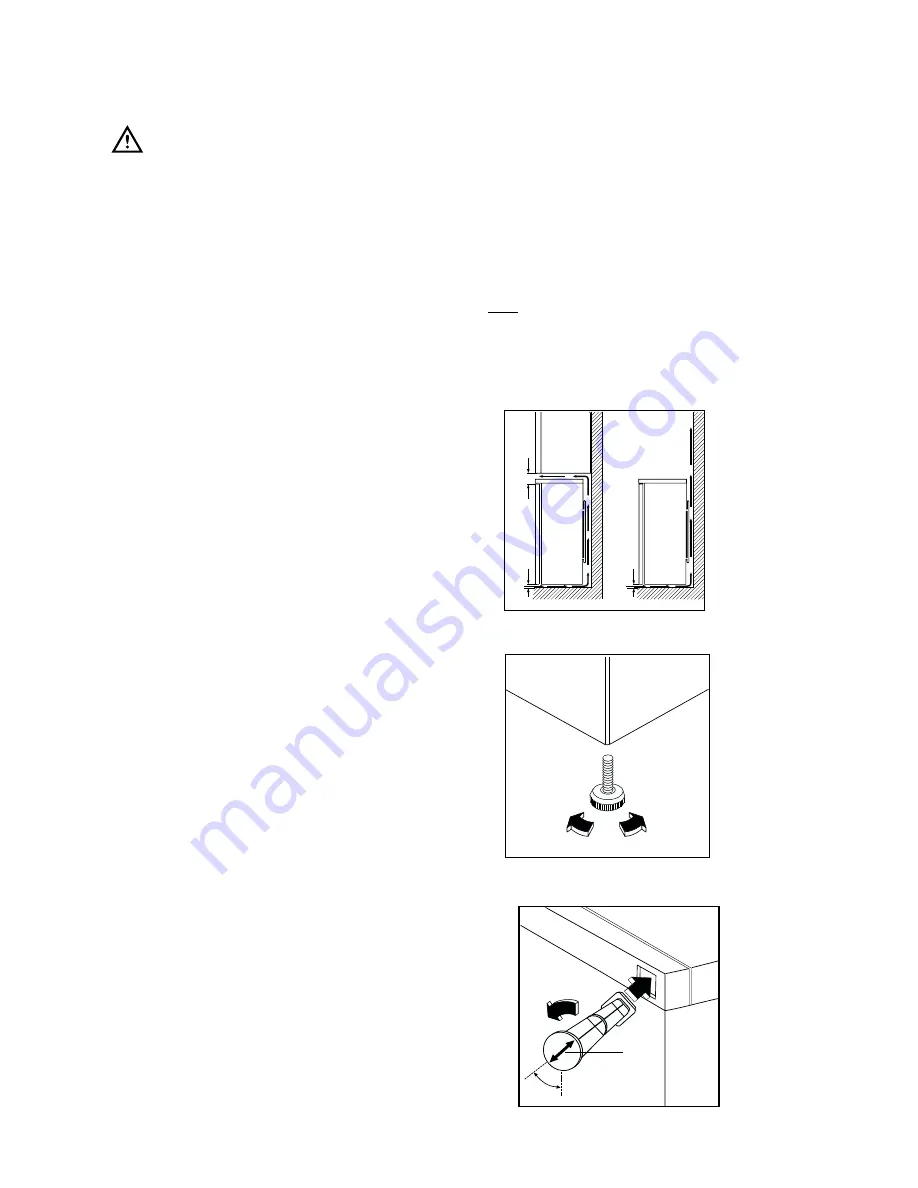
The plastic bag containing all relevant
documentation also contains two spacers to be fitted
into special holes in the back of the appliance.

Fit the spacers into the holes, taking care to ensure
that the arrow (A) is positioned as shown in the
diagram. Then turn them through 45° (arrow (A)
vertical) until they lock into place.

Important

It must be possible to disconnect the appliance from
the mains power supply; the plug must therefore be
easily accessible after installation.

PR60

A

45°

Depending upon the position which you choose for
your appliance, you may wish to reverse the way in
which the door opens. To do this, refer to instructions
on “Door reversal directions” paragraph.

Summary of Contents for EU 7120/1 C

Page 1: ...f r e e z e r INSTRUCTION BOOK 2222 060 16 EU 7120 1 C ...

Page 2: ...ose to radiators or boilers Avoid prolonged exposure of the appliance to direct sunlight Do not use other electrical appliances such as ice cream makers inside of refrigerating appliances unless they are approved for this purpose by the manufacturer During Use This appliance is designed for domestic use only specifically for the storage of edible foodstuffs only Frozen food must NOT be re frozen o...

Page 3: ...s 5 Normal operating sounds 5 Health and Safety Guidelines 6 Maintenance and Cleaning 6 Internal cleaning 6 External cleaning 7 When the appliance is not in use 7 Defrosting 7 Something Not Working 9 Service and Spare Parts 10 Customer Care Department 10 Guarantee Conditions 11 Instructions for the Installer Technical Specification 12 Installation 13 Positioning 13 Rear Spacers 13 Electrical Conne...

Page 4: ... To obtain a lower temperature turn the thermostat control towards max to obtain a higher temperature turn the control towards min Control Panel A Fast freeze knob When you place fresh food in the appliance turn the fast freeze knob to S B Thermostat control When you first start the freezer we suggest that you turn the thermostat to a medium setting by using a coin that fits the groove Min lowest ...

Page 5: ...any type of frozen or deep frozen food follow the oven instructions particularly regarding the placement of aluminium wrapping or containers in the oven Defrosted cooked food must never be refrozen This time can be shortened depending on the quantity of food to be frozen After the time has elapsed place the food to be frozen in the two top compartments of the freezer as these are the coldest parts...

Page 6: ...ust not be refrozen Lean food keeps better and longer than fatty food salt reduces the storage time Wrap the food in polythene or aluminium freezing bags or foil so that they adhere to the food and provide an airtight seal Packaging which is swollen or has traces of refrozen water droplets on the pack could indicate that the product has not been kept at a suitable temperature and that it may have ...

Page 7: ...liance is not in use When the appliance is not in use for long periods disconnect from the electricity supply empty all foods and clean the appliance leaving the doors ajar to prevent unpleasant smells External cleaning Many proprietary kitchen surface cleaners contain chemicals that can attack damage the plastics used in this appliance For this reason it is recommended that the outer casing of th...

Page 8: ...st you Ice cream once thawed should be discarded Fruits Vegetables if soft should be cooked and used up Breads Cakes can be re frozen without danger Shellfish should be refrigerated and used up quickly Cooked Dishes i e casseroles should be refrigerated and used up Large Pieces of Meat can be re frozen providing there are still ice crystals remaining within them Small Joints should be cooked and c...

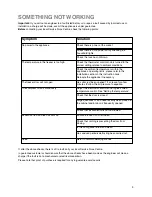
Page 9: ...g the temperature Check that the door is closed Large quantities of food have recently been placed in the cabinet and or door is frequently opened Check that air ventilation is not obstructed Ensure the door is not left open Check that nothing is preventing the door from closing Is the door gasket intact and clean Has advised periodic defrosting been carried out Refer to normal operating sounds Im...

Page 10: ...r please ensure you have read the details under the heading Something Not Working When you contact the Service Force Centre you will need to give the following details 1 Your name address and post code 2 Your telephone number 3 Clear and concise details of the fault 4 The model and serial number of the appliance found on the rating plate 5 The purchase date Please note that a valid purchase receip...

Page 11: ...ight an appliance which is improperly installed or calls to appliances outside the European Community EC or European Free Trade Area Appliances found to be in use within a commercial environment plus those which are subject to rental agreements Products of Electrolux manufacture which are not marketed by Electrolux European Guarantee If you should move to another country within Europe then your gu...

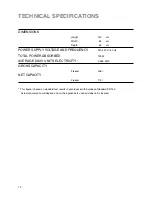
Page 12: ...220 240 V 50 Hz TOTAL POWER ABSORBED 100 W AVERAGE DAILY UNITS ELECTRICITY 0 948 kWh GROSS CAPACITY Freezer 206 l NET CAPACITY Freezer 174 l This figure is based on standard test results in accordance with European Standard EN 153 Actual consumption will depend on how the appliance is used and where it is located ...

Page 13: ...lso be a gap of 25 mm either side of the appliance Do not obstruct the space underneath The back of the cabinet may be placed close to the wall but must not touch it DO NOT install in places with restricted ventilation Adjust the level of the appliance by screwing out the adjustable foot or feet at the bottom of the cabinet using your fingers D200 100 mm 10 mm 10 mm A B NP00 Warning IF YOU ARE DIS...

Page 14: ...ug which is marked with the letter E or the earth symbol or coloured green and yellow Connect the blue neutral wire to the terminal in the plug which is marked with the letter N or coloured black Connect the brown live wire to the terminal in the plug which is marked with the letter L or coloured red D207 GREEN YELLOW 13 AMP FUSE BROWN CORD CLAMP BLUE 13 AMP The plug moulded onto the lead incorpor...

Page 15: ... on the opposite side 7 Refit the door and bottom hinge 1 on the opposite side 8 Refit the feet 3 on the opposite side 9 Unscrew the handle Refit it on the opposite side after having pierced the plugs with a punch Cover the holes left open with the plugs contained in the documentation pack Important After completion of the door reversiing operation check that the door gasket adheres to the cabinet...

Page 16: ... Electrolux plc 2003 ...

Reviews: