background image

Branchement électrique

Contrôlez, avant de brancher l’appareil, que le
voltage et la fréquence indiqués sur la plaque
signalétique correspondent à ceux de votre réseau.

Tolérance admise: ±6%.

Pour l’adaptation de l’appareil à des voltages
différents, l’adjonction d’un autotransformateur d’une
puissance adéquate est indispensable.

Il faut absolument brancher l'appareil à une prise
de terre réglementaire.

C'est pour cela que la prise du câble d'alimentation
est munie d'un contact prévu exprès. Si la prise de
courant du réseau domestique n'est pas branchée à
la terre, branchez l'appareil à une prise de terre à
part, conformément aux normes en vigueur, en vous
adressant à un technicien spécialisé.

Le fabricant décline toute responsabilité, si cette
norme de prévention des accidents n'est pas
respectée.

-Cet appareil est conforme aux Directives

Communautaires suivantes:

- 87/308 CEE du 2.6.87 concernant la
suppression des interférences radio-électriques

- 73/23 CEE 19/02/73 (Basse Tension) et
modifications successives;

- 89/336 CEE 03/05/89 (Compatibilité Electro-
magnétique) et modifications successives.

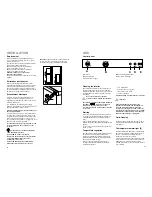
Entretoises postérieures

Dans le sachet de la documentation, il y a deux
entretoises à mettre dans les trous prévus à cet effet,
à l’arrière de l’appareil. Introduisez les entretoises
dans les trous situés à l’arrière de l’appareil (flèche
(A) comme indiqué sur la Figure), puis tournez-les de
45° jusqu’à accrochage (flèche verticale).

PR60

A

45°

INSTALLATION

Emplacement

Placez de préférence votre appareil loin d’une
source de chaleur (chauffage, cuisson ou rayons
solaires trop intenses).
Pour des raisons de sécurité, la ventilation doit être
prévue comme indiqué dans la Fig.
Appreil positionné sous armoires murales de
cuisine en surplomb (voir Fig. A).
Appreil positionné sans armoires murales de
cuisine en surplomb (voir Fig. B).

Attention: veillez à ne pas obstruer les
ouvertures de ventilation.

Mettez l’appareil d’aplomb en agissant sur les pieds
réglables.

100 mm

10 mm

10 mm

A

B

NP00

22

Important:

L’appareil doit pouvoir être débranché du

secteur ; il est donc nécessaire que la fiche reste
accessible une fois que l’installation est terminée.

43

The temperature alarm light (E)

The temperature alarm light turns on automatically
whenever the temperature within the freezer rises
above a certain value which might endanger
satisfactory long-term conservation.

It is perfectly normal for the temperature alarm light
to remain lit up for a short time after the freezer is
initially turned on. It will remain lit up until the
optimum temperature for the conservation of frozen
food is attained.

Cleaning the interior

Before using the appliance for the first time, wash
the interior and all internal accessories with luke-
warm water and some neutral soap so as to remove
the typical smell of a brand-new product, then dry
thoroughly.

Do not use detergents or abrasive
powders, as these will damage the finish.

This freezer compartment has been marked with
the symbol  

, which means that it is

suited to the freezing of fresh foods, the
conservation of frozen foods and the production
of ice-cubes.

Starting

Insert the power supply plug into the nearest wall
socket (the function indicator light (C) will light up
indicating that the freezer is receiving electrical
input.)

Turn the thermostat knob (B) to the right to a
medium setting (the temperature alarm light (E) will
light up).

To turn off the freezer, turn the thermostat knob to
the «

» position.

Temperature regulation

The temperature is automatically regulated and can
be increased to achieve a higher temperature
(warmer) by rotating the thermostat knob toward
minimum settings or reduced (colder) rotating the
knob toward maximum settings.

However, the exact setting should be chosen
keeping in mind that the temperature inside the
refrigerator depends on:

USE

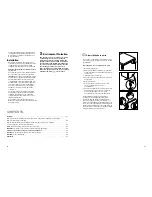
Control panel

min

MAX

C

A

B

D E

ALARM

SUPER

ON

N S

A.

N/S knob 

B.

Thermostat knob

C.

Function indicator light 

D.

Quick-freezing indicator light 

E.

Temperature alarm light 

room temperature;

how often the door is opened;

the quantity of food stored;

location of appliance.

A medium setting is generally the most suitable.

Important

If the ambient temperature is high or the
appliance is fully loaded, and the appliance is
set to the lowest temperatures, it may run
continuously causing frost to form on the rear
wall. In this case the dial must be set to a higher
temperature to allow automatic defrosting and
therefore reduced energy consumption.

Quick-freezing

For quick-freezing, turn the N/S knob (A) to the «S»
symbol. The quick-freezing indicator light (D) will
then light up.

Summary of Contents for EU6830C

Page 1: ...l a t e u r k o e l k a s t f r e e z e r f r y s s k å p GEBRAUCHSANWEISUNGEN MODE D EMPLOI GEBRUIKSAANWIJZINGEN INSTRUCTION BOOK BRUKSANVISNING 2222 113 87 EU 6830 C NL F D S Electrolux HemProdukter AB S 105 45 Stockholm www electrolux se ...

Page 2: ...fier ou d essayer de modifier les caractéristiques de cet appareil Cet appareil contient des hydrocarbures dans son circuit de réfrigérant I entretien et la recharge ne doivent donc être effectués que par du personnel autorisé En cas de panne n essayez pas de réparer l appareil vous même Les réparations effectuées par du personnel non qualifié peuvent provoquer des dommages Contactez le Service Ap...

Page 3: ... the consumer has under this legislation are not affected by this declaration of guarantee terms This declaration does not affect the vendor s statutory warranty to the end user The appliance is guaranteed within the context of and in adherence with the following terms 1 In accordance with provisions laid down in paragraphs 2 to 15 we will remedy free of charge any defect that occurs within 24 mon...

Page 4: ...s Branchement électrique 22 Installation Réversibilité de la porte 23 Conditions de garantie 24 Réglage de la température La température est réglée automatiquement et peut être augmentée moine froid en tournant le bouton vers le minimum ou bien diminuée plus froid en le tournant vers le maximum En tout cas l exacte position doit être repérée en considérant que la température interne dépend des fac...

Page 5: ...10 kg INSTALLATION Location The appliance should be installed well away from sources of heat such as radiators boilers direct sunlight etc For safety reasons minimum ventilation must be as shown in Fig Appliance positioned under overhanging kitchen wall units see Fig A Appliance positioned without overhanging kitchen wall units see Fig B Attention keep ventilation openings clear of obstruction Two...

Page 6: ...s à glace Accumulateurs thermiques 2 accumulateurs thermiques sont fournis dans le congélateur ils permettent de prolonger le temps de conservation des aliments en cas de coupure de courant ou de panne Ils doivent être placés dans le compartiment supérieur 47 TECHNICAL INFORMATION 150 0 75 274 20 30 1240 550 600 Energy Consumption kWh 24h Energy Consumption kWh year Freezing Capacity kg Rising tim...

Page 7: ...ved with the special plastic scraper provided whenever the thickness of the frost exceeds 4 mm During this operation it is not necessary to switch off the power supply or to remove the foodstuffs Never use sharp metal tools to scrape off frost from the evaporator as you could damage it However when the ice becomes very thick on the inner liner complete defrosting should be carried out as follows 1...

Page 8: ...s Passez de temps en temps un produit à polir Dépoussiérez le condenseur situé à l arrière de l appareil à l aide d une brosse ou d un aspirateur Une accumulation de poussière risquerait de diminuer le rendement de l appareil Arrêt prolongé Lorsque l appareil doit rester à l arrêt pendant un certain temps prenez les précautions suivantes débranchez la prise de courant videz l appareil dégivrez le ...

Page 9: ...em in the freezer compartment Do not use metallic instruments to remove the trays from the freezer Freezing fresh food The 4 star compartment is suitable for long term storage of commercially frozen food and for freezing fresh food To freeze fresh foods turn the fast freezing knob at least 24 hours before introducing the food into the freezer in order to ensure better freezing results Place the fo...

Page 10: ...mperature alarm light turns on automatically whenever the temperature within the freezer rises above a certain value which might endanger satisfactory long term conservation It is perfectly normal for the temperature alarm light to remain lit up for a short time after the freezer is initially turned on It will remain lit up until the optimum temperature for the conservation of frozen food is attai...

Page 11: ...Technical information 47 Installation Location Rear spacers Electrical connection 48 Installation Door reversibility 49 Guarantee 50 speed up the thawing process other than those recommended by the manufacturer Never use metal objects for cleaning your appliance as it may get damaged Installation During normal operation the condenser and compressor at the back of the appliance heat up considerably...

Page 12: ... garantie n entraîne pas de prolongation de la période normale de garantie ni le départ d un nouveau cycle de garantie B 41 WARNINGS It is most important that this instruction book should be retained with the appliance for future reference Should the appliance be sold or transferred to another owner or should you move house and leave the appliance always ensure that the book is supplied with the a...

Page 13: ...arborgperiode de herstelling van hetzelfde gebrek meermaals mislukt of de herstellingkosten disproportioneel zijn wordt in overleg met de gebruiker een gelijkwaardige vervanging geleverd In geval van vervanging behouden we ons het recht voor om een vergoeding te rekenen naar rato van de verstreken gebruiksperiode 13 Herstelling onder waarborg heeft geen verlenging van de waarborgtermijn noch aanva...

Reviews: