background image

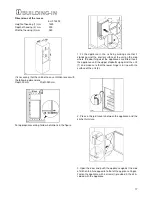
Dimensions of the recess

EUF 14800

Height of housing (1) mm

1225

Depth of housing (2) mm

550

Width of housing (3) mm

560

It is necessary that the cabinet has a ventilation recess with

the following dimensions:

Depth 50 mm

Width 540 mm

For appropriate venting, follow indications in the figure.

1. Fit the appliance in the niche by making sure that it

stands against the interior surface of the unit on the side

where the door hinges of the appliances are fitted. Insert

the appliance until the upper stripbutts up against the unit

(1) and make sure that the lower hinge is in line with the

surface of the unit (2).

2. Press in the joint covers between the appliance and the

kitchen furniture.

3. Open the door and push the appliance against the side

of kitchen furniture opposite to that of the appliance hinges.

Fasten the appliance with 4 screws (I) provided in the kit in-

cluded with the appliance.

BUILDING-IN

17

Summary of Contents for EUF14800

Page 1: ...EUF14800 Cuprightfreeze OPERATING INSTRUCTIONS 2222782 01 ...

Page 2: ...g 15 Door reversal 15 Electrical connection 16 Building in 17 PACKING DISPOSAL Except for wood material the packing and packaging materials used for our major appliances can and should be recy cled In countries where suitable recycling programs have been set up you may return the packing to the store you pur chased your appliance from Customers are encouraged to Bring paper cardboard and corrugate...

Page 3: ... cleaning your appliance as it may get damaged Under no circumstances should you attempt to repair the appliance yourself Repairs carried out by inexpe rienced persons may cause injury or more serious malfunctioning Refer to your local Service Centre and always insist on genuine spare parts Positioning Care must be taken to ensure that the appliance does not stand on the electrical supply cable Im...

Page 4: ... symbol are recyclable Disposal of old appliances The symbol on the product or on its packag ing indicates that this product may not be treated as household waste Instead it shall be handed over to the applicable collection point for the recycling of electrical and electronic equipment By ensuring this product is disposed of correctly you will help prevent potential negative consequences for the e...

Page 5: ...kewarm water and some neutral soap so as to remove the typical smell of a brand new product then dry thoroughly Do not use detergents or abrasive powders as these will damage the finish Control panel A Power ON OFF switch B Display with temperature readout and mode indicator C Mode selection alarm reset button D Freezer temperature control DISPLAY 1 Door Ajar alarm indicator 2 Temperature plus min...

Page 6: ... the freezer must be at least 18 C or colder Mode selection At each press of button C the following modes are acti vated in clockwise order Symbol 4 Fast Freeze mode No symbol normal operation How to power off the appliance To power off the appliance hold the A switch depressed for over 1 sec The temperature readout changes to a count down The display will count down from 3 to 1 and then turn off ...

Page 7: ...ar alarm condition is indicated by symbol 1 blinking the display turning red the buzzer beeping Press button C to stop the buzzer When normal operating conditions are restored closed door the buzzer stops beeping Storage of frozen food When you first start the freezer or if the freezer has been out of use for some time wait at least 12 hours before stor ing frozen food in your appliance If you nee...

Page 8: ... months for the ap propriate types of frozen goods Whether the upper or lower value of the indicated storage time is valid depends on the quality of the foods and pre treating before freezing Thawing Deep frozen or frozen food prior to being used can be thawed in the refrigerator or at room temperature depend ing on the time available for this operation Small pieces may even be cooked still frozen...

Page 9: ...already frozen foods but put in the special freez ing compartment This will stop the temperature of al ready frozen foods from rising Never put fizzy drinks in the freezer as they might well burst In addition never put hot foods or liquids in the freezer compartment and take care not to fill recipients up to the brim if they are covered with a lid Tips for storage of commercially frozen food To ge...

Page 10: ...rtment defrosts automatically Periodic cleaning Never use metal objects for cleaning your appliance as it may get damaged Clean the inside with lukewarm water and a mild detergent Rinse and dry thoroughly To guarantee a safe operation of the fridge once a year remove the ventilation grille at the base and clean the air channels with a vacuum cleaner This helps ensure proper operation resulting in ...

Page 11: ...n the appliance properly wrapped Was the door left open Was the door opened too frequently or left open too long Is the gasket in good condition Is something inside the freezer keeping the door slightly open Cooling system does not work Check to see if the temperature setting is between 1 and 6 Compressor makes repeated start attempts and fails to come on Power off the appliance wait 20 minutes an...

Page 12: ...Force Centre you will need to give the following details 1 Your name address and post code 2 Your telephone number 3 Clear and concise details of the fault 4 The model and serial number of the appliance found on the rating plate 5 The purchase date Please note that a valid purchase receipt or guarantee documentation is required for in guarantee service calls CUSTOMER CARE DEPARTMENT For general en...

Page 13: ...ic Costs incurred for calls to put right an appliance which is improperly installed or calls to appliances outside the European Community EC or European Free Trade Area Appliances found to be in use within a commercial environment plus those which are subject to rental agreements Products of Electrolux manufacture which are not marketed by Electrolux European Guarantee If you should move to anothe...

Page 14: ... TOTAL POWER ABSORBED 1 A AVERAGE DAILY UNITS ELECTRICITY 0 64 KWH GROSS CAPACITY 135 L NET CAPACITY 135 L THIS FIGURE IS BASED ON STANDARD TEST RESULTS IN ACCORDANCE WITH EUROPEAN STANDARD EN153 ACTUAL CONSUMPTION WILL DEPEND ON HOW THE APPLIANCE IS USED AND WHERE IT IS LOCA TED ...

Page 15: ... a dry atmosphere out of direct sunlight and away from continuous heat and ex treme temperature e g not next to a boiler or radiator or in a very cold room e g an outhouse If these temperatures are exceeded i e warmer or colder then the appliance may not operate correctly For building in and door reversal instructions please refer to the relevant instructions on the following pages Door reversal T...

Page 16: ...the plug This appliance complies with the following E E C Directive 73 23 EEC of 19 2 73 Low Voltage Directive and subse quent amendments 87 308 of 2 6 87 Radio Interference Suppression and subsequent amendments 89 336 EEC of 3 5 89 Electromagnetic Compatibility Di rective and subsequent amendments Please ensure that when the appliance is installed it is easily accessible for the engineer in the e...

Page 17: ...s against the interior surface of the unit on the side where the door hinges of the appliances are fitted Insert the appliance until the upper stripbutts up against the unit 1 and make sure that the lower hinge is in line with the surface of the unit 2 2 Press in the joint covers between the appliance and the kitchen furniture 3 Open the door and push the appliance against the side of kitchen furn...

Page 18: ...uare Hb into guide Ha Put together the appliance door and the furniture door and mark the holes as indicated in the figure 9 Remove the squares and mark a distance of 8 mm from the outer edge of the door where the nail must be fitted K 10 Place the small square on the guide again and fix it with the screws supplied Should the alignment of the furniture door be necessary use the clearance of slots ...

Page 19: ......

Page 20: ......

Reviews: