background image

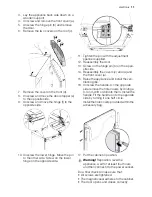
3. Lay the appliance back side down on a

wooden support.

4. Unscrew and remove the front cover (a).

5. Unscrew the hinge pin (b) and remove

the door.

6. Remove the two covers on the roof (c).

7. Remove the cover on the front (d).

8. Unscrew and move the door stopper (e)

to the opposite side.

9. Unscrew and move the hinge (f) to the

opposite side.

10. Unscrew the lower hinge. Move the pin

to the other side. Screw on the lower

hinge on the opposite side.

11. Tighten the pin with the adjustment

spanner supplied.

12. Reassembly the door.

13. Screw on the hinge pin (b) on the oppo-

site side.

14. Reassembly the covers (c) and (d) and

the front cover (a).

15. Raise the appliance and install the ven-

tilation grille.

16. Unscrew the handle. On the opposite

side remove the hole covers by driving a

3-4 mm drift or drill into them. Install the

handle. Fit the handle on to the opposite

side by turning it one half circle.

Install the hole covers provided within the

accessory bag.

17. Put the cabinet in position.

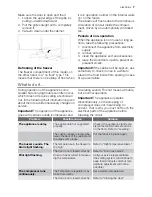
Warning!

 Reposition, level the

appliance, wait for at least four hours

and then connect it to the power socket.

Do a final check to make sure that:

• All screws are tightened.

• The magnetic seal adheres to the cabinet.

• The door opens and closes correctly.

electrolux 

 11

Summary of Contents for EUF29202W

Page 1: ...user manual Freezer EUF29202W EUF29202X ...

Page 2: ...do not play with the appliance Keep all packaging well away from chil dren There is risk of suffocation If you are discarding the appliance pull the plug out of the socket cut the connection cable as close to the appliance as you can and remove the door to prevent play ing children to suffer electric shock or to close themselves into it If this appliance featuring magnetic door seals is to replace...

Page 3: ...compartment as it creates pressure on the container which may cause it to explode resulting in damage to the appliance Ice lollies can cause frost burns if con sumed straight from the appliance Care and cleaning Before maintenance switch off the appli ance and disconnect the mains plug from the mains socket Do not clean the appliance with metal ob jects Do not use sharp objects to remove frost fro...

Page 4: ...y regulated To operate the appliance proceed as fol lows turn the Temperature regulator counter clockwise to obtain warmer storage tem perature turn the Temperature regulator clockwise to obtain colder storage temperature A medium setting is generally the most suitable The exact setting should be chosen keeping in mind that the temperature inside the ap pliance depends on room temperature how ofte...

Page 5: ...nd easy to find the food package you want If large quantities of food are to be stored remove all drawers except for the bottom basket which needs to be in place to provide good air circulation On all shelves except for the top shelf it is possible to place food that protrude until load limit stated on the side of the middle section Important In the event of accidental defrosting for example due t...

Page 6: ...nd cannot be refrozen Do not exceed the storage period indica ted by the food manufacturer Care and cleaning Caution Unplug the appliance before carrying out any maintenance operation This appliance contains hydrocarbons in its cooling unit maintenance and re charging must therefore only be carried out by authorized technicians Periodic cleaning The equipment has to be cleaned regularly clean the ...

Page 7: ...e following chart information is given about them to avoid unnecessary charges on service Important The operation of the appliance goes with certain sounds compressor and circulating sound This not means a trouble but a normal operation Important The appliance operates discontinuously so the stopping of compressor does not mean being no current That is why you must not touch the electrical parts o...

Page 8: ...od temperature decrease to room temperature before stor age The temperature in the freezer is too high Food is too near to each other Store food so that there is cold air circulation Large quantities of food to be fro zen were put in at the same time Insert smaller quantities of food to be frozen at the same time The appliance does not operate The appliance is switched off Switch on the appliance ...

Page 9: ...lly however the appliance should not be positioned below overhanging wall units If the cabinet is placed in a corner and the side with the hinges facing the wall the dis tance between the wall and the cabinet must be at least 150 mm to allow the door to open enough so that the equipment can be re moved The ventilation space can be directly above the appliance behind and above the top cupboard In t...

Page 10: ...tall the spacers provided within the ac cessory bag as shown in the figures When two appliances are placed beside each other attach the adhesive spacers be tween the appliances Install the spacers on the back side of the panel Levelling When placing the appliance ensure that it stands level If necessary adjust the feet us ing the adjustment spanner supplied Door reversibility To change the opening...

Page 11: ...3 Screw on the hinge pin b on the oppo site side 14 Reassembly the covers c and d and the front cover a 15 Raise the appliance and install the ven tilation grille 16 Unscrew the handle On the opposite side remove the hole covers by driving a 3 4 mm drift or drill into them Install the handle Fit the handle on to the opposite side by turning it one half circle Install the hole covers provided withi...

Page 12: ... be taken to the appropriate collection point for the recycling of electrical and electronic equipment By ensuring this product is disposed of correctly you will help prevent potential negative consequences for the environment and human health which could otherwise be caused by inappropriate waste handling of this product For more detailed information about recycling of this product please contact...

Page 13: ...electrolux 13 ...

Page 14: ...14 electrolux ...

Page 15: ...electrolux 15 ...

Page 16: ...298376840 02 12022010 www electrolux com ...

Reviews: