background image

44

GB

Switch and indicators

A)On/off indicator 

green

B)Thermostat and on/off switch

C)Quick freeze indicator 

yellow

D)Acoustic signal stop and quick freeze switch

E) Alarm indicator 

red

Operation and use

Installation

Insert the plug into the socket. In order to switch on the
product, turn the thermostat 

(B)

to a temperature lower

than << -16°C >>. The green, yellow and red indicators
will light up. The lighting up of the on/off indicator 

(A)

means that the product is switched on. The yellow indi-
cator lights continuously indicating an uninterrupted
refrigeration for 5 hours (it can be switched off manual-
ly after 2 hours). The red indicator lights continuously
indicating an improper temperature in the freezing com-
partment. As well as an intermittent sound can be
heard, which can be stopped by pressing button 

(D)

once. You can switch off the freezer by turning the ther-
mostat 

(B)

in position << 

>>.

When the product is switched on for the first
time, the quick freeze function will start auto-

matically and will stop only 5 hours later. You can
manually switch off this function any time by press-
ing the quick freeze (D) switch.

Adjusting the temperature

The internal temperature of the freezer is regulated
electronically through five temperature positions and a
switch-off << 

>> setting.

Position << -16°C >> indicates the highest (least cold)
temperature, while position << -24°C >> is for the low-
est (coldest) temperature. Rotate the thermostat in the
desired position.

In general, it is best to set the thermostat to << -18°C
>> but, for the purpose of temperature setting, you
should also consider

the temperature of the room where the product is
installed,

the frequency of door openings,

the volume of food to be stored in the product,

the location of the product.

Therefore, you should consider all these factors and
you may have to do some testing for finding the best
temperature. If you want a lower temperature, turn the
thermostat into a position of higher number or, vice
versa, if you need a higher temperature, you should set
a position of lower number. Please allow 24 hours for
the freezer temperature to stabilize between two adjust-
ments.

Alarm (red) indicator

The temperature alarm indicator 

(E)

will light up when

the internal temperature of the freezer increases to a
level (above -12°C) where the long-term conservation

Summary of Contents for EUT 1258

Page 1: ...SV E 18 1 06 FR DE IT GB 200380643 GEFRIERSCHRANK CONGELATEUR CONGELATORE FREEZER GEBRAUCHSANLEITUNG MODE D EMPLOI LIBRETTO D ISTRUZIONI INSTRUCTION BOOK EUT 1258 ...

Page 2: ... be handed over to the applicable collection point for the recycling of electrical and electronic equipment By ensuring this product is disposed of correctly you will help prevent potential negative consequences for the environment and human health which could otherwise be caused by inappropriate waste handling of this product For more detailed information about recycling of this product please co...
Page 3: ...ning 42 Placement 43 Switch and indicators 44 Operation and use 44 Installation 44 Adjusting the temperature 44 Freezing 45 Storing 45 How to make ice cubes 45 Some useful information and advice 45 Hints and ideas 45 How to save energy 45 The appliance and environment 45 Maintenance 46 Defrosting 46 Regular cleaning 46 When the refrigerator is not in use 47 Trouble shooting 47 Change of door openi...

Page 4: ... chemicals Do not make hot pot touch the plastic parts of the freezer Warning if you place frozen foods on top of the prod uct the interaction of cold and vapor may produce water condensate in the space below the top If such water condensate drips on the electric compo nents placed in that space a short circuit may occur and damage the product Therefore it is for bidden to place frozen foods on to...

Page 5: ... requirements of stan dards between different temperature limits accord ing to the climate class The letter symbol for climate class can be found on the data plate Ins Instr tructions f uctions for the User or the User Description of the appliance main parts 1 Freezer tray 2 Freezer basket 3 Storage boxes baskets 4 Data plate 5 Switches and indicators 6 Defrost water drain 7 Adjustable feet 8 Door...

Page 6: ...mended to deliver the appliance in original packaging in vertical position consider ing the protective warning on packaging After each transportation the appliance must not be switched on for approx 2 hours Unpack the appliance and check if there are damages on it Report possible damages immediately to the place you bought it In that case retain packaging Cleaning Remove every adhesive tape which ...

Page 7: ...on When placing the appliance ensure that it stands level This can be achieved by two adjustable feet 1 at the bottom in front 1 1 piece of distance washers 2 are accessories of the adjustable feet If levelling the appli ance requires these washers can be removed Do not stand the appliance on a sunny place or close to a radiator or cooker If it is unavoidable because of furnishing and the appli an...

Page 8: ...switch off this function any time by press ing the quick freeze D switch Adjusting the temperature The internal temperature of the freezer is regulated electronically through five temperature positions and a switch off setting Position 16 C indicates the highest least cold temperature while position 24 C is for the low est coldest temperature Rotate the thermostat in the desired position In genera...

Page 9: ...artment Wetting the bottom of the tray and setting thermostatic control knob to maximum stage can shorten preparing time After finishing do not forget to reset the thermosta tic control to the suitable stage Ready ice cubes can be taken out of the tray under run ning water then twist or hit it Some useful information and advice After opening and closing the door of freezer vac uum will rise inside...

Page 10: ...dge Leave the door open From time to time use a cloth or sponge to sweep off laterally the defrost water so that it can be collected in a drain at the bottom of the product and then remove the water as follows Place a tray of sufficient height in front of the product Following the arrow carefully pull out the defrost water drain located in the central bottom section of the prod uct to let the defr...

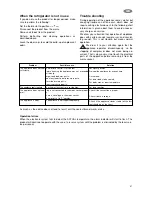
Page 11: ...e electronic system fails to detect the ACTUAL temperature the alarm indicator will start to flash The product will continue to operate with the use of a reserve system until the problem is eliminated by the local serv ice personnel When the refrigerator is not in use If you do not use the product for longer periods make sure to perform the following Set the thermostat to position Disconnect the p...

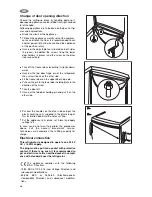
Page 12: ...e pin in the lower door holding plate in the direction of the arrow Take the door off Unscrew the top door holding pin and put it on the other side Put over the handles on the other side and put the plastic covering nails supplied in the plastic bag of this instruction book into the holes set free Put the appliance to its place set it level and apply voltage to it In case you do not want to perfor...

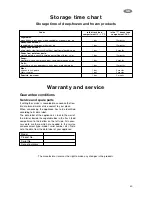
Page 13: ...facturer reserves the right to make any changes in the products Foods In the fresh food In the frozen food compartment 2 7 C compartment 18 C Vegetables green beans green peas mixed vegetables marrow corn etc 1 day 12 months Ready cooked foods vegetable dish trimmings with meat etc 1 day 12 months Ready cooked foods sirloin steaks stew from knuckle of ham meat from pig pudding etc 1 day 6 months F...

Page 14: ...50 ...

Page 15: ...51 ...

Page 16: ...öhere Gewalt Eingriffe Dritter und Verwendung von Nicht Original Teilen Nous octroyons sur chaque produit 2 ans de garantie à partir de la date de livraison ou de la mise en service au consommateur documenté au moyen d une facture d un bon de garantie ou d un justificatif d achat Notre garantie couvre les frais de mains d œuvres et de déplacement ainsi que les pièces de rechange Les conditions de ...

Reviews: