background image

CONTENTS

SAFETY INFORMATION . . . . . . . . . . . . . . . . . . . . . . . . . . . . . . . . . . . . . . . . . . . . . . . . . . . . . . . . .  3
PRODUCT DESCRIPTION . . . . . . . . . . . . . . . . . . . . . . . . . . . . . . . . . . . . . . . . . . . . . . . . . . . . . . .  6
CONTROL PANEL . . . . . . . . . . . . . . . . . . . . . . . . . . . . . . . . . . . . . . . . . . . . . . . . . . . . . . . . . . . . .  7
FIRST USE . . . . . . . . . . . . . . . . . . . . . . . . . . . . . . . . . . . . . . . . . . . . . . . . . . . . . . . . . . . . . . . . . . .  9
DAILY USE . . . . . . . . . . . . . . . . . . . . . . . . . . . . . . . . . . . . . . . . . . . . . . . . . . . . . . . . . . . . . . . . . .  10
HELPFUL HINTS AND TIPS . . . . . . . . . . . . . . . . . . . . . . . . . . . . . . . . . . . . . . . . . . . . . . . . . . . . .  11
CARE AND CLEANING . . . . . . . . . . . . . . . . . . . . . . . . . . . . . . . . . . . . . . . . . . . . . . . . . . . . . . . .  12
WHAT TO DO IF… . . . . . . . . . . . . . . . . . . . . . . . . . . . . . . . . . . . . . . . . . . . . . . . . . . . . . . . . . . . .  14
INSTALLATION . . . . . . . . . . . . . . . . . . . . . . . . . . . . . . . . . . . . . . . . . . . . . . . . . . . . . . . . . . . . . .  16
NOISES . . . . . . . . . . . . . . . . . . . . . . . . . . . . . . . . . . . . . . . . . . . . . . . . . . . . . . . . . . . . . . . . . . . .  19
TECHNICAL DATA . . . . . . . . . . . . . . . . . . . . . . . . . . . . . . . . . . . . . . . . . . . . . . . . . . . . . . . . . . . .  20
ENVIRONMENT CONCERNS . . . . . . . . . . . . . . . . . . . . . . . . . . . . . . . . . . . . . . . . . . . . . . . . . . . .  21

WE’RE THINKING OF YOU

Thank you for purchasing an Electrolux appliance. You’ve chosen a product that brings with it
decades of professional experience and innovation. Ingenious and stylish, it has been designed with
you in mind. So whenever you use it, you can be safe in the knowledge that you’ll get great results
every time.

Welcome to Electrolux.

Visit our website for:

Get usage advice, brochures, trouble shooter, service information:

www.electrolux.com

Register your product for better service:

www.electrolux.com/productregistration

Buy Accessories, Consumables and Original spare parts for your appliance:

www.electrolux.com/shop

CUSTOMER CARE AND SERVICE

We recommend the use of original spare parts.
When contacting Service, ensure that you have the following data available.
The information can be found on the rating plate. Model, PNC, Serial Number.

Warning / Caution-Safety information

General information and tips

Environmental information

Subject to change without notice.

2

www.electrolux.com

Summary of Contents for EUT1100FW

Page 1: ...TG09210 EUT1101FW EUT1100FW EN FREEZER USER MANUAL ...

Page 2: ...e that you ll get great results every time Welcome to Electrolux Visit our website for Get usage advice brochures trouble shooter service information www electrolux com Register your product for better service www electrolux com productregistration Buy Accessories Consumables and Original spare parts for your appliance www electrolux com shop CUSTOMER CARE AND SERVICE We recommend the use of origi...

Page 3: ...sure to make that spring lock unusable before you discard the old ap pliance This will prevent it from becom ing a death trap for a child GENERAL SAFETY WARNING Keep ventilation openings in the appliance enclosure or in the built in structure clear of obstruction The appliance is intended for keeping foodstuff and or beverages in a normal household as explained in this instruction booklet Do not u...

Page 4: ... which may cause it to explode resulting in damage to the appliance Ice lollies can cause frost burns if con sumed straight from the appliance CARE AND CLEANING Before maintenance switch off the appli ance and disconnect the mains plug from the mains socket Do not clean the appliance with metal objects Do not use sharp objects to remove frost from the appliance Use a plastic scra per Never use a h...

Page 5: ...circuit or insulation materials The appliance shall not be discarded together with the urban refuse and rubbish The insulation foam con tains flammable gases the appli ance shall be disposed according to the applicable regulations to ob tain from your local authorities Avoid damaging the cooling unit especially at the rear near the heat exchanger The materials used on this appliance marked by the ...

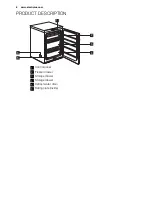
Page 6: ...PRODUCT DESCRIPTION 1 6 5 2 3 4 1 Control panel 2 Freezer drawer 3 Storage drawer 4 Storage drawer 5 Defrost water drain 6 Rating plate inside 6 www electrolux com ...

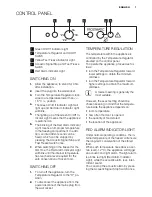
Page 7: ... To turn off the appliance turn the Temperature Regulator to the O po sition 2 To disconnect the appliance from the power disconnect the mains plug from the wall socket TEMPERATURE REGULATION The temperature within the appliance is controlled by the Temperature Regulator situated on the control panel To operate the appliance proceed as fol lows turn the Temperature Regulator toward lower settings ...

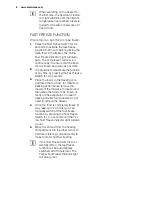
Page 8: ... 3 seconds 3 Place the foods in the freezing com partment the top box for maximum freezing performance remove the drawer if the drawer is foreseen and then place the foods to be frozen di rectly on the evaporator In case of freezing smaller food volumes do not need to remove the drawer 4 Once the food is completely frozen it may take up to 24 hours you can manually switch off the fast freeze funct...

Page 9: ...the first time wash the interior and all internal accesso ries with lukewarm water and some neutral soap so as to remove the typical smell of a brand new product then dry thoroughly Do not use detergents or abrasive powders as these will damage the finish ENGLISH 9 ...

Page 10: ...hen first starting up or after a period out of use before putting the products in the compartment let the appliance run at least 2 hours on the higher settings In the event of accidental defrost ing for example due to a power failure if the power has been off for longer than the value shown in the technical characteristics chart un der rising time the defrosted food must be consumed quickly or coo...

Page 11: ...it to be rapidly and completely frozen and to make it possible subsequently to thaw only the quantity required wrap up the food in aluminium foil or pol ythene and make sure that the packages are airtight do not allow fresh unfrozen food to touch food which is already frozen thus avoiding a rise in temperature of the lat ter lean foods store better and longer than fatty ones salt reduces the stora...

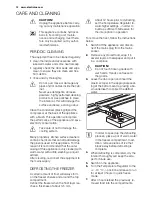
Page 12: ...ng up liquid added After cleaning reconnect the equipment to the mains supply DEFROSTING THE FREEZER A certain amount of frost will always form on the freezer shelves and around the top compartment Defrost the freezer when the frost layer rea ches a thickness of about 3 5 mm About 12 hours prior to defrosting set the Temperature Regulator to ward higher settings in order to build up sufficient chi...

Page 13: ...g defrosting may shorten their safe storage life PERIODS OF NON OPERATION When the appliance is not in use for long periods take the following precautions 1 disconnect the appliance from electric ity supply 2 remove all food 3 defrost and clean the appliance and all accessories 4 leave the door doors open to prevent unpleasant smells If the cabinet will be kept on ask somebody to check it once in ...

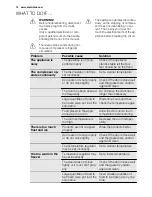
Page 14: ... undam aged and clean The door has been opened too frequently Do not leave the door open longer than necessary Large quantities of food to be frozen were put in at the same time Wait some hours and then check the temperature again Food placed in the appli ance was too warm Allow food to cool to room temperature before storing The room temperature is too high Decrease the room temper ature There is...

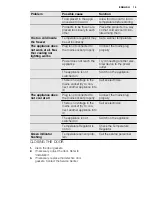
Page 15: ... device to the power outlet The appliance is not switched on Switch on the appliance There is no voltage in the mains socket try to con nect another appliance into it Call an electrician The appliance does not cool at all Plug is not connected to the mains socket properly Connect the mains plug properly There is no voltage in the mains socket try to con nect another appliance into it Call an elect...

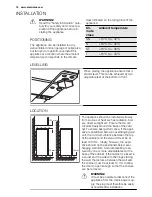
Page 16: ...installed well away from sources of heat such as radiators boil ers direct sunlight etc Ensure that air can circulate freely around the back of the cabi net To ensure best performance if the appli ance is positioned below an overhanging wall unit the minimum distance between the top of the cabinet and the wall unit must be at least 100 mm Ideally however the appli ance should not be positioned bel...

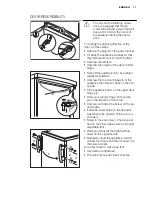
Page 17: ... door hinge pin of the appliance then screw it back on the oth er side Fit the appliance door on the upper door hinge pin Remove the lower hinge Put over the pin in the direction of the arrow Unscrew and install the screw on the op posite side Install the lower hinge on the opposite side leaving the position of the door un changed Screw in the one screw in the place set free on the other side as w...

Page 18: ... CONNECTION Before plugging in ensure that the voltage and frequency shown on the rating plate correspond to your domestic power sup ply The appliance must be earthed The power supply cable plug is provided with a con tact for this purpose If the domestic power supply socket is not earthed connect the appliance to a separate earth in compli ance with current regulations consulting a qualified elec...

Page 19: ...NOISES There are some sounds during normal run ning compressor refrigerant circulation BRRR HISSS CLICK BLUBB CRACK SSSRRR OK CLICK CLICK BRRR BRRR BLUBB BLUBB ENGLISH 19 ...

Page 20: ...TA Dimension Height 850 mm Width 595 mm Depth 635 mm Rising Time 24 h Voltage 230 240 V Frequency 50 Hz The technical information are situated in the rating plate on the internal left side of the appliance and in the energy label 20 www electrolux com ...

Page 21: ...ainers to recycle it Help protect the environment and human health and to recycle waste of electrical and electronic appliances Do not dispose appliances marked with the symbol with the household waste Return the product to your local recycling facility or contact your municipal office ENGLISH 21 ...

Page 22: ...22 www electrolux com ...

Page 23: ...ENGLISH 23 ...

Page 24: ...www electrolux com shop 200384005 A 432011 ...

Reviews: