background image

INHOUD

VEILIGHEIDSINFORMATIE . . . . . . . . . . . . . . . . . . . . . . . . . . . . . . . . . . . . . . . . . . . . . . . . . . . . . . .  3
BESCHRIJVING VAN HET PRODUCT . . . . . . . . . . . . . . . . . . . . . . . . . . . . . . . . . . . . . . . . . . . . . .  6
BEDIENINGSPANEEL . . . . . . . . . . . . . . . . . . . . . . . . . . . . . . . . . . . . . . . . . . . . . . . . . . . . . . . . . .  7
DAGELIJKS GEBRUIK . . . . . . . . . . . . . . . . . . . . . . . . . . . . . . . . . . . . . . . . . . . . . . . . . . . . . . . . . .  9
NUTTIGE AANWIJZINGEN EN TIPS . . . . . . . . . . . . . . . . . . . . . . . . . . . . . . . . . . . . . . . . . . . . . . .  10
ONDERHOUD EN REINIGING . . . . . . . . . . . . . . . . . . . . . . . . . . . . . . . . . . . . . . . . . . . . . . . . . . .  11
PROBLEMEN OPLOSSEN . . . . . . . . . . . . . . . . . . . . . . . . . . . . . . . . . . . . . . . . . . . . . . . . . . . . . .  13
MONTAGE . . . . . . . . . . . . . . . . . . . . . . . . . . . . . . . . . . . . . . . . . . . . . . . . . . . . . . . . . . . . . . . . . .  15
GELUIDEN . . . . . . . . . . . . . . . . . . . . . . . . . . . . . . . . . . . . . . . . . . . . . . . . . . . . . . . . . . . . . . . . . .  18
TECHNISCHE GEGEVENS . . . . . . . . . . . . . . . . . . . . . . . . . . . . . . . . . . . . . . . . . . . . . . . . . . . . . .  19
MILIEUBESCHERMING . . . . . . . . . . . . . . . . . . . . . . . . . . . . . . . . . . . . . . . . . . . . . . . . . . . . . . . .  20

WE DENKEN AAN U

Bedankt om een Electrolux-apparaat te kopen. U koos voor een product dat jaren professionele
ervaring en innovatie bevat. Ingenieus en stijlvol, het werd ontworpen met u in het achterhoofd.
Wanneer u het gebruikt, kunt u er op vertrouwen dat u keer op keer fantastische resultaten zult
krijgen.

Welkom bij Electrolux.

Ga naar onze website voor:

Advies over gebruik, brochures, het oplossen van problemen en onderhoudsinformatie:

www.electrolux.com

Registreer uw product voor een betere service:

www.electrolux.com/productregistration

Koop accessoires, verbruiksartikelen en originele reserveonderdelen voor uw apparaat:

www.electrolux.com/shop

KLANTENSERVICE

Wij raden altijd het gebruik van originele onderdelen aan.
Zorg er als u contact opneemt met de klantenservice voor dat u de volgende gegevens bij de hand
hebt.
De informatie staat op het typeplaatje. model, productnummer, serienummer.

Waarschuwing - Belangrijke veiligheidsinformatie.

Algemene informatie en tips

Milieu-informatie

Wijzigingen voorbehouden.

2

www.electrolux.com

Summary of Contents for EUT1101AOW

Page 1: ...EUT1101AOW NL VRIEZER GEBRUIKSAANWIJZING 2 EN FREEZER USER MANUAL 21 ...

Page 2: ...n zult krijgen Welkom bij Electrolux Ga naar onze website voor Advies over gebruik brochures het oplossen van problemen en onderhoudsinformatie www electrolux com Registreer uw product voor een betere service www electrolux com productregistration Koop accessoires verbruiksartikelen en originele reserveonderdelen voor uw apparaat www electrolux com shop KLANTENSERVICE Wij raden altijd het gebruik ...

Page 3: ...aat afdankt trek dan de stekker uit het stopcontact snij de voe dingskabel door zo dicht mogelijk bij het apparaat en verwijder de deur om te voorkomen dat kinderen een elektrische schok krijgen of zichzelf in het apparaat opsluiten Als dit apparaat dat voorzien is van een magnetische deursluiting een ouder ap paraat vervangt dat voorzien is van een veerslot slot op de deur of het deksel zorg er d...

Page 4: ...de kunststof onderdelen in het apparaat Bewaar geen brandbare gassen of vloei stoffen in het apparaat deze kunnen ontploffen Zet geen levensmiddelen direct tegen de luchtopening in de achterwand Als het apparaat rijpvrij is Diepgevroren voedsel mag niet opnieuw worden ingevroren als het eenmaal ont dooid is Bewaar voorverpakte diepvriesproducten volgens de aanwijzingen van de fabri kant U dient zi...

Page 5: ... ting ONDERHOUD Alle elektrotechnische werkzaamheden die noodzakelijk zijn voor het uitvoeren van onderhoud aan het apparaat dienen uitgevoerd te worden door een gekwalifi ceerd elektricien of competent persoon Dit product mag alleen worden onder houden door een erkend onderhouds centrum en er dient alleen gebruik te worden gemaakt van originele reser veonderdelen BESCHERMING VAN HET MILIEU Dit ap...

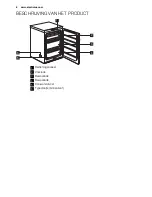
Page 6: ...BESCHRIJVING VAN HET PRODUCT 1 6 5 2 3 4 1 Bedieningspaneel 2 Vrieslade 3 Bewaarlade 4 Bewaarlade 5 Dooiwaterafvoer 6 Typeplaatje binnenkant 6 www electrolux com ...

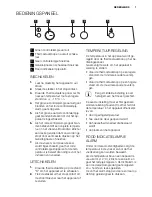
Page 7: ... op de stand O om het apparaat uit te schakelen 2 Trek de stekker uit het stopcontact om de stroomtoevoer naar het apparaat af te sluiten TEMPERATUURREGELING De temperatuur in het apparaat wordt ge regeld door de thermostaatknop op het be dieningspaneel Ga als volgt te werk om het apparaat in werking te stellen draai de thermostaatknop op een lagere stand om de minimale koude te verkrij gen draai ...

Page 8: ...et in te vriezen voedsel direct op de verdam per plaatsen Als u kleinere hoeveelhe den levensmiddelen wilt invriezen hoeft u de lade niet te verwijderen 4 Als de levensmiddelen volledig zijn diepgevroren dit kan tot 24 uur duren kunt u de snelvriesfunctie uitschakelen door de snelvriestoets gedurende 2 3 seconden in te drukken Het gele snel vriesindicatielampje gaat dan ook uit 5 Verplaats het bev...

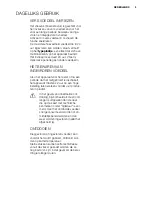
Page 9: ...paraat voor het eerst of na een periode dat het niet gebruikt is inschakelt het apparaat minstens 2 uur op een hoge instelling laten werken voordat u er produc ten in plaatst In het geval van onbedoelde ont dooiing bijvoorbeeld als de stroom langer is uitgevallen dan de duur die op de kaart met technische kenmerken onder tijdsduur is ver meld moet het ontdooide voedsel snel geconsumeerd worden of ...

Page 10: ...l en volledig worden inge vroren en zo kunt u later alleen die hoe veelheid laten ontdooien die u nodig heeft wikkel het voedsel in aluminiumfolie of plastic en zorg ervoor dat de pakjes luchtdicht zijn leg vers nog niet ingevroren voedsel niet tegen het al ingevroren voedsel om te voorkomen dat dit laatste warm wordt smalle pakjes zijn makkelijker op te ber gen dan dikke zout maakt voedsel min de...

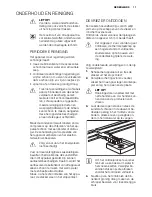
Page 11: ... dit apparaat gebruikt zijn kunnen aantasten beschadigen Daarom wordt het aanbevolen de buitenkant van dit apparaat alleen schoon te maken met warm water met een beetje afwasmiddel Steek na het schoonmaken van het appa raat de stekker weer in het stopcontact DE VRIEZER ONTDOOIEN Een zekere hoeveelheid rijp zal zich altijd vormen op de schappen van de vriezer en rond het bovenste vak Ontdooi de vri...

Page 12: ...en temperatuurstijging tijdens het ontdooien van de ingevroren le vensmiddelen kan de veilige be waartijd verkorten PERIODES DAT HET APPARAAT NIET GEBRUIKT WORDT Als het apparaat gedurende lange tijd niet gebruikt wordt neem dan de volgende voorzorgsmaatregelen 1 Trek de stekker uit het stopcontact 2 Haal al het voedsel eruit 3 Ontdooi het apparaat en toebehoren en maak alles schoon 4 Laat de deur...

Page 13: ... Stel een hogere temperatuur in Deuren sluiten niet goed af of zijn niet goed gesloten Controleer of de deuren goed sluiten en of de pak kingen onbeschadigd en schoon zijn De deur is te vaak open ge daan Laat de deur niet langer open staan dan noodzakelijk Er zijn grote hoeveelheden voedsel tegelijk in de vrie zer geplaatst Wacht een paar uur en con troleer dan nogmaals de temperatuur Het voedsel ...

Page 14: ...t stopcontact Sluit de stekker goed aan De stroom bereikt het ap paraat niet Probeer een ander elektrisch apparaat op het stopcontact aan te sluiten Het apparaat staat niet aan Schakel het apparaat in Er staat geen spanning op het stopcontact probeer een ander apparaat er op aan te sluiten Bel een elektricien Het apparaat koelt helemaal niet De stekker zit niet goed in het stopcontact Sluit de ste...

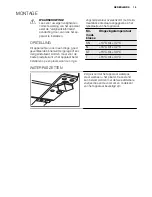
Page 15: ... prestatie kunt u het apparaat beter installeren op een plaats waar de omge vingstemperatuur overeenkomt met de kli maatklasse die staat aangegeven op het typeplaatje van het apparaat Kli maat klasse Omgevingstemperatuur SN 10 C tot 32 C N 16 C tot 32 C ST 16 C tot 38 C T 16 C tot 43 C WATERPAS ZETTEN Zorg ervoor dat het apparaat waterpas staat wanneer u het plaatst Deze stand kan bereikt worden m...

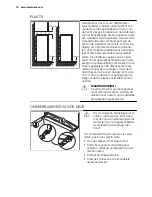
Page 16: ...n de zijkant bevat schar nieren die naar de muur wijzen moet de af stand tussen de muur en de kast ten minste 10 mm zijn om de deur ver genoeg open te krijgen zodat de planken verwijderd kunnen worden WAARSCHUWING De stroomtoevoer aan het apparaat moet verbroken kunnen worden de stekker moet daarom na de installatie gemakkelijk toegankelijk zijn OMKEERBAARHEID VAN DE DEUR Om de volgende handelinge...

Page 17: ...ijn aangedraaid De deur goed open en dicht gaat Als de omgevingstemperatuur laag is bijv in de winter kan het zijn dat het deurrub ber niet precies op de kast past Wacht in dat geval tot de deurrubber zich op een na tuurlijke wijze zet Als u bovenstaande handelingen liever niet zelf uitvoert neem dan contact op met de dichtstbijzijnde klantenservice Een vakman van de klantenservice zal de draairic...

Page 18: ...GELUIDEN Tijdens normaal gebruik hoort u geluiden compressor koelmiddelcirculatie BRRR HISSS CLICK BLUBB CRACK SSSRRR OK CLICK CLICK BRRR BRRR BLUBB BLUBB 18 www electrolux com ...

Page 19: ... Afmeting Hoogte 850 mm Breedte 595 mm Diepte 635 mm maximale bewaartijd bij stroomuitval 24 h Voltage 230 240 V Frequentie 50 Hz De technische gegevens staan op het type plaatje aan de linker binnenkant van het ap paraat en op het energielabel NEDERLANDS 19 ...

Page 20: ...recyclen Help om het milieu en de volksgezondheid te beschermen en recycle het afval van elektrische en elektronische apparaten Gooi apparaten gemarkeerd met het symbool niet weg met het huishoudelijk afval Breng het product naar het milieustation bij u in de buurt of neem contact op met de gemeente 20 www electrolux com ...

Page 21: ...e that you ll get great results every time Welcome to Electrolux Visit our website for Get usage advice brochures trouble shooter service information www electrolux com Register your product for better service www electrolux com productregistration Buy Accessories Consumables and Original spare parts for your appliance www electrolux com shop CUSTOMER CARE AND SERVICE We recommend the use of origi...

Page 22: ...o make that spring lock unusable before you discard the old ap pliance This will prevent it from becom ing a death trap for a child GENERAL SAFETY WARNING Keep ventilation openings in the appliance enclosure or in the built in structure clear of obstruction The appliance is intended for keeping foodstuff and or beverages in a normal household as explained in this instruction booklet Do not use a m...

Page 23: ...ainer which may cause it to explode resulting in damage to the appliance Ice lollies can cause frost burns if con sumed straight from the appliance CARE AND CLEANING Before maintenance switch off the appli ance and disconnect the mains plug from the mains socket Do not clean the appliance with metal objects Do not use sharp objects to remove frost from the appliance Use a plastic scra per Never us...

Page 24: ...t or insulation materials The appliance shall not be discarded together with the urban refuse and rubbish The insulation foam con tains flammable gases the appli ance shall be disposed according to the applicable regulations to ob tain from your local authorities Avoid damaging the cooling unit especially at the rear near the heat exchanger The materials used on this appliance marked by the sym bo...

Page 25: ...PRODUCT DESCRIPTION 1 6 5 2 3 4 1 Control panel 2 Freezer drawer 3 Storage drawer 4 Storage drawer 5 Defrost water drain 6 Rating plate inside ENGLISH 25 ...

Page 26: ...he appliance turn the Temperature Regulator to the O po sition 2 To disconnect the appliance from the power disconnect the mains plug from the wall socket TEMPERATURE REGULATION The temperature within the appliance is controlled by the Temperature Regulator situated on the control panel To operate the appliance proceed as fol lows turn the Temperature Regulator toward lower settings to obtain the ...

Page 27: ...and then place the foods to be frozen di rectly on the evaporator In case of freezing smaller food volumes do not need to remove the drawer 4 Once the food is completely frozen it may take up to 24 hours you can manually switch off the fast freeze function by pressing the Fast Freeze Switch for 2 3 seconds and the Yel low Fast Freeze Indicator light will also go out 5 Move frozen food from the fre...

Page 28: ...hen first starting up or after a period out of use before putting the products in the compartment let the appliance run at least 2 hours on the higher settings In the event of accidental defrost ing for example due to a power failure if the power has been off for longer than the value shown in the technical characteristics chart un der rising time the defrosted food must be consumed quickly or coo...

Page 29: ...it to be rapidly and completely frozen and to make it possible subsequently to thaw only the quantity required wrap up the food in aluminium foil or pol ythene and make sure that the packages are airtight do not allow fresh unfrozen food to touch food which is already frozen thus avoiding a rise in temperature of the lat ter lean foods store better and longer than fatty ones salt reduces the stora...

Page 30: ...ng up liquid added After cleaning reconnect the equipment to the mains supply DEFROSTING THE FREEZER A certain amount of frost will always form on the freezer shelves and around the top compartment Defrost the freezer when the frost layer rea ches a thickness of about 3 5 mm About 12 hours prior to defrosting set the Temperature Regulator to ward higher settings in order to build up sufficient chi...

Page 31: ...g defrosting may shorten their safe storage life PERIODS OF NON OPERATION When the appliance is not in use for long periods take the following precautions 1 disconnect the appliance from electric ity supply 2 remove all food 3 defrost and clean the appliance and all accessories 4 leave the door doors open to prevent unpleasant smells If the cabinet will be kept on ask somebody to check it once in ...

Page 32: ... undam aged and clean The door has been opened too frequently Do not leave the door open longer than necessary Large quantities of food to be frozen were put in at the same time Wait some hours and then check the temperature again Food placed in the appli ance was too warm Allow food to cool to room temperature before storing The room temperature is too high Decrease the room temper ature There is...

Page 33: ... device to the power outlet The appliance is not switched on Switch on the appliance There is no voltage in the mains socket try to con nect another appliance into it Call an electrician The appliance does not cool at all Plug is not connected to the mains socket properly Connect the mains plug properly There is no voltage in the mains socket try to con nect another appliance into it Call an elect...

Page 34: ...installed well away from sources of heat such as radiators boil ers direct sunlight etc Ensure that air can circulate freely around the back of the cabi net To ensure best performance if the appli ance is positioned below an overhanging wall unit the minimum distance between the top of the cabinet and the wall unit must be at least 100 mm Ideally however the appli ance should not be positioned bel...

Page 35: ... door hinge pin of the appliance then screw it back on the oth er side Fit the appliance door on the upper door hinge pin Remove the lower hinge Put over the pin in the direction of the arrow Unscrew and install the screw on the op posite side Install the lower hinge on the opposite side leaving the position of the door un changed Screw in the one screw in the place set free on the other side as w...

Page 36: ... CONNECTION Before plugging in ensure that the voltage and frequency shown on the rating plate correspond to your domestic power sup ply The appliance must be earthed The power supply cable plug is provided with a con tact for this purpose If the domestic power supply socket is not earthed connect the appliance to a separate earth in compli ance with current regulations consulting a qualified elec...

Page 37: ...NOISES There are some sounds during normal run ning compressor refrigerant circulation BRRR HISSS CLICK BLUBB CRACK SSSRRR OK CLICK CLICK BRRR BRRR BLUBB BLUBB ENGLISH 37 ...

Page 38: ...TA Dimension Height 850 mm Width 595 mm Depth 635 mm Rising Time 24 h Voltage 230 240 V Frequency 50 Hz The technical information are situated in the rating plate on the internal left side of the appliance and in the energy label 38 www electrolux com ...

Page 39: ...ainers to recycle it Help protect the environment and human health and to recycle waste of electrical and electronic appliances Do not dispose appliances marked with the symbol with the household waste Return the product to your local recycling facility or contact your municipal office ENGLISH 39 ...

Page 40: ...www electrolux com shop 200384060 A 482011 ...

Reviews: