


2
CONTENTS
Warnings .
.
.
.
.
.
.
.
.
.
.
.
.
.
.
.
.
.
.
.
.
.
.
.
.
.
Page
3
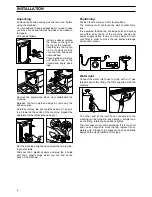
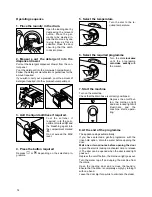
Installation
.
.
.
.
.
.
.
.
.
.
.
.
.
.
.
.
.
.
.
.
.
.
.
.
.
Page
4
Unpacking .
.
.
.
.
.
.
.
.
.
.
.
.
.
.
.
.
.
.
.
.
.
.
.
.
.
Page
4
Positioning.
.
.
.
.
.
.
.
.
.
.
.
.
.
.
.
.
.
.
.
.
.
.
.
.
.
Page
4
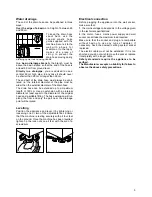
Water inlet .
.
.
.
.
.
.
.
.
.
.
.
.
.
.
.
.
.
.
.
.
.
.
.
.
.
Page
4
Water drainage
.
.
.
.
.
.
.
.
.
.
.
.
.
.
.
.
.
.
.
.
.
.
.
.
Page
5
Levelling
.
.
.
.
.
.
.
.
.
.
.
.
.
.
.
.
.
.
.
.
.
.
.
.
.
.
Page
5
Electrical connection .
.
.
.
.
.
.
.
.
.
.
.
.
.
.
.
.
.
.
.
.
.
.
Page
5
Use
.
.
.
.
.
.
.
.
.
.
.
.
.
.
.
.
.
.
.
.
.
.
.
.
.
.
.
Page
6
Control panel .
.
.
.
.
.
.
.
.
.
.
.
.
.
.
.
.
.
.
.
.
.
.
.
.
Page
6
Washing hints .
.
.
.
.
.
.
.
.
.
.
.
.
.
.
.
.
.
.
.
.
.
.
.
.
Page
7
Detergents and additives
.
.
.
.
.
.
.
.
.
.
.
.
.
.
.
.
.
.
.
.
.
Page
8
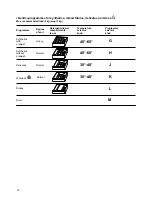
Wash code symbols .
.
.
.
.
.
.
.
.
.
.
.
.
.
.
.
.
.
.
.
.
.
.
Page
9
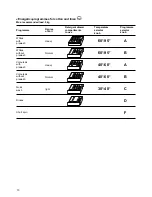
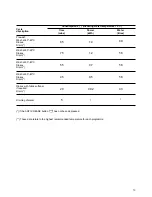
Washing programmes
.
.
.
.
.
.
.
.
.
.
.
.
.
.
.
.
.
.
.
.
.
.
Page
10-13
Operating sequence .
.
.
.
.
.
.
.
.
.
.
.
.
.
.
.
.
.
.
.
.
.
.
Page
14
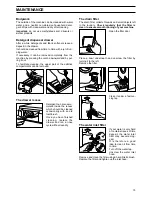
Maintenance .
.
.
.
.
.
.
.
.
.
.
.
.
.
.
.
.
.
.
.
.
.
.
.
.
Page
15
Bodywork .
.
.
.
.
.
.
.
.
.
.
.
.
.
.
.
.
.
.
.
.
.
.
.
.
.
Page
15
Detergent dispenser drawer.
.
.
.
.
.
.
.
.
.
.
.
.
.
.
.
.
.
.
.
.
Page
15
Drain filter .
.
.
.
.
.
.
.
.
.
.
.
.
.
.
.
.
.
.
.
.
.
.
.
.
.
Page
15
Water inlet filter
.
.
.
.
.
.
.
.
.
.
.
.
.
.
.
.
.
.
.
.
.
.
.
.
Page
15
Something not working? .
.
.
.
.
.
.
.
.
.
.
.
.
.
.
.
.
.
.
.
.
Page 16
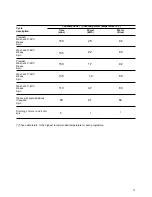
TECHNICAL SPECIFICATIONS
DIMENSIONS
Height
85 cm
Width
60 cm
Depth
54 cm
POWER SUPPLY VOLTAGE
220-230 V
FREQUENCY
50Hz
TOTAL POWER ABSORBED
2250 W (10 A)
WATER PRESSURE
Minimum
5 N/cm
2
Maximum
80 N/cm
2
MAXIMUM RECOMMENDED
Cotton, linen
5 kg
LOAD
Synthetics, delicates
2 kg
Wool 1
kg
SPIN SPEED
Maximum 500 rpm
This appliance complies with the following E.E.C. Directives:
- 73/23 EEC of 19.2.73 (Low Voltage Directive) and subsequent modifications;
- 89/336 EEC of 3.5.89 (Electromagnetic Compatibility Directive) and subsequent modifications.
Summary of Contents for EW 510 F
Page 17: ...124890710 Z ...


