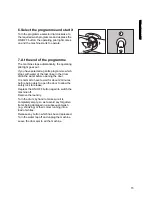
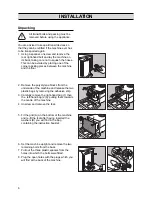
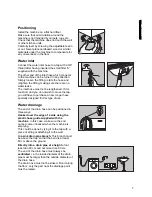
background image

7

ENGLISH

Positioning

Install the machine on a flat hard floor.
Make sure that air circulation around the
machine is not impeded by carpets, rugs etc.
Check that the machine does not touch the wall
or other kitchen units.
Carefully level by screwing the adjustable feet in
or out. Never place cardboard, wood or similar
materials under the machine to compensate for
any unevenness in the floor.
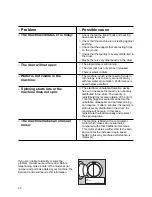
Water inlet

Connect the water inlet hose to a tap with a 3/4"
thread after having inserted the small filter “A”
supplied with the machine.
The other end of the inlet hose which connects
to the machine can be turned in any direction.
Simply loosen the fitting, rotate the hose and
retighten the fitting, making sure there are no
water leaks.
The inlet hose must not be lengthened. If it is
too short and you do not wish to move the tap,
you will have to purchase a new, longer hose
specially designed for this type of use.
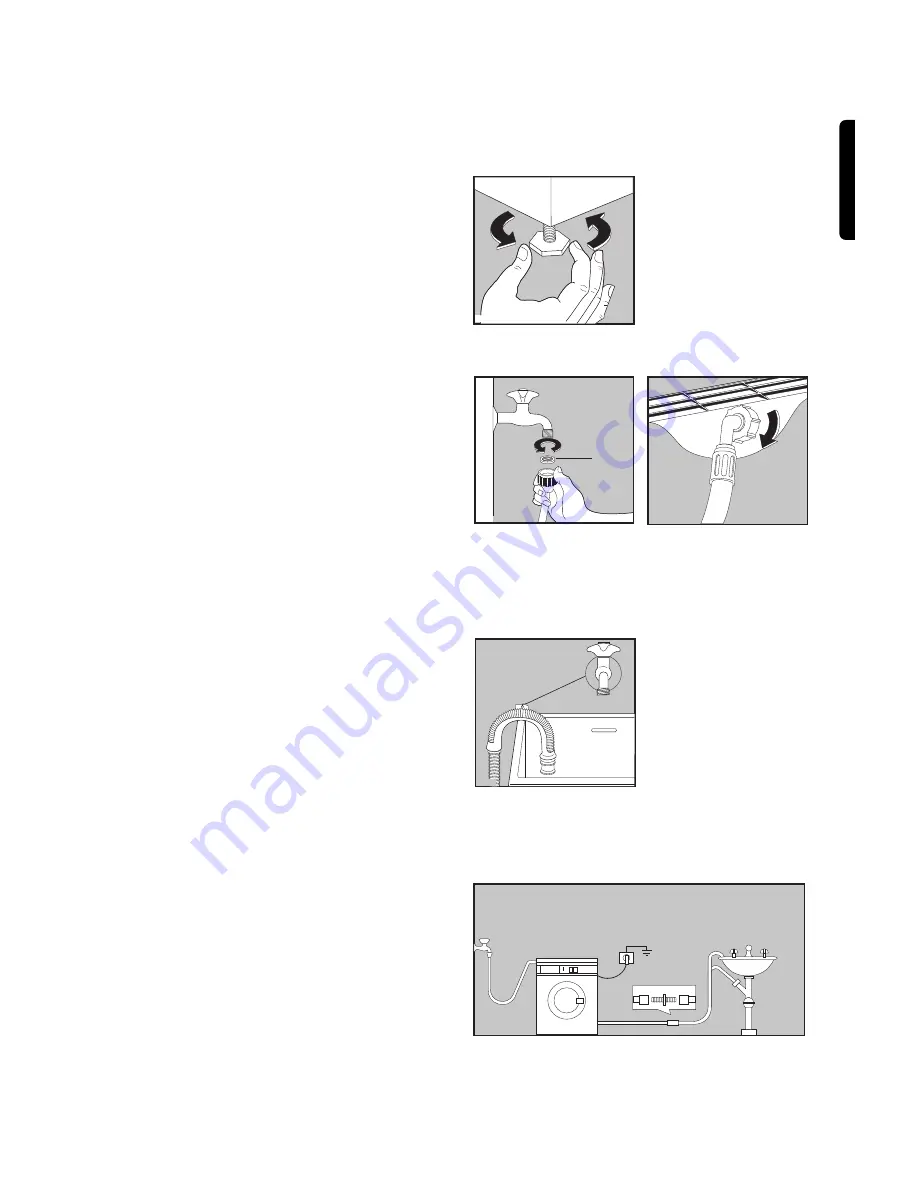
Water drainage

The end of the drain hose can be positioned in
three ways:
Hooked over the edge of a sink using the
plastic hose guide supplied with the
machine. 
In this case, make sure the end
cannot come unhooked when the machine is
emptying.
This could be done by tying it to the tap with a
piece of string or attaching it to the wall.
In a sink drain pipe branch. This branch must
be above the trap so that the bend is at least 
60 cm above the ground.
Directly into a drain pipe at a height of not
less than 60 cm and not more than 90 cm.
The end of the drain hose must always be
ventilated, i.e. the inside diameter of the drain
pipe must be larger than the outside diameter of
the drain hose.
The drain hose must not be kinked. Run it along
the floor; only the part near the drainage point
must be raised.

A

P0003

P0022

P0023

P0021

P0850

Summary of Contents for EW 842 F

Page 1: ...WASHING MACHINE INSTRUCTION BOOKLET EW 842 F 124 974 450 GB TR ...

Page 2: ...dry being washed Select Quick wash for lightly soiled laundry Environment protection Packaging recycling Materials marked with the symbol are recyclable To enable them to be recycled they must be placed in the appropriate collection areas or containers Check with your local authorities PE polyethylene PS polystyrene PP polypropylene Washing machine scrapping When the appliance is to be scrapped cu...

Page 3: ...9 Washing hints 10 Sorting the laundry 10 Temperatures 10 Before loading the laundry 10 Maximum loads 10 Laundry weights 10 Removing stains 10 Detergents and additives 11 Quantity of detergent to be used 11 Washing programmes 12 13 Operating sequence 14 15 International wash code symbols 16 Maintenance 17 Bodywork 17 Detergent dispenser drawer 17 Water inlet filter 17 Drain filter 18 Emergency emp...

Page 4: ...shing wait until they have completely evaporated from the fabric before placing garments in the appliance Place small items such as socks belts etc in a cloth bag or pillowcase to prevent them getting trapped between the drum and the tub Use only the recommended quantities of fabric softener An excessive amount could damage the laundry Leave the porthole door slightly ajar when the appliance is no...

Page 5: ...on the handle of the detergent dispenser drawer P1017 TECHNICAL SPECIFICATIONS DIMENSIONS Height 85 cm Width 60 cm Depth 54 cm POWER SUPPLY VOLTAGE FREQUENCY 220 230V 50 Hz TOTAL POWER ABSORBED 2200 W MINIMUM FUSE PROTECTION 10 A WATER PRESSURE Minimum 50 N cm2 Maximum 80 N cm2 MAXIMUM LOAD Cotton 5 kg 5 5 kg only for Turkey and India Synthetics delicate fabrics 2 kg Woollens 1 kg SPIN SPEED 800 r...

Page 6: ...the adhesive strip 3 Carefully remove the right hand bag 1 then the left hand bag 2 by pulling them towards the centre of the machine 4 Unscrew and remove the feet 5 Fit the grid A on the bottom of the machine and re fit the feet after having inserted the washers B you will find in the bag containing the instruction booklet 6 Set the machine upright and remove the two remaining bolts from the back...

Page 7: ...it is too short and you do not wish to move the tap you will have to purchase a new longer hose specially designed for this type of use Water drainage The end of the drain hose can be positioned in three ways Hooked over the edge of a sink using the plastic hose guide supplied with the machine In this case make sure the end cannot come unhooked when the machine is emptying This could be done by ty...

Page 8: ...lity should this safety measure not be observed The appliance is supplied with a 13 amp plug fitted In the event of having to change the fuse in the plug supplied a 13amp ASTA approved BS1363A fuse must be used Should the plug need to be replaced for any reason proceed as described below The wires in the mains lead are coloured in accordance with the following code Green and Yellow Earth Blue Neut...

Page 9: ...reduced as follows cotton and linen from 800 rpm to 400 rpm programme 14 short spin from 550 rpm to 400 rpm 5 Door opening button Depress it to open the door 6 Temperature selector dial Turn this dial to select the washing temperature Position cold wash 7 Programme selector dial To select the required programme turn this dial clockwise until the programme number is exactly opposite the pointer Bef...

Page 10: ...ly packed synthetics drum no more than half full delicate fabrics and woollens drum no more than one third full i Washing a maximum load makes the most efficient use of water and energy For heavily soiled laundry reduce the load size Laundry weights The following weights are indicative bathrobe 1200 g napkin 100 g quilt cover 700 g sheet 500 g pillow case 200 g tablecloth 250 g towelling towel 200...

Page 11: ...and woollens liquid detergents preferably for low temperature wash programmes 60 C max for all types of fabric or special for woollens only The detergent and any additives must be placed in the appropriate compartments of the dispenser drawer before starting the wash programme If using concentrated powder or liquid detergents a programme without prewash must be selected Pour liquid detergent into ...

Page 12: ...res indicated are the optimum temperatures for each programme and depend on the type of laundry and degree of soiling Consumptions for washing 5 kg cotton items at 60 C programme 2 Water 77 litres Energy 1 35 kWh Time 130 mins Consumptions for washing 5 5 kg Water 80 litres Energy 1 45 kWh Time 130 mins This data has been calculated with a temperature of incoming water of 15 C 60 95 3 Delicate cot...

Page 13: ...cription Possible options 40 60 Synthetics with prewash heavy soiled Prewash Wash at 40 60 C 3 rinses Stop with water left in the drum 9 Synthetics without prewash normally soiled Wash at 40 60 C 3 rinses Stop with water left in the drum 10 Delicate fabrics Silk Wash at 30 40 C 3 rinses Stop with water left in the drum 11 12 Wash at 40 C 3 rinses Stop with water left in the drum 40 Woollens 40 60 ...

Page 14: ...haking them out as much as possible Close the door 2 Measure out the detergent Pull out the dispenser drawer until it stops Measure out the amount of detergent recommended by the manufacturer in a graduated cup and pour it into the main wash compartment If you wish to carry out a prewash pour detergent into the appropriate compartment marked 3 Measure out the additives If required pour fabric soft...

Page 15: ...ast rinse in the drum drain the water before opening the door It is normal to have to wait for about 2 minutes before being able to open the door to allow the safety lock to release Depress the ON OFF button again to switch the machine off Remove the laundry Turn the drum by hand to make sure it is completely empty so as to avoid any forgotten items being damaged in a subsequent wash e g shrinking...

Page 16: ... C Hand wash Do not wash at all Bleaching Bleach in cold water Do not bleach Ironing Hot iron max 200 C Warm iron max 150 C Lukewarm iron max 110 C Do not iron Dry cleaning Dry cleaning in all solvents Dry cleaning in perchlorethylene petrol pure alcohol R 111 R 113 Dry cleaning in petrol pure alcohol and R 113 Do not dry clean Drying Flat On the line On clothes hanger Tumble dry high temperature ...

Page 17: ...r a running tap To remove the drawer from the machine press the button in the rear left hand corner To facilitate cleaning the top part of the additive compartments can be removed Detergent can also eventually accumulate inside the drawer recess clean it with an old toothbrush Refit the drawer after cleaning 3 Water inlet filter If you notice that the machine is taking longer to fill check that th...

Page 18: ...essary wait until the water has cooled down place a bowl on the floor put the drain hose end into the bowl and let the water come out 6 The dangers of freezing If the machine is exposed to temperatures below 0 C certain precautions should be taken Turn off the water tap Unscrew the inlet hose Unhook the drain hose from the rear support and position the end of this hose and that of the inlet hose i...

Page 19: ...Check that the drain hose is not squashed or kinked A gentle programme which ends with water in the drum has been performed The drain filter is clogged Clean it There is water on the floor Too much detergent or unsuitable detergent creates too much foam has been used Check whether there are any leaks from one of the inlet hose fittings It is not always easy to see this as the water runs down the h...

Page 20: ...ing make a note of the model serial number and purchase date of your machine the Service Centre will require this information Mod Prod No Ser No Mod Ser P0042 Spinning starts late or the machine does not spin The electronic unbalance detection device has cut in because the laundry is not evenly distributed in the drum The laundry is redistributed by reverse rotation of the drum This may happen sev...

Page 21: ...Z MADE IN ITALY ...

Reviews: