background image

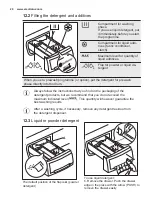
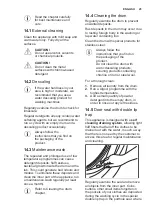
12.2 Filling the detergent and additives

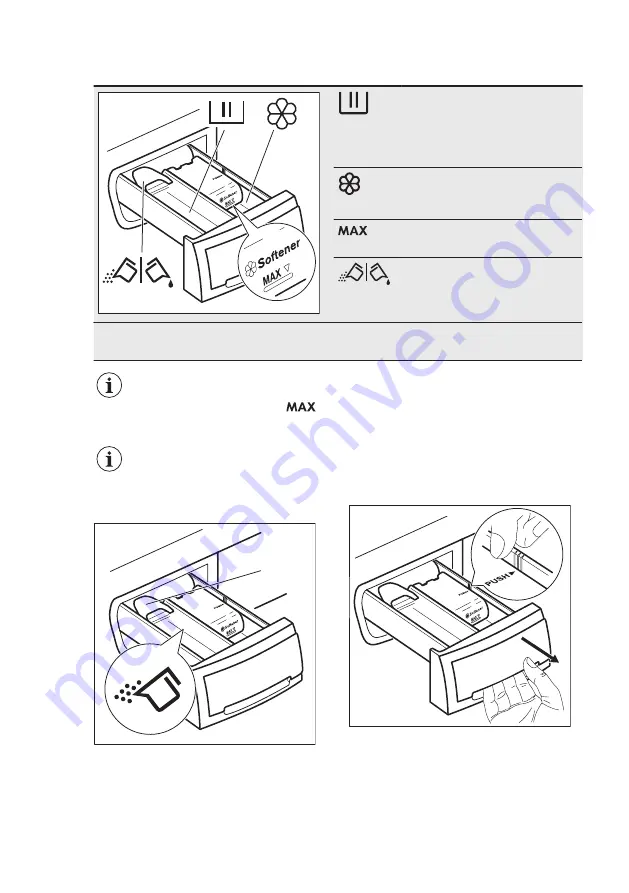
Compartment for washing

phase.

If you use liquid detergent, put

it immediately before you start

the programme.
Compartment for liquid addi‐

tives (fabric conditioner,

starch).
Maximum level for quantity of

liquid additives.
Flap for powder or liquid de‐

tergent.

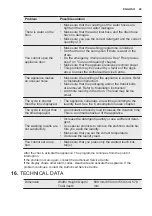
When you set a prewash programme (or option), put the detergent for prewash

phase directly into the drum.

Always follow the instructions that you find on the packaging of the

detergent products, but we recommend that you do not exceed the

maximum indicated level (

). This quantity will however guarantee the

best washing results.

After a washing cycle, if necessary, remove any detergent residue from

the detergent dispenser.

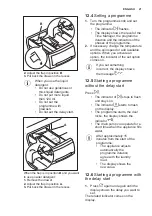
12.3 Liquid or powder detergent

A

The default position of the flap is A (powder

detergent).

To use liquid detergent:

1. Remove the drawer. Push the drawer

edge in the place with the arrow (PUSH) to

remove the drawer easily.

www.electrolux.com

20

Summary of Contents for EW2F4822AF

Page 1: ...EW2F4822AF EN Washing Machine User Manual ...

Page 2: ...been designed with you in mind So whenever you use it you can be safe in the knowledge that you ll get great results every time Welcome to Electrolux Visit our website for Get usage advice brochures trouble shooter service information www electrolux com webselfservice Register your product for better service www registerelectrolux com Buy Accessories Consumables and Original spare parts for your a...

Page 3: ...nd the hazards involved Children between 3 and 8 years of age and persons with very extensive and complex disabilities shall be kept away from the appliance unless continuously supervised Children of less than 3 years of age should be kept away from the appliance unless continuously supervised Do not let children play with the appliance Keep all packaging away from children and dispose of it appro...

Page 4: ...ctrical hazard Before any maintenance operation deactivate the appliance and disconnect the mains plug from the socket Do not use high pressure water sprays and or steam to clean the appliance Clean the appliance with a moist cloth Use only neutral detergents Do not use abrasive products abrasive cleaning pads solvents or metal objects 2 SAFETY INSTRUCTIONS 2 1 Installation The installation must c...

Page 5: ...cable or the mains plug with wet hands Do not pull the mains cable to disconnect the appliance Always pull the mains plug This appliance complies with the E E C Directives 2 3 Water connection Do not cause damage to the water hoses Before connection to new pipes pipes not used for a long time where repair work has been carried out or new devices fitted water meters etc let the water flow until it ...

Page 6: ...s from becoming trapped in the drum Dispose of the appliance in accordance with local requirements for the disposal of Waste Electrical and Electronic Equipment WEEE 3 INSTALLATION WARNING Refer to Safety chapters 3 1 Unpacking 1 Remove the external film If necessary use a cutter 2 Remove the cardboard top and the polystyrene packaging materials 3 Open the door Remove all the items from the drum 4...

Page 7: ...in the user manual bag in the holes We recommend that you keep the packaging and the transit bolts for any transport of the appliance 3 2 Positioning and levelling 1 Install the appliance on a flat hard floor Make sure that the appliance does not touch the wall or other units 2 Loosen or tighten the feet to adjust the level WARNING Do not put cardboard wood or equivalent materials below the applia...

Page 8: ...d water tap with 3 4 thread CAUTION Make sure that there are no leaks from the couplings Do not use an extension hose if the inlet hose is too short Contact the service centre for the replacement of the inlet hose 3 4 Water drainage The drain hose should be positioned at a height of not less than 60 cm and not more than 100 cm from the floor You can extend the drain hose to maximum 400 cm Contact ...

Page 9: ... mm min 1 5 must be larger than the external diameter of the drain hose 4 If the end of the drain hose looks like this see the picture you can push it directly into the stand pipe 5 Without the plastic hose guide to a sink spigot Put the drain hose in the spigot and tighten it with a clamp Refer to the illustration Make sure that the drain hose makes a loop to prevent particles going into the appl...

Page 10: ...ing plates Read carefully the instructions supplied with the accessory 4 3 Stacking kit The tumble dryer can be stacked on the top of the washing machine only by using the correct stacking kit manufactured and approved by ELECTROLUX WARNING Verify the compatible stacking kit by checking the depth of your appliances Do not put the tumble dryer under the washing machine The stacking kit can be used ...

Page 11: ...ffective treatment of laundry with low water energy and detergent consumption and will care for fabrics This appliance is designed with a self cleaning draining system allowing light fluff fibers that fall off the clothes to be drained out with the water in such a way that there is no need to access this area for regular maintenance and cleaning Refer to chapter Care and Cleaning for best maintena...

Page 12: ...ay A B E D C A The time area Programme time The alarm codes Refer to the chapter Troubleshooting for their description The level of the Time Manager B The Delay Start indicator C The Child Lock indicator D The Door Lock indicator It is on you cannot open the door It is off you can open the door It flashes you cannot open the door Wait for some minutes until the indicator is off E Washing phase ind...

Page 13: ...ric items Normal soil Delicados 30 C 40 C Cold 1200 rpm 1200 400 rpm 3 kg Delicate fabrics such as acrylics viscose and mixed fabrics requiring gentler washing Normal soil Special programmes Diario Express 40 C 60 C Cold 1200 rpm 1200 400 rpm 3 kg Cottons and Synthetics Programme to wash daily laundry in a short time Normal to light soil Rápido 30 min 2 40 C 40 C 30 C 1200 rpm 1200 400 rpm 3 kg Sy...

Page 14: ...ld 1200 rpm 1200 400 rpm 3 kg Synthetic and delicate items Light soil items or items to refresh Lana Lãs Seda 40 C 40 C Cold 1200 rpm 1200 400 rpm 1 5 kg Machine washable wool hand washable wool and other fabrics with hand washing care symbol3 1 Standard programmes for the Energy Label consumption values According to regu lation 1061 2010 these programmes are respectively the Standard 60 C cotton ...

Page 15: ...MPTION VALUES Stated values are obtained in laboratory conditions with relevant stand ards Different causes can change the data the quantity and type of laundry and ambient temperature Water pressure the supply voltage and the temperature of inlet water may also affect the washing pro gramme duration Technical specifications may be changed without prior notice to improve the quality of product ENG...

Page 16: ...mption litre Approxi mate pro gramme duration minutes Remaining moisture 1 Algod 60 C 8 1 35 70 159 53 Algod 40 C 8 0 87 69 158 53 Sintéticos 40 C 3 0 60 56 103 35 Delicados 40 C 3 0 55 59 81 35 Lana Lãs Seda 30 C 2 1 5 0 45 62 75 30 Standard cotton programmes Standard 60 C cotton 8 0 96 52 244 53 Standard 60 C cotton 4 0 73 40 210 53 Standard 40 C cotton 4 0 62 41 196 53 1 At the end of spin phas...

Page 17: ...utton repeatedly to set the required delay The time increases from 30 minutes to 20 hours The display shows the indicator and the selected delay time After touching the Inicio Pausa button the appliance begins the countdown and the door is locked 9 5 Extra Aclarado Enxag With this option you can add a few rinses according to the selected washing programme Use this option for people with allergies ...

Page 18: ...f You can activate this option After you press the options and the programme knob are locked Before you press the appliance cannot start 10 2 Permanent Extra Rinse With this option you can permanently have an extra rinse when you set a new programme To activate deactivate this option press and at the same time until the indicator comes on goes off 10 3 Acoustic signals The acoustic signals operate...

Page 19: ...rt a programme for cotton at the highest temperature without laundry This removes all possible dirt from the drum and the tub 12 DAILY USE WARNING Refer to Safety chapters 12 1 Loading the laundry 1 Open the appliance door 2 Empty the pockets and unfold the items before you put them in the appliance 3 Put the laundry in the drum one item at a time Make sure not to put too much laundry in the drum ...

Page 20: ...e directly into the drum Always follow the instructions that you find on the packaging of the detergent products but we recommend that you do not exceed the maximum indicated level This quantity will however guarantee the best washing results After a washing cycle if necessary remove any detergent residue from the detergent dispenser 12 3 Liquid or powder detergent A The default position of the fl...

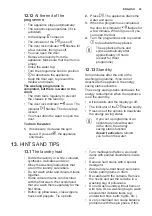
Page 21: ... change the temperature and the spin speed or add available options When you activate an option the indicator of the set option comes on If you set something incorrect the display shows the message 12 5 Starting a programme without the delay start Press The indicator of stops to flash and stays on The indicator starts to flash on the display The programme starts the door locks the display shows th...

Page 22: ...celling a running programme 1 Turn the programme knob to position to cancel the programme and to deactivate the appliance 2 Turn the programme knob again to activate the appliance Now you can set a new washing programme Before starting the new programme the appliance could drain the water In this case make sure that the detergent is still in the detergent compartment if not fill the detergent agai...

Page 23: ... washing programme if you do not deactivate the appliance the energy saving status activates The energy saving status decreases the energy consumption when the appliance is on the stand by All indicators and the display go off The indicator of the flashes slowly Press one of the options to deactivate the energy saving status If you set a programme or an option that ends with water in the drum the ...

Page 24: ...ons that you find on the on packaging of these products Use the correct products for the type and colour of the fabric the programme temperature and the level of soil If your appliance does not have the detergent dispenser with the flap device add the liquid detergents with a dosing ball supplied by the detergent s manufacturer 13 4 Ecological hints Set a programme without the prewash phase to was...

Page 25: ... a month Refer to Cleaning the drum chapter 14 4 Cleaning the drum Regularly examine the drum to prevent unwanted deposits Rust deposits in the drum may occur due to rusting foreign body in the washing or tap water containing iron Clean the drum with special products for stainless steel Always follow the instructions that you find on the packaging of the product Do not clean the drum with acidic d...

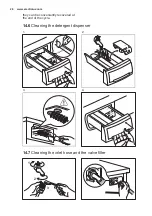
Page 26: ...they can be conveniently recovered at the end of the cycle 14 6 Cleaning the detergent dispenser 1 2 3 4 14 7 Cleaning the inlet hose and the valve filter 1 2 3 www electrolux com 26 ...

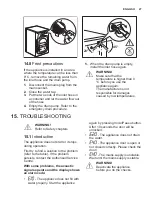
Page 27: ...esponsible for damages caused by low temperatures 15 TROUBLESHOOTING WARNING Refer to Safety chapters 15 1 Introduction The appliance does not start or it stops during operation First try to find a solution to the problem refer to the table If the problem persists contact the Authorised Service Centre With some problems the acoustic signals operate and the display shows an alarm code The appliance...

Page 28: ...nnection of the water inlet hose is correct Make sure that the connections of the water inlet hoses are correct The appliance does not fill with water and drain immediately Make sure that the drain hose is in the correct position The hose may be too low Refer to Installation instruc tion The appliance does not drain the water Make sure that the sink spigot is not clogged Make sure that the drain h...

Page 29: ...uction Add more laundry in the drum The load may be too small The cycle is shorter than the time displayed The appliance calculates a new time according to the laundry load See the Consumption Values chapter The cycle is longer than the time displayed An unbalanced laundry load increases the duration time This is a normal behaviour of the appliance The washing results are not satisfactory Increase...

Page 30: ... REGULATION 1369 2017 Product Information Sheet Trade Mark ELECTROLUX Model EW2F4822AF PNC914912364 Rated capacity in kg 8 Energy efficiency class A Energy consumption in kWh per year based on 220 standard washing cycles for cotton programmes at 60 C and 40 C at full and partial load and the con sumption of the low power modes Actual energy con sumption will depend on how the appliance is used 190...

Page 31: ... cotton pro gramme at full load in minutes 244 Programme time of the standard 60 C cotton pro gramme at partial load in minutes 210 Programme time of the standard 40 C cotton pro gramme at partial load in minutes 196 Duration of the left on mode in minutes 5 Airborne acoustical noise emission in db A washing 58 Airborne acoustical noise emission in db A spinning 79 Built in appliance Y N No The in...

Page 32: ...www electrolux com shop 192929870 A 012019 ...

Reviews: