background image

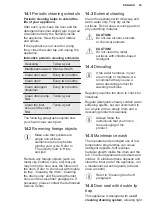
fluff fibers that fall off the clothes to be

drained out with the water. Regularly

examine the seal. Coins, buttons, other

small items can be recovered at the end

of the cycle.

Clean it when needed, using ammonia

cream cleanser agent without scratching

the seal surface.

Always obey the instructions

that you find on the

packaging of the product.

14.7 Cleaning the drum

Regularly examine the drum to prevent

unwanted deposits.
Rust deposits in the drum may occur due

to rusting foreign body in the washing or

tap water containing iron
Clean the drum with special products for

stainless steel.

Always follow the

instructions that you find on

the packaging of the

product.

Do not clean the drum with

acidic descaling products,

scouring products containing

chlorine or iron or steel wool.

For a thorough clean:

1. Remove all laundry from the drum.

2. Run the Machine Clean programme.

For more details, refer to washing

programme table.

3. Add a small quantity of powder

detergent into the empty drum, in

order to rinse out any left residues.

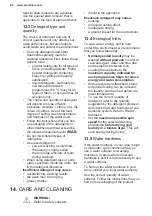
Occasionally, at the end of a

cycle the display may show
the icon  : this is a

recommendation to perform

the “drum cleaning”. Once

the drum cleaning has been

performed, the icon

disappears.

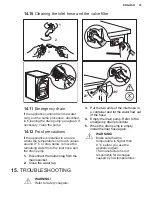
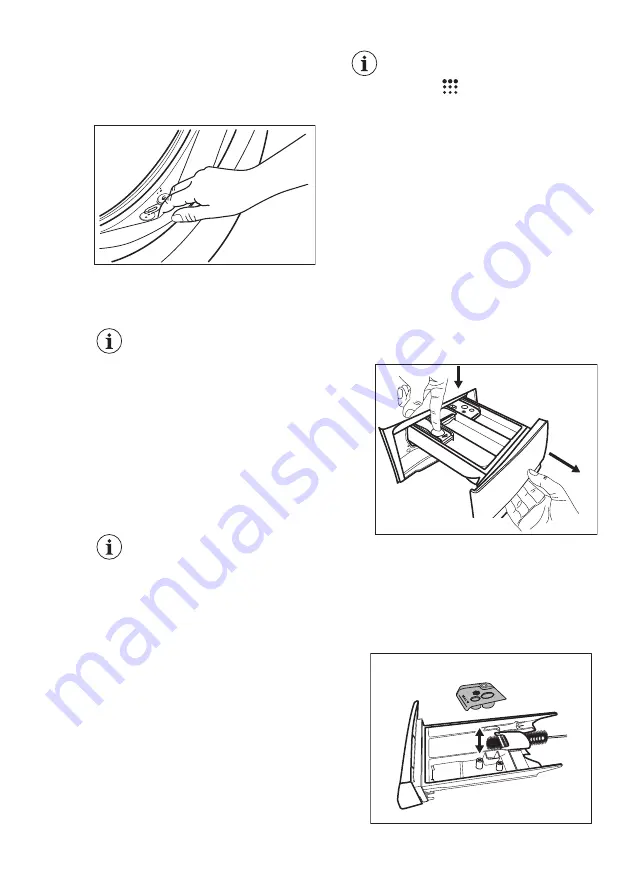
14.8 Cleaning the detergent

dispenser

To prevent possible deposits of dried

detergent or clotted fabric softener

and/or formation of mould in the

detergent dispenser drawer, once in a

while carry out the following cleaning

procedure:

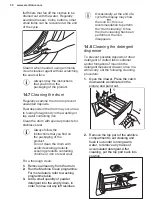
1. Open the drawer. Press the catch

downwards as indicated in the

picture and pull it out.

2

1

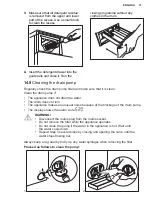
2. Remove the top part of the additive

compartment to aid cleaning and

flush it out under running warm

water, to remove any traces of

accumulated detergent. After

cleaning, put the top part back into

position.

www.electrolux.com

30

Summary of Contents for EW6F6268N3

Page 1: ...EW6F6268N3 EN Washing Machine User Manual ...

Page 2: ...nd So whenever you use it you can be safe in the knowledge that you ll get great results every time Welcome to Electrolux Visit our website to Get usage advice brochures trouble shooter service and repair information www electrolux com support Register your product for better service www registerelectrolux com Buy Accessories Consumables and Original spare parts for your appliance www electrolux c...

Page 3: ...nd the hazards involved Children between 3 and 8 years of age and persons with very extensive and complex disabilities shall be kept away from the appliance unless continuously supervised Children of less than 3 years of age should be kept away from the appliance unless continuously supervised Do not let children play with the appliance Keep all packaging away from children and dispose of it appro...

Page 4: ...s or other new hose sets supplied by the Authorised Service Centre Old hose sets must not be reused If the mains power supply cable is damaged it must be replaced by the manufacturer its Authorised Service Centre or similarly qualified persons to avoid an electrical hazard Before any maintenance operation deactivate the appliance and disconnect the mains plug from the socket Do not use high pressu...

Page 5: ...tact the Authorised Service Centre to ensure which accessories can be used 2 2 Electrical connection WARNING Risk of fire and electric shock The appliance must be earthed Always use a correctly installed shockproof socket Make sure that the parameters on the rating plate are compatible with the electrical ratings of the mains power supply Do not use multi plug adapters and extension cables Make su...

Page 6: ...nternal lighting contact the Authorised Service Centre 2 6 Service To repair the appliance contact the Authorised Service Centre Use original spare parts only Please note that self repair or non professional repair can have safety consequences and might void the guarantee The following spare parts will be available for 10 years after the model has been discontinued motor and motor brushes transmis...

Page 7: ...se 9 Inlet hose connection 10 Mains cable 11 Transit bolts 12 Hose support 00000000 00A Mod xxxxxxxxx 000V 00Hz 0000 W 910000000 00 A B C Prod No D The rating plate reports the model name A product number B electrical ratings C and serial number D 4 TECHNICAL DATA Dimension Width Height Total depth 59 6 cm 84 7 cm 60 1 cm Electrical connection Voltage Overall power Fuse Frequency 230 V 2200 W 10 A...

Page 8: ...Safety chapters 5 1 Unpacking 1 Open the door Remove all the items from the drum Accessories delivered with the appliance may vary depending on the model 2 Put the packaging element on the floor behind the appliance and carefully put it down onto its rear side Remove the polystyrene protection from the bottom 1 2 CAUTION Do not lay washing machine on its front 3 Put the appliance back into an upri...

Page 9: ...floor The appliance must be levelled and stable Make sure that the appliance does not touch the wall or other units and there is air circulation below the appliance 2 Loosen or tighten the feet to adjust the level All feet must rest firmly on the floor x4 WARNING Do not put cardboard wood or equivalent materials below the appliance feet to adjust the level 2 The inlet hose CAUTION Make sure there ...

Page 10: ...the plastic hose guide 2 On the edge of a sink Fasten the guide to the water tap or to the wall Make sure that the plastic guide cannot move when the appliance drains and the drain hose end is not immersed in the water There may be a return of dirty water into the appliance 3 If the end of the drain hose looks like this see the picture you can push it directly into the stand pipe 4 To a stand pipe...

Page 11: ...ng into account any other appliances in use Connect the appliance to an earthed socket The power supply cable must be easily accessible after installing the appliance For any electrical work required to install this appliance contact our Authorised Service Centre The manufacturer does not accept any responsibility for damage or injury through failure to comply with the above safety precaution 6 AC...

Page 12: ...es approved by ELECTROLUX ensure the safety standards of the appliance If unapproved parts are used any claims will be invalidated 7 CONTROL PANEL 7 1 Special features Your new washing machine meets all modern requirements for an effective treatment of laundry with low water energy and detergent consumption and will care for fabrics Thanks to the Soft Plus option the fabric softener is uniformly s...

Page 13: ...y 5 Delay Start touch button 6 Time Manager touch button 7 Start Pause touch button 8 Easy Iron touch button 9 Soft Plus touch button 10 Extra Rinse touch button 11 Stain touch button 12 Prewash touch button 13 On Off push button 7 3 Display The Temperature area Temperature indicator Cold water indicator Child safety lock indicator ENGLISH 13 ...

Page 14: ... still pause the appliance and add more laundry Drum clean indicator Night indicator Rinse Hold indicator The spin area Spin speed indicator No Spin indicator Spin phase is off 7 4 Multilingual badges Adhesive badges in different languages are supplied with the appliance The desired badge can be glued next to the programme dial Outdoor Puuvilla Puuvilla Koneen puhdistus Silkki Villa Tyhjennys Link...

Page 15: ...the No Spin option Set this option to deactivate all spin phases The appliance performs the only draining phase of the selected washing programme Set this option for very delicate fabrics The rinse phase uses more water for some washing programmes The display shows the indicator Activate the Rinse Hold option The final spin is not performed The water of the last rinse is not drained out to prevent...

Page 16: ...manent Soft Plus Set this option to optimise the fabric softener distribution and improve fabric softness Recommended when you use fabric softener This option increases the programme duration The corresponding indicator above the touch button illuminates and also stays permanently on during next cycles until this option is deactivated 8 9 Easy Iron The appliance carefully washes and spins the laun...

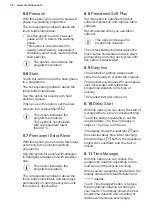
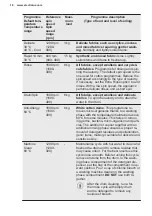
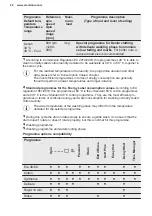
Page 17: ...use the appliance or interrupt a running programme 9 PROGRAMMES 9 1 Programme Chart Programme Default tem perature Temperature range Reference spin speed Spin speed range rpm Maxi mum load Programme description Type of load and level of soiling Eco 40 60 40 C 1 60 C 30 C2 1600 rpm 1600 400 8 kg White cotton and fast coloured cotton Nor mally soiled items The energy consumption decreases and the ti...

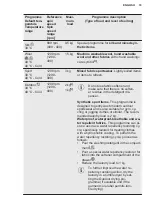
Page 18: ...pin the laundry and to drain the water in the drum Anti Allergy 60 C 1600 rpm 1600 400 8 kg White cotton items This programme re moves micro organisms thanks to a washing phase with the temperature maintained above 60 C for some minutes This helps in remov ing germs bacteria micro organism and parti cles The addition of vapour together with an additional rinsing phase ensures a proper re moval of ...

Page 19: ...ynthetic sport items This programme is designed to gently wash modern outdoor sportswear and is also suitable for gym cy cling or jogging clothes or similar The recom mended laundry load is 2 kg Waterproof waterproof breathable and wa ter repellent fabrics This programme can al so be used as a water repellency restoring cy cle specifically tailored for treating clothes with a hydrophobic coating T...

Page 20: ...ose that perform at lower temperatures and longer duration 2 Standard programmes for the Energy Label consumption values According to EU regulation 1061 2010 this programme at 60 C is the Standard 60 C cotton programme and at 30 C is the Standard 40 C cotton programme They are the most efficient pro grammes in terms of combined energy and water consumption for washing normally soiled cotton laundr...

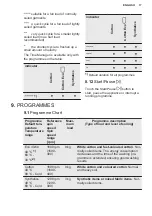
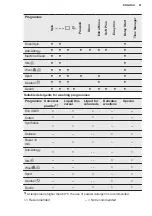
Page 21: ...enim Suitable detergents for washing programmes Programme Universal powder1 Liquid Uni versal Liquid for coloureds Delicates woollens Special Eco 40 60 Cotton Synthetics Delicate Rapid 14 min Anti Allergy Silk Wool Sport Outdoor Denim 1 At temperature higher than 60 C the use of powder detergent is recommended Recommended Not recommended ENGLISH 21 ...

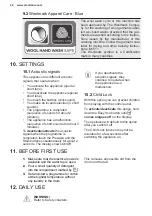
Page 22: ... minutes To deactivate activate the acoustic signals when the programme is completed touch the Prewash and the Stain buttons simultaneously for about 2 seconds The display shows On Off If you deactivate the acoustic signals they continue to operate when the appliance has a malfunction 10 2 Child Lock With this option you can prevent children from playing with the control panel To activate deactiva...

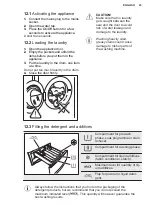
Page 23: ...en the seal and the door to avoid risk of water leakage and damage to the laundry Washing heavily oiled greasy stains could cause damage to rubber parts of the washing machine 12 3 Filling the detergent and additives Compartment for prewash phase soak programme or stain remover Compartment for washing phase Compartment for liquid additives fabric conditioner starch Maximum level for quantity of li...

Page 24: ...ou close the drawer 12 5 Setting a programme 1 Turn the programme dial to select the desired washing programme The indicator of the Start Pause button flashes The display shows an indicative programme duration 2 To change the temperature and or the spin speed touch the related buttons 3 If desired set one or more options by touching the related buttons The related indicators illuminate on the disp...

Page 25: ...down 12 8 The SensiCare System load detection After touching the Start Pause button 1 The SensiCare System starts estimating the weight of the load to calculate the real programme duration During this phase the Time Manager bars placed below the time digits play a simple animation 2 After about 15 20 minutes the Time Manager bars disappear and new cycle duration is displayed The appliance automati...

Page 26: ...tion automatically deactivates the appliance When you activate the appliance again the display shows the end of the previous programme Turn the programme dial to set a new cycle 2 Remove the laundry from the appliance 3 Make sure that the drum is empty 4 Keep the door and the detergent dispenser slightly ajar to prevent mildew and odours 5 Close the water tap 12 13 Draining water out after end of ...

Page 27: ...olour with the first wash We recommend that you wash them separately for the first couple of times Turn multilayered fabrics wool and items with printed illustrations inside out Pre treat stubborn stains Wash stubborn stains with a special detergent Be careful with curtains Remove the hooks and put the curtains in a washing bag or pillowcase A very small load can cause balance problems with the sp...

Page 28: ...satisfactory washing results the wash load to turn grey greasy clothes mould in the appliance Excessive detergent may cause sudsing reduced washing effect inadequate rinsing a greater impact for the environment 13 4 Ecological hints To save water energy and to help protect the environment we recommend that you follow these tips Normally soiled laundry may be washed without prewash in order to save...

Page 29: ...let hose and the valve filter paragraphs If necessary please contact the Authorised Service Centre 14 3 External cleaning Clean the appliance with mild soap and warm water only Fully dry all the surfaces Do not use a scouring pads or any scratching material CAUTION Do not use alcohol solvents or chemical products CAUTION Do not clean the metal surfaces with chlorine based detergent 14 4 Descaling ...

Page 30: ...For a thorough clean 1 Remove all laundry from the drum 2 Run the Machine Clean programme For more details refer to washing programme table 3 Add a small quantity of powder detergent into the empty drum in order to rinse out any left residues Occasionally at the end of a cycle the display may show the icon this is a recommendation to perform the drum cleaning Once the drum cleaning has been perfor...

Page 31: ...does not drain the water The drum does not turn The appliance makes an unusual noise because of the blockage of the drain pump The display shows the alarm code WARNING Disconnect the mains plug from the mains socket Do not remove the filter while the appliance operates Do not clean the pump if the water in the appliance is hot Wait until the water cools down Repeat Step 3 several times by closing ...

Page 32: ... 8 2 1 1 WARNING Make sure that the impeller of the pump can rotate If it does not rotate contact the Authorised Service Centre Make sure also that you tighten the filter correctly to prevent leakages www electrolux com 32 ...

Page 33: ...remaining water from the inlet hose and the drain pump 1 Disconnect the mains plug from the mains socket 2 Close the water tap 3 Put the two ends of the inlet hose in a container and let the water flow out of the hose 4 Empty the drain pump Refer to the emergency drain procedure 5 When the drain pump is empty install the inlet hose again WARNING Make sure that the temperature is higher than 0 C be...

Page 34: ...ke sure that the sink spigot is not clogged Make sure that the drain hose has no kinks or bends Make sure that the drain filter is not clogged Clean the fil ter if necessary Refer to Care and cleaning Make sure that the connection of the drain hose is correct Set the drain programme if you set a programme without drain phase Set the drain programme if you set an option which ends with water in the...

Page 35: ...loor Make sure that the couplings of the water hoses are tight and there is not water leakages Make sure that the water inlet hose and the drain hose have no damages Make sure you use the correct detergent and the correct quantity of it You cannot open the appliance door Make sure that a washing programme that ends with water in tub has not been selected Make sure that the washing programme is fin...

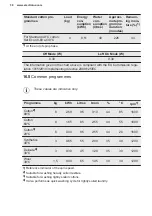
Page 36: ...ing plate 16 CONSUMPTION VALUES 16 1 Introduction This user manual reports two different tables in order to favour a gradual passage from a regulation to the other Regulation EU 1061 2010 valid up to 28th of February 2021 is related to the Energy Efficiency classes from A to D Regulation EU 2019 2023 valid from 1st March 2021 is related to the Energy Efficiency classes from A to G set by Regulatio...

Page 37: ...a programme 16 3 According to Commission Regulation Eu 2019 2023 Eco 40 60 pro gramme kg kWh Litres h mm C rpm1 Full load 8 1 080 58 3 30 50 43 1551 Half load 4 0 700 44 2 40 50 38 1551 Quarter load 2 0 360 38 2 40 54 27 1551 1 Maximum spin speed Power consumption in different modes Off W Stand by W Delay start W 0 30 0 30 4 00 Time to Off Standby mode is 15 minutes maximum 16 4 According to Regul...

Page 38: ...menting directive 2009 125 EC 16 5 Common programmes These values are indicative only Programme kg kWh Litres h mm C rpm1 Cotton2 90 C 8 2 50 95 3 10 44 85 1600 Cotton 60 C 8 1 65 85 2 55 44 55 1600 Cotton3 20 C 8 0 40 85 2 55 44 20 1600 Synthetics 40 C 3 0 65 55 2 00 35 40 1200 Delicate4 30 C 3 0 30 45 1 20 35 30 1200 Wool 30 C 1 5 0 30 65 1 05 30 30 1200 1 Reference indicator of the spin speed 2...

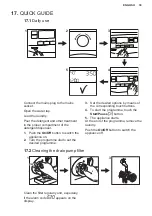
Page 39: ...pliance on 2 Turn the programme dial to set the desired programme 3 Set the desired options by means of the corresponding touch buttons 4 To start the programme touch the Start Pause button 5 The appliance starts At the end of the programme remove the laundry Push the On Off button to switch the appliance off 17 2 Cleaning the drain pump filter 1 3 2 180 2 1 Clean the filter regularly and especial...

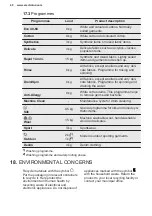
Page 40: ... White cotton items This programme helps to remove germs and bacteria Machine Clean Maintenance cycle for drum cleaning Silk 0 5 kg Special programme for silk and mixed syn thetic items Wool 1 5 kg Machine washable wool hand washable wool and delicates Sport 3 kg Sportswear Outdoor 2 kg1 1 kg2 Modern outdoor sporting garments Denim 3 kg Denim clothing 1 Washing programme 2 Washing programme and wa...

Page 41: ......

Page 42: ......

Page 43: ......

Page 44: ...www electrolux com shop 192942532 A 252020 ...

Reviews: