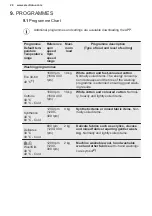
background image

00000000

00A

Mod. xxxxxxxxx

000V ~ 00Hz  0000 W

910000000

00

A

B

C

Prod.No.

D

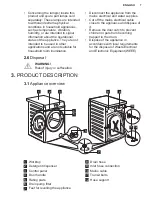
The rating plate reports the model name (A) ,

product number (B), electrical ratings (C) and

serial number (D).

4. TECHNICAL DATA

Dimension

Width/ Height/ Total depth

59.7 cm /84.7 cm /65.8 cm

Electrical connection

Voltage

Overall power

Fuse

Frequency

230 V

2200 W

10 A

50 Hz

Level of protection against ingress of solid particles

and moisture ensured by the protective cover, except

where the low voltage equipment has no protection

against moisture

IPX4

Water supply pressure

Minimum

Maximum

0.5 bar (0.05 MPa)

10 bar (1.0 MPa)

Water supply 1)

Cold water

Maximum Load

Cotton

10 kg

Spin Speed

Maximum spin speed

1551 rpm

1) Connect the water inlet hose to a water tap with a 3/4'' thread.
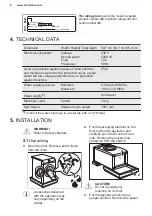
5. INSTALLATION

WARNING!

Refer to Safety chapters.
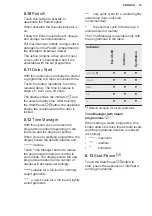
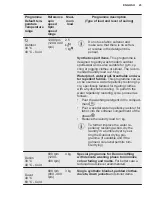
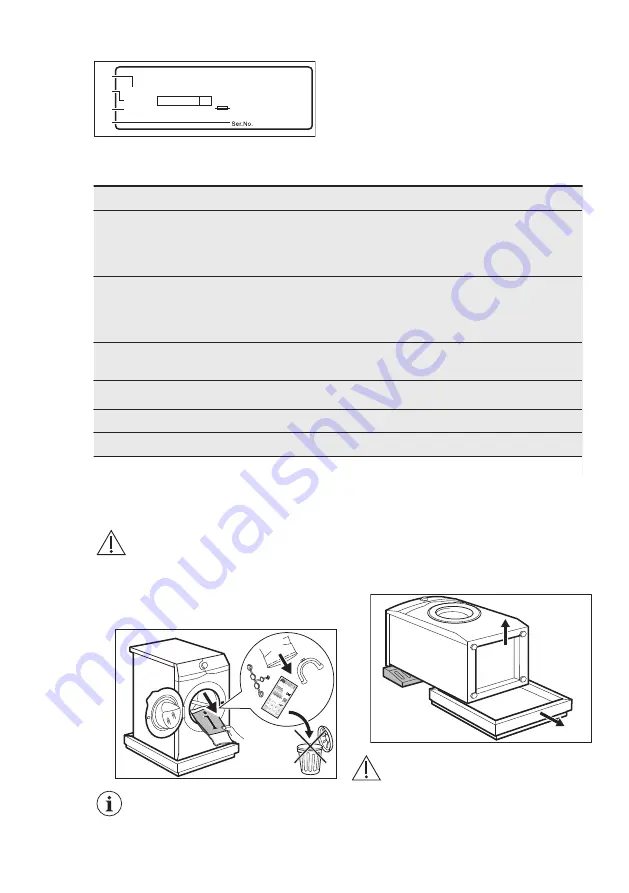
5.1 Unpacking

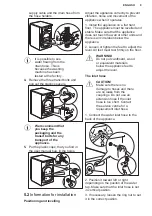
1. Open the door. Remove all the items

from the drum.

Accessories delivered

with the appliance may

vary depending on the

model.

2. Put the packaging element on the

floor behind the appliance and

carefully put it down onto its rear

side. Remove the polystyrene

protection from the bottom.

1

2

CAUTION!

Do not lay washing

machine on its front.

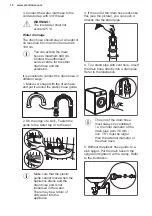
3. Put the appliance back into an

upright position. Remove the power

www.electrolux.com

8

Summary of Contents for EW8F8661U1

Page 1: ...EW8F8661U1 EN Washing Machine User Manual ...

Page 2: ...NEL 11 7 WI FI CONNECTIVITY SETUP 14 8 DIAL AND BUTTONS 17 9 PROGRAMMES 20 10 SETTINGS 27 11 BEFORE FIRST USE 27 12 DAILY USE 27 13 HINTS AND TIPS 33 14 CARE AND CLEANING 34 15 TROUBLESHOOTING 40 16 CONSUMPTION VALUES 45 17 ACCESSORIES 47 18 QUICK GUIDE 48 19 ENVIRONMENTAL CONCERNS 50 My Electrolux Care app www electrolux com 2 ...

Page 3: ...ce Centre ensure that you have the following data available Model PNC Serial Number The information can be found on the rating plate Warning Caution Safety information General information and tips Environmental information Subject to change without notice 1 SAFETY INFORMATION Before the installation and use of the appliance carefully read the supplied instructions The manufacturer is not responsib...

Page 4: ...not carry out cleaning and user maintenance of the appliance without supervision 1 2 General Safety Do not change the specification of this appliance This appliance is intended to be used in household and similar applications such as staff kitchen areas in shops offices and other working environments by clients in hotels motels bed breakfast and other residential type environments areas for commun...

Page 5: ... prevent an internal damage Always take care when moving the appliance as it is heavy Always use safety gloves and enclosed footwear Follow the installation instructions supplied with the appliance Do not install or use a damaged appliance Do not install or use the appliance where the temperature can be less than 0 C or where it is exposed to the weather The floor area on which the appliance is to...

Page 6: ...re for the other drain hose and the extension Make sure that there is access to the tap after the installation 2 4 Use WARNING Risk of injury electric shock fire burns or damage to the appliance Follow the safety instructions on the detergent packaging Do not put flammable products or items that are wet with flammable products in near or on the appliance Do not wash fabrics which are heavily soile...

Page 7: ...sconnect the appliance from the mains electrical and water supplies Cut off the mains electrical cable close to the appliance and dispose of it Remove the door catch to prevent children or pets from becoming trapped in the drum Dispose of the appliance in accordance with local requirements for the disposal of Waste Electrical and Electronic Equipment WEEE 3 PRODUCT DESCRIPTION 3 1 Appliance overvi...

Page 8: ...X4 Water supply pressure Minimum Maximum 0 5 bar 0 05 MPa 10 bar 1 0 MPa Water supply 1 Cold water Maximum Load Cotton 10 kg Spin Speed Maximum spin speed 1551 rpm 1 Connect the water inlet hose to a water tap with a 3 4 thread 5 INSTALLATION WARNING Refer to Safety chapters 5 1 Unpacking 1 Open the door Remove all the items from the drum Accessories delivered with the appliance may vary depending...

Page 9: ...t be levelled and stable Make sure that the appliance does not touch the wall or other units and there is air circulation below the appliance 2 Loosen or tighten the feet to adjust the level All feet must rest firmly on the floor WARNING Do not put cardboard wood or equivalent materials below the appliance feet to adjust the level The inlet hose CAUTION Make sure there is no damage to hoses and th...

Page 10: ... or to the wall Make sure that the plastic guide cannot move when the appliance drains and the drain hose end is not immersed in the water There may be a return of dirty water into the appliance 3 If the end of the drain hose looks like this see the picture you can push it directly into the stand pipe 4 To a stand pipe with vent hole Insert the drain hose directly into a drain pipe Refer to the il...

Page 11: ... does not accept any responsibility for damage or injury through failure to comply with the above safety precaution 6 CONTROL PANEL 6 1 Special features Your new washing machine meets all modern requirements for an effective treatment of laundry with low water energy and detergent consumption and proper care of fabric The Wi Fi connection and Remote Start enable you to start a cycle to interact wi...

Page 12: ...duration in 30 seconds The washing programme is tailored to the laundry load and the type of fabric without consuming more time energy and water than necessary 6 2 Control panel description On Off Eco 40 60 Synthetics Delicates Wool Silk FreshScent Spin Drain Rinse Rapid 20min Anti Allergy Outdoor Denim Duvet Cottons Temperature Stain Extra Rinse Soft Plus Plus Steam Delay Start Time Manager Ultra...

Page 13: ...or locked indicator Delay start indicator The digital indicator can show Programme duration e g Delay time e g Cycle end Warning code e g Error indicator When working with the APP access point update Please refer to the chapter Wi FI Connec tivity setup Time Manager indicator MIX UltraCare indicator Steam phase indicator Anti crease phase indicator ENGLISH 13 ...

Page 14: ...ramme dial Outdoor Puuvilla Puuvilla Koneen puhdistus Silkki Villa Tyhjennys Linkous Huuhtelu Pika 14 min Hienopesu Synteettiset Denim UltraWash Anti Allergy 7 WI FI CONNECTIVITY SETUP This chapter describes how to connect the smart appliance to the Wi Fi network and to link it to mobile devices By this functionality you can receive notifications control and monitor your appliance from your mobile...

Page 15: ...ou do not have an account create a new one following the instructions in My Electrolux 5 Follow the instructions on the App for the appliance registration and configuration 7 2 Configuring the washing machine wireless connection 1 Press the On Off button for a few seconds to activate the appliance Wait about 10 seconds before proceeding with wireless configuration 2 Select a programme by turning t...

Page 16: ...te the Remote Start 1 Touch the Remote Start button and the indicator appears on the display for a few seconds 2 Touch the Start Pause button to activate the Remote Start before the indicator stops blinking The indicators and appear on the programme summary screen and the door is locked Now it is possible to start the programme remotely When touching the Start Pause button after the indicator stop...

Page 17: ...ptions No Spin Set this option to deactivate all spin phases The appliance performs the only draining phase of the selected washing programme Set this option for very delicate fabrics The rinses phase uses more water for some washing programmes Activate the Rinse Hold option The final spin is not performed The water of the last rinse is not drained out to prevent the fabrics from creasing The wash...

Page 18: ...ays permanently on during next cycles until this option is deactivated 8 8 Permanent Soft Plus Set this option to optimise the fabric softener distribution and improve fabric softness Recommended when you use fabric softener This option increases the programme duration The corresponding indicator above the touch button illuminates and also stays permanently on during next cycles until this option ...

Page 19: ...gramme duration depending on the load size and the degree of soiling When you set a washing programme the display shows the default duration and dashes Touch Time Manager button to reduce the programme duration according to your needs The display shows the new programme duration and a number of dashes will decrease accordingly suitable for a full load of normally soiled garments a quick cycle for ...

Page 20: ...washing programme is extended ensuring good wash ing results Cottons 40 C 90 C Cold 1600 rpm 1600 400 rpm 10 kg White cotton and coloured cotton Normal ly heavily and lightly soiled items Synthetics 40 C 60 C Cold 1200 rpm 1200 400 rpm 4 kg Synthetic items or mixed fabric items Nor mally soiled items Delicates 30 C 40 C Cold 800 rpm 1200 400 rpm 2 kg Delicate fabrics such as acrylics viscose and m...

Page 21: ...ge when treating smaller load By means of the Time Manager button you can reduce the programme duration when treating items labeled to be washed at low temperature DO NOT Tumble dry the garments treated with fragrance Its benefit would evaporate Use the fragrance with different purposes than those here described Use the fragrance on new garments New garments may contain residual finishing compound...

Page 22: ...me for rinsing and spin ning the laundry The default spin speed is the one used for cotton programmes Reduce the spin speed according to the type of laundry If necessary set the Extra Rinse option to add rinses With a low spin speed the appliance performs delicate rinses and a short spin Additional washing programmes Rapid 20min 30 C 40 C 30 C 1200 rpm 1200 400 rpm 3 kg Cotton and synthetic items ...

Page 23: ...cle specifically tailored for treating clothes with a hydrophobic coating To perform the water repellency restoring cycle proceed as follows Pour the washing detergent in the compart ment Pour a special water repellency restorer for fabric into the softener compartment of the drawer Reduce the laundry load to 1 kg To further improve the water re pellency restoring action dry the laundry in a tumbl...

Page 24: ... 2023 this programme at 40 C is able to clean normally soiled cotton laundry declared to be washable at 40 C or 60 C together in the same cycle For the reached temperature in the laundry the programme duration and other data please refer to Consumption Values chapter The most efficient programmes in terms of energy consumption are generally those that perform at lower temperatures and longer durat...

Page 25: ...gramme Spin No Spin Prewash 1 Stain 2 Extra Rinse Soft Plus Plus Steam 2 Pods Delay Start Time Manager Eco 40 60 Cottons Synthetics Delicates Wool Silk FreshScent Spin Drain 3 Rinse Rapid 20min Outdoor Denim Duvet Anti Allergy ENGLISH 25 ...

Page 26: ...f you set the No Spin option the appliance performs draining only Suitable detergents for washing programmes Programme Universal powder1 Liquid Uni versal Liquid for coloureds Delicates woollens Special Eco 40 60 Cottons Synthetics Delicates Wool Silk Rapid 20min Outdoor Denim Duvet Anti Allergy UltraWash 59min 1 At temperature higher than 60 C the use of powder detergent is recommended Recommende...

Page 27: ...amme is completed touch the Prewash and the Stain buttons simultaneously for about 2 seconds The display shows On Off If you deactivate the acoustic signals they continue to operate when the appliance has a malfunction 10 2 Child Lock With this option you can prevent children from playing with the control panel To activate deactivate this option hold down the Pods button until comes on goes off on...

Page 28: ...Max 2 pods When using detergent tablets make sure that the Pods option is activated Compartment for prewash phase an soak programme powder de tergent only Compartment for washing phase powder detergent only Make sure that the Pods option is deactivated when using this compartment If using liquid detergent re member to insert the con tainer for liquid detergent Compartment for fabric softener and o...

Page 29: ... Close the detergent dispenser 12 4 Setting a programme 1 Turn the programme dial to select the desired washing programme The first programme on the top right of the programme dial is Eco 40 60 the programme to which the information of the energy label relates The indicator of the Start Pause button flashes The display shows an indicative programme duration 2 To change the temperature and or the s...

Page 30: ...s the indicator When the countdown is completed the programme starts automatically 2 Touch the Start Pause button to pause the appliance The related indicator flashes 3 Touch the Delay Start button repeatedly until the display shows and the indicator goes off 4 Touch the Start Pause button again to start the programme immediately Changing the delay start after the countdown has started To change t...

Page 31: ...ay changes accordingly 3 Touch the button Start Pause again The washing programme continues 12 9 Cancelling a running programme 1 Press the button On Off to cancel the programme and to deactivate the appliance 2 Press the button On Off again to activate the appliance If the SensiCare System has completed and the water filling has already started the new programme starts without repeating the Sensi...

Page 32: ...e Spin button to decrease the spin speed proposed by the appliance 2 Press the Start Pause button the appliance drains the water and spins The option indicator Rinse Hold or disappears If you have set Silent and the spin speed is not changed when you press the Start Pause button the appliance only drains the water 3 When the programme is completed and the door locked indicator goes off you can ope...

Page 33: ... redistribute the load so that the items are spaced evenly around the tub c press the Start Pause button The spin phase continues Button up pillowcases close zippers hooks and poppers Tie up belts cords shoelaces ribbons and any other loose elements Do not wash laundry without hems or with cuts Use a washing bag to wash small and or delicate items e g underwired bras belts tights shoelaces ribbons...

Page 34: ...d that you follow these tips Normally soiled laundry may be washed without prewash in order to save detergent water and time the environment is protected too Loading the appliance to the maximum capacity indicated for each programmes helps to reduce energy and water consumption With adequate pre treatment stains and limited soiling can be removed the laundry can then be washed at a lower temperatu...

Page 35: ...al products CAUTION Do not clean the metal surfaces with chlorine based detergent 14 4 Descaling If the water hardness in your area is high or moderate we recommend that you use a water descaling product for washing machines Regularly examine the drum to check for limescale Regular detergents already contain water softening agents but we recommend to run a cycle with an empty drum and a descaling ...

Page 36: ...ing products scouring products containing chlorine or iron or steel wool For a thorough clean 1 Remove all laundry from the drum 2 Run a Cottons programme with the highest temperature 3 Add a small quantity of powder detergent into the empty drum in order to rinse out any left residues Occasionally at the end of a cycle the display may show the icon this is a recommendation to perform the drum cle...

Page 37: ...thes 8 Put bottom cover back to its position by aligning its holes on drawer hooks as indicated in the picture Close it till click sound CAUTION Press the bottom cover as indicated in the picture Make sure that it is closed properly CLICK 9 Reassembly the drawer as follows a Place the bottom cover and press till click sound b Place the top cover and press till click sound c Insert the container fo...

Page 38: ...o not clean the pump if the water in the appliance is hot Wait until the water cools down Proceed as follows to clean the pump 1 Open the pump cover 1 2 2 Place a suitable bowl below the drain pump access to collect the water that flows out 3 Open the chute downwards Always keep a rag nearby to dry up any water spillages when removing the filter 4 Turn the filter 180 degrees in anti clockwise dire...

Page 39: ...ean the filter under the water tap 11 Put the filter back into the special guides by turning it clockwise Make sure that you tighten the filter correctly to prevent leakages 2 1 12 Close the pump cover 2 1 When you drain the water with the emergency drain procedure you must activate the drain system again a Put 2 litres of water in the main wash compartment of the detergent dispenser b Start the p...

Page 40: ...liance is installed in an area where the temperature can reach values around 0 C or drop below remove the remaining water from the inlet hose and the drain pump 1 Disconnect the mains plug from the mains socket 2 Close the water tap 3 Put the two ends of the inlet hose in a container and let the water flow out of the hose 4 Empty the drain pump Refer to the emergency drain procedure 5 When the dra...

Page 41: ...low For this information contact your local water authority Make sure that the water tap is not clogged Make sure that the inlet hose has no kinks damages or bends Make sure that the connection of the water inlet hose is correct Make sure that the filter of the inlet hose and the filter of the valve are not clogged Refer to Care and cleaning The appliance does not drain the water Make sure that th...

Page 42: ...uched If the delay start is set cancel the setting or wait for the end of countdown Deactivate the Child Lock function if it is on Check the position of the knob on the selected pro gramme The appliance fills with water and drains immediately Make sure that the drain hose is in the correct position The hose may be positioned too low Refer to Installation instruction The spin phase does not operate...

Page 43: ...nal Check if your smart device is connected to the wireless network Check your home network and router Restart the router Contact your wireless service provider if there are prob lems with the wireless network The appliance the smart device or both need to be con figured again because a new router has been installed or the router configuration has been changed The App cannot fre quently connect to...

Page 44: ... modify their charac teristic and their behaviour in the Pods compartment specially in combination with certain options e g Delay Start After the check activate the appliance The programme continues from the point of interruption If the problem occurs again contact the Authorised Service Centre The necessary data for the service centre are on the rating plate 15 2 Emergency door opening In case of...

Page 45: ...ance in the EU EPREL database Keep the energy label for reference together with the user manual and all other documents provided with this appliance It is also possible to find the same information in EPREL using the link https eprel ec europa eu and the model name and product number that you find on the rating plate of the appliance Refer to Product description chapter for the position of the rat...

Page 46: ...25 54 23 1551 1 Maximum spin speed Power consumption in different modes Off W Stand by W Delay start W Networked standby W 0 50 0 50 4 00 2 001 Time to Off Standby mode is 15 minutes maximum 1 The energy consumption of the connected function is approximately 17 5 kWh per year To disconnect this function please refer to the chapter Wi fi Connectivity setup 16 4 Common programmes These values are in...

Page 47: ...If unapproved parts are used any claims will be invalidated 17 2 Fixing plate kit If you install the appliance on a plinth that is not an accessory supplied by ELECTROLUX secure the appliance in the fixing plates Read carefully the instructions supplied with the accessory 17 3 Stacking kit The tumble dryer can be stacked on the top of the washing machine only by using the correct stacking kit WARN...

Page 48: ...he On Off button to switch the appliance on 2 Turn the programme dial to set the desired programme 3 Set the desired options by means of the corresponding touch buttons 4 To start the programme touch the Start Pause button 5 The appliance starts At the end of the programme remove the laundry Push the On Off button to switch the appliance off 18 2 Cleaning the drain pump filter 1 3 2 180 2 1 Clean ...

Page 49: ... and very deli cate fabrics Programme for rinsing and spinning Rapid 20min 3 kg Cotton and synthetic lightly soiled items or once worn items Outdoor 2 5 kg1 1 kg2 Modern outdoor sporting garments Denim 4 kg Denim clothing Duvet 3 kg Synthetic or feather and down filled blan kets padded clothes duvets Anti Allergy 10 kg White cotton items This program removes more than 99 99 of bacteria and viru se...

Page 50: ...to recycle it Help protect the environment and human health by recycling waste of electrical and electronic appliances Do not dispose of appliances marked with the symbol with the household waste Return the product to your local recycling facility or contact your municipal office www electrolux com 50 ...

Page 51: ......

Page 52: ...f the open software and robotics communities to the development project To access the source code of these free and open source software components whose license conditions require publishing and to see their full copyright information and applicable license terms please visit http electrolux opensoftwarerepository com folder NIU5 www electrolux com shop 157040831 A 392021 ...

Reviews: