background image

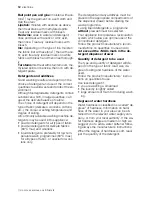
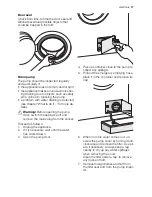
If you cannot open the door but you need
to open it you have to switch the machine
off by turning the selector dial to 

 . After a

few minutes the door can be opened 

(pay

attention to the water level and temper-
ature!)

 .

After closing the door, it is necessary to se-
lect the programme and options again and
to press button 

8

 .

At the end of the programme

The machine stops automatically. Three
blinking zeros ( 

 ) appear on the dis-

play and the pilot light of button 

8

 goes off.

Some acoustic signals sound for a few mi-
nutes.
If a programme or an option that ends with
water left in the tub has been selected, the
icon 

2.8

 remains displayed to indicate that

the water must be emptied out before open-
ing the door.

Follow the below instructions to empty out
the water:
1. Turn the programme selector dial to 

 .

2. Select the draining or spinning pro-

gramme.

3. Reduce the spin speed if needed, by

pressing the relevant button.

4. Press button 

8

 .

At the end of the programme, the icon 

2.8

disappears and the door can be opened.
Turn the programme selector dial to 

 to

switch the machine off.
Remove the laundry from the drum and care-
fully check that the drum is empty. If you do
not intend to carry out another wash, close
the water tap. Leave the door open to pre-
vent the formation of mildew and unpleas-
ant smells.

Stand by

 : once the programme has finish-

ed after a few minutes the energy saving sys-
tem will be enabled. The brightness of the

display is reduced. By pressing any button
the appliance will come out of the energy
saving status.

HELPFUL HINTS AND TIPS

Sorting out the laundry

Follow the wash code symbols on each gar-
ment label and the manufacturer’s washing
instructions. Sort the laundry as follows:
whites, coloureds, synthetics, delicates,
woollens.

Before loading the laundry

Never wash whites and coloureds together.
Whites may lose their «whiteness» in the
wash.
New coloured items may run in the first
wash; they should therefore be washed sep-
arately the first time.
Button up pillowcases, close zip fasteners,
hooks and poppers. Tie any belts or long
tapes.
Remove persistent stains before washing.
Rub particularly soiled areas with a special
detergent or detergent paste.
Treat curtains with special care. Remove
hooks or tie them up in a bag or net.

Removing stains

Stubborn stains may not be removed by
just water and detergent. It is therefore ad-
visable to treat them prior to washing.

Blood:

 treat fresh stains with cold water.

For dried stains, soak overnight in water
with a special detergent then rub in the
soap and water.

Oil based paint:

 moisten with benzine

stain remover, lay the garment on a soft
cloth and dab the stain; treat several times.

Dried grease stains:

 moisten with turpen-

tine, lay the garment on a soft surface and
dab the stain with the fingertips and a cot-
ton cloth.

Rust:

 oxalic acid dissolved in hot water or a

rust removing product used cold. Be careful
with rust stains which are not recent since
the cellulose structure will already have
been damaged and the fabric tends to hole.

Mould stains:

 treat with bleach, rinse well

(whites and fast coloureds only).

Grass:

 soap lightly and treat with bleach

(whites and fast coloureds only).

electrolux 

 11

Summary of Contents for EWF 147540 W

Page 1: ...user manual Washing Machine EWF 147540 W ...

Page 2: ...r supplier If the appliance is delivered in the winter months when there are minus tempera tures Store it at room temperature for 24 hours before using for the first time General safety It is dangerous to alter the specifications or attempt to modify this product in any way During high temperature wash pro grammes the door glass may get hot Do not touch it Make sure that small pets and children do...

Page 3: ...cles and treat stains such as paint ink rust and grass before washing Under wired bras must NOT be machine washed Garments which have been in contact with volatile petroleum products should not be machine washed If volatile clean ing fluids are used care should be taken to ensure that the fluid is removed from the garment before placing in the machine Never pull the power supply cable to re move t...

Page 4: ...e or for stain remover used during the stain action phase if availa ble The prewash and soak detergent is added at the beginning of the wash pro gramme The stain remover is added dur ing the stain action phase Compartment for powder or liquid deter gent used for main wash If using liquid de tergent pour it just before starting the pro gramme Compartment for liquid additives fabric softener starch ...

Page 5: ...selected programme Prewash By selecting this option the machine per forms a prewash cycle before the main wash phase The washing time will be pro longed This option is recommended for heavily soiled laundry Extra Rinse This appliance is designed to save energy If it necessary to rinse the laundry using an extra quantity of water extra rinse select this option Some additional rinses will be perform...

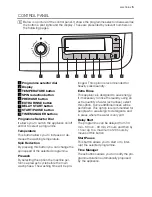
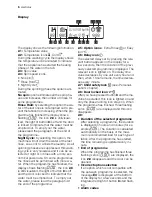
Page 6: ...alized the light of button 8 is off and the door is locked to indicate that the water must be emptied out To empty out the water please read the paragraph At the end of the programme 2 5 Option icons Extra Rinse or Easy Iron 2 6 Delay icon The selected delay set by pressing the rele vant button appears on the display for a few seconds then the duration of the previ ously selected programme is disp...

Page 7: ...nning phase stays on Prewash this icon lights on when the relevant option button is selected as well Wash Rinses Drain Spin TABLE OF SYMBOLS Table of Symbols Programme selector dial Cotton Synthetics Delicates Wool Handwah Lingerie Rinse Drain Spin Energy Saving programme Economy Blanket Baby 14 minutes Sport Light Cool clean Temperature Prewash Extra Rinse Delay Start Start Pause Time Manger butt...

Page 8: ...tart the machine 2 After pressing button 8 it will be impos sible to change any other programme or option To enable or disable this option press simul taneously for about 6 seconds buttons 6 and 7 until on the display the icon ap pears or disappears DAILY USE Load the laundry Open the door by carefully pulling the door handle outwards Place the laundry in the drum one item at a time shaking them o...

Page 9: ...d for that programme Press button 4 repeatedly to change the spin speed if you want your laundry to be spun at a different speed Select the available options by pressing buttons 4 5 and 6 Depending on the programme different functions can be combined These must be selected after choosing the desired pro gramme and before pressing button 8 When these buttons are pressed the corre sponding icons app...

Page 10: ... items Light For slightly soiled items Soil Level Icon Type of fabric Quick For very slightly soiled items Super Quick 1 For items used or worn for a short time Refresh 1 2 For refreshing items only Super Re fresh 1 2 For refreshing a very few items only 1 We recommend you to reduce the load sizes see Washing programmes table 2 When you select this option the relevant icon appears just for a while...

Page 11: ...ill come out of the energy saving status HELPFUL HINTS AND TIPS Sorting out the laundry Follow the wash code symbols on each gar ment label and the manufacturer s washing instructions Sort the laundry as follows whites coloureds synthetics delicates woollens Before loading the laundry Never wash whites and coloureds together Whites may lose their whiteness in the wash New coloured items may run in...

Page 12: ...liquid detergents preferably for low tem perature wash programmes 60 C max for all types of fabric or special for wool lens only The detergent and any additives must be placed in the appropriate compartments of the dispenser drawer before starting the wash programme If using liquid detergents a programme without prewash must be selected Your appliance incorporates a recirculation system which allo...

Page 13: ...FEINWÄ SCHE 40 Cold Main wash Rinses Maximum spin speed 700 rpm Max load 3 5 kg Reduced load 2 kg1 Delicate fabrics acrylics viscose polyester SPIN REDUCTION NO SPIN RINSE HOLD NIGHT CY CLE PREWASH2 EXTRA RINSE TIME MANAGER WOL LAINE WOOL WOLLE 40 Cold Main wash Rinses Maximum spin speed 1000 rpm Max load 2 kg Washing programme for machine washable wool as well as for hand washable woollens and de...

Page 14: ... Night Cycle option selected You can choose the spin speed by pressing the relevant button to adapt it to the fabrics to be spun SPIN REDUCTION KATOEN ECO COTON ECO COTTON ECO ECO 90 40 Main wash Rinses Maximum spin speed 1400 rpm Max load 7 kg White and fast coloured cotton This programme can be selected for slightly or normal ly soiled cotton items The temperature will decrease and the washing t...

Page 15: ...etergent rec ommended by detergent s manufacturer SPIN REDUCTION NO SPIN RINSE HOLD EXTRA RINSE OFF For cancelling the programme which is running or to switch the machine off 1 If you select the Quick or Super Quick option by pressing button 9 we recommend that you reduce the maximum load as indicated Full loading is possible however with somewhat reduced cleaning results If you select the Refresh...

Page 16: ...er and additive dispens er drawer should be cleaned regularly Remove the drawer by pressing the catch downwards and by pulling it out Flush it out under a tap to remove any traces of accumulated powder To aid cleaning the top part of the additive compartment should be removed Clean all parts with water Clean the chamber of dispenser drawer with a brush Washing drum Rust deposits in the drum may oc...

Page 17: ...ppliance off and remove the mains plug from the socket Proceed as follows 1 Unplug the appliance 2 If it is necessary wait until the water has cooled down 3 Open the pump door 4 Place a container close to the pump to collect any spillage 5 Pull out the emergency emptying hose place it in the container and remove its cap 6 When no more water comes out un screw the pump cover by turning it anti cloc...

Page 18: ... in use and depend ing on the programme selected there can be hot water in the pump Never remove the pump cover during a wash cycle always wait until the appliance has finished the cycle and is empty When refitting the pump cover ensure it is secure ly re tightened so as to stop leaks and young children being able to remove it Cleaning the water inlet filters If you notice that the machine is taki...

Page 19: ...ld drop below 0 C pro ceed as follows 1 Pull out the plug from the power socket 2 Turn off the water tap 3 Unscrew the inlet hose 4 Place the end of the inlet hose in a bowl placed on the floor open the emergen cy emptying cup of the filter and let wa ter drain out 5 Refit the emergency emptying cap into the filter and screw the water inlet hose back 6 When you intend to start the machine up again...

Page 20: ...mediately The end of the drain hose is too low Refer to relevant paragraph in water drainage section The machine does not emp ty and or does not spin The drain hose is squashed or kinked Check the drain hose connection The drain filter is clogged Clean the drain filter An option or a programme that ends with the water still in the tub or a that eliminates all the spinning phases has been selected ...

Page 21: ...aybe there is very little laundry in the drum Load more laundry Spinning starts late or the machine does not spin The electronic unbalance detection device has cut in because the laundry is not evenly distributed in the drum The laundry is redis tributed by reverse rotation of the drum This may happen several times before the unbalance disappears and normal spinning can re sume If after 10 minutes...

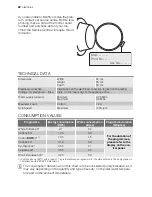
Page 22: ...Load Cotton 7 kg Spin Speed Maximum 1400 rpm CONSUMPTION VALUES Programme Energy consumption KWh Water consumption litres Programme duration Minutes White Cottons 90 2 1 62 For the duration of the programmes please refer to the display on the con trol panel Cottons 60 1 35 58 Cotton ECO 60 1 1 05 45 Cottons 40 0 75 58 Synthetics 40 0 55 51 Delicates 40 0 55 63 Wool Handwash 30 0 25 58 1 Cottons Ec...

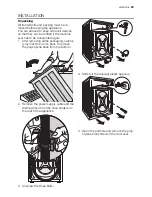
Page 23: ... transported again 1 After removing all the packaging careful ly lay machine on it s back to remove the polystyrene base from the bottom 2 Remove the power supply cable and the draining hose from the hose holders on the rear of the appliance 3 Unscrew the three bolts 4 Slide out the relevant plastic spacers 5 Open the porthole and remove the poly styrene block fitted on the door seal electrolux 23...

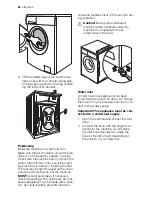
Page 24: ...ting with a spirit level Any nec essary adjustment can be made with a span ner Accurate levelling prevents vibration noise and displacement of the machine dur ing operation Caution Never place cardboard wood or similar materials under the machine to compensate for any unevenness in the floor Water inlet An inlet hose is supplied and can been found inside the machine drum Do not use the hose from y...

Page 25: ...ow A Should this occur turn the water tap off and refer to your Service Centre to replace the hose 4 5 3 5 A Water drainage The end of the drain hose can be posi tioned in three ways Hooked over the edge of a sink using the plastic hose guide supplied with the machine In this case make sure the end cannot come unhooked when the ma chine is emptying This could be done by tying it to the tap with a ...

Page 26: ...e taken to the appropriate collection point for the recycling of electrical and electronic equipment By ensuring this product is disposed of correctly you will help prevent potential negative consequences for the environment and human health which could otherwise be caused by inappropriate waste handling of this product For more detailed information about recycling of this product please contact y...

Page 27: ...dry can then be washed at a lower tem perature Measure out detergent according to the water hardness the degree of soiling and the quantity of laundry being washed electrolux 27 ...

Page 28: ...132948313 00 352010 www electrolux com shop ...

Reviews: