background image

        47        

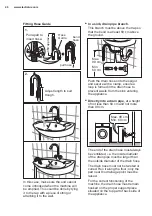
Fitting Hose Guide

bend 

hose

2. 

Adjust length to suit 

trough.

Pull apart to 

insert hose.

pull hose

1.


450 approx

.

Hose 

Guide

Push the drain hose onto the spigot 

and secure with a clamp, ensure a 

loop is formed in the drain hose to 

prevent waste from the sink entering 

the appliance. 

In a sink, drain pipe branch. 

Directly into a drain pipe,

 at a height 

of not less than 60 cm and not more 

than 90 cm.

The end of the drain hose must always 

be ventilated, i.e. the inside diameter 

of the drain pipe must be larger than 

the outside diameter of the drain hose.
The drain hose must not be twisted or 

curled. Run it along the floor; only the 

part near the drainage point must be 

raised.

In this case, make sure the end cannot 

come unhooked when the machine will 

be emptied. This could be done by tying 

it to the tap with a piece of string or 

attaching it to the wall.

For the correct functioning of the 

machine, the drain hose must remain 

hooked on the proper support piece 

situated on the top part of back side of 

the appliance.

This branch must be above the trap so 

that the bend is at least 60 cm above 

the ground.

Max. 

90 cm
Min. 

60 cm

Max. 90 cm

Min. 60 cm

The materials marked with the 

symbol        are recyclable.

>PE<=polyethylene

>PS<=polystyrene

>PP<=polypropylene
This means that they can be recycled by 

disposing them properly in appropriate 

collection containers.

To save water, energy and to help 

protect the environment, we recommend 

that you follow these tips:

Use authorized disposal sites for your old 

appliance. Help to keep your country tidy!
The symbol       on the product or on its 

packaging indicates that this product may 

not be treated as household waste. 
Instead it shall be handed over to the 

applicable collection point for the recycling 

of electrical and electronic equipment. By 

ensuring this product is disposed of 

correctly, you will help prevent potential 

negative consequences for the environ-

ment and human health, which could 

otherwise be caused by inappropriate 

waste handling of this product. 

For more detailed information about 

recycling of this product, please contact 

your local city office, your household 

waste disposal service or the shop where 

you purchased the product.

Normally soiled laundry may be 

washed without prewashing in order to 

save detergent, water and time (the 

environment is protected too!).
The machine works more economically 

if it is fully loaded.
With adequate pre-treatment, stains 

and limited soiling can be removed; the 

laundry can then be washed at a lower 

temperature.
Measure out detergent according to 

the water hardness, the degree of 

soiling and the quantity of laundry 

being washed.

This machine is designed to operate on a 

220-240 V, single-phase, 50 Hz supply.

“An incorrect power supply may void 

your warranty.”

Check that your domestic electrical 

installation can take the maximum load 

required (2.1 kW), also taking into 

account any other appliances in use.

The manufacturer declines any 

responsibility for damage or 

injury through failure to comply 

with the above safety precaution. 

Should the appliance power 

supply cable need to be 

replaced, this shall be carried 

out by our Service Centre.

Connect the machine to an 

earthed socket outlet. 

CAUTION!

When the appliance is installed, the 

power supply cable must be easily 

accessible. 

11.5 Electrical Connection

12.1 Packaging Materials

12.2 Old Machine

12.3 Ecological Hints

12. ENVIRONMENT CONCERNS

Summary of Contents for EWF1041ZDWA

Page 1: ...EWF1041ZDWA WASHING MACHINE USER MANUAL WI FI CONNECTIVITY SETUP 2 48 ...

Page 2: ...information can be found on the rating plate Model PNC Serial Number Adherence to the directions for use in this manual is extremely important for health and safety Failure to strictly adhere to the requirements in this manual may result in personal injury property damage and affect your ability to make a claim under the Electrolux manufacturer s warranty provided with your product Products must b...

Page 3: ...s Water In The Drum 27 5 11 AUTO Off Mode 27 6 WASHING HINTS 28 6 1 Sorting The Laundry 28 6 2 Temperatures 28 6 3 Before Loading The Laundry 28 6 4 Maximum Loads 28 6 5 Removing Stains 28 6 6 Detergents Type And Quantity Of Detergent 29 7 INTERNATIONAL WASH CODE SYMBOLS 30 8 CARE AND CLEANING 31 8 1 External Cleaning 31 8 2 Descaling 31 8 3 After Each Wash 31 8 4 Maintenance Wash With Tub Clean P...

Page 4: ...g the appliance are thoroughly familiar with its operation and safety features Save these instructions and make sure that they remain with the appliance if it is moved or sold so that everyone using it through its life will be properly informed on appliance use and safety bed and breakfast type environtments areas for communal use in blocks of flats or in launderettes staff kitchen areas in shops ...

Page 5: ...e machine Only use manufacturer s recommended quantities of fabric softener and detergent Damage to the fabric or appliance can occur if you exceed the recommended amount Wash small items such as socks laces washable belts etc in a washing bag or pillow case as it is possible for such items to slip down between the tub and the inner drum Do not use your washing machine to wash articles with whaleb...

Page 6: ... Always be sure that there is no water leakage from hoses and their connections after the installation Any plumbing work required to install this appliance should be carried out by a qualified plumber Any electrical work required to install this appliance should be carried out by a qualified electrician Only wash fabrics which are designed to be machine washed Follow the instructions on each garme...

Page 7: ...el Adjustment Feet Front Level Adjustment Feet Back Water Inlet Hose Transit Bolts Hose Support Transit Bolts Hose Support Mains Cable Water Drain Hose Worktop Control Panel Transit Bolts 2 1 Parts 2 PRODUCT DESCRIPTION see page 19 see page 11 see page 33 see page 45 see page 45 ...

Page 8: ... Pump Filter when open Level Adjustment Feet Drum Lifter Stainless Steel Washing Drum Door when open for more informations For more informations see page 19 see page 19 2 2 Accessories Plastic Caps To close the holes on the rear side of the cabinet after the removal of the transit bolts Plastic Hose Guide To connect the drain hose on the edge of a sink Spanner To remove the transit bolts To adjust...

Page 9: ...rogram BEFORE loading the laundry in the drum The display shows these indicators when the door is open 2 3 Load Sensor The display will show when max limit is reached for selected program On the display the weight of the laundry updates by 0 5 kg steps The weight is a general indication that changes with the type of the laundry If you exceed the max weight limit of a program the symbol will start ...

Page 10: ...or are shown on display If one or both options are not shown on the display detergent and softener should be added manually Cottons Mixed Bedding Energy Saver Sports Quick 15 Daily 60 Delicates Cottons Mixed Bedding Energy Saver Sports Quick 15 Daily 60 Wool Delicates Auto dose detergent is available for the following wash programs AutoDose Fabric Softener Program available are The appliance is pr...

Page 11: ...gram Phase Indication Icon Ultramix phase Wash phase Rinse phase Spin phase Vapour phase A C D E F G H I J B 1 2 3 4 5 7 8 6 9 Program Selector Knob Display Temperature Selection Touchpad Spin Selection Touchpad Remote Touchpad 16 Child Lock Option AutoDose Softener Touchpad Start Pause and Add Clothes Touchpad Delay End Touchpad 11 Stain Touchpad 12 Prewash Touchpad 13 On Off Button 14 Vapour Tou...

Page 12: ...rum Energy Saver Cold and 40 C1 White and colourfast cotton Set this program to have a good washing results and decrease the energy consumption The time of the washing program is extended Coloured cotton e g shirts blouses towels and undergarments with normal level of soil A gentle program designed for mixed fabrics found in delicate clothes Cottons Mixed Daily 60 Quick 15 Sports Tub Clean For cle...

Page 13: ...sh cycle of this machine has been approved by The Woolmark Company for the washing of wool garments labelled as hand wash provided that the garments are washed according to the instructions issued by the manufac turer of this washing machine Follow the garment care label for drying and other laundry instructions M1361 The Woolmark symbol is a Certification mark in many countries 1 Energy Saver Pro...

Page 14: ...t your laundry to be spun at a speed different from the one proposed by the washing machine No spin option eliminates all the spin phases and increase the number of rinses No Spin By selecting this option the water of the last rinse is not emptied out and the drum turns regularly to prevent the laundry creases The door is still locked to indicate that the water must be emptied out Rinse Hold AutoD...

Page 15: ...eps below set the washing machine to PAUSE by pressing Start Pause touchpad press the Start Pause to start the program deselect this option by pressing Delay End touchpad repeatedly till the display shows delay time Remote Touchpad This option allows you to connect washing machine to Wi Fi network and to link it to your smart phone By this functionality you can receive notifications control and mo...

Page 16: ...drum during a vapour wash cycle Vapour is created below the drum and allowed to naturally rise into the clothes Vapour may not be present during the entire vapour wash cycle Vapour function is more effective with half load 1 If AutoDose Detergent is Off put the detergent for Main wash phase into the compartment Manual for powder or I for liquid and pour detergent for Prewash phase directly into th...

Page 17: ... which permits you to leave the appliance unsupervised with the door closed without having to worry that children might be injured by or cause damage to the appliance To activate the function press and hold Extra Rinse touchpad about 2 seconds until the display shows the icon To deactivate the function press and hold Extra Rinse touchpad about 2 seconds until the display shows the icon To set Chil...

Page 18: ...e to a complete stop before opening the door wait for door lock icon to turn off During installation or before first use you may observe some water in the machine This is a residual water left in the machine after a full functional test in the factory to ensure the machine is delivered to customers in perfect working order and is no cause for concern 1 Make sure that all transit bolts have been re...

Page 19: ...Loading The Laundry 5 2 Detergent Dispenser With Autodose Tanks And Manual Compartments Do not put POWDER detergent in the AutoDose compartment NOTE Read this chapter carefully WARNING AutoDose Manual Manual I Auto dosing tanks are for liquid detergent and fabric softener only Manual compartment for powder detergent I Manual compartment for liquid detergent Refer to page 28 WASHING HINTS When usin...

Page 20: ...this setting Check on the detergent product instruction to identify the right dosage considering a normal laundry soil level the actual water hardness and the additional dosage suggested for larger load 1 Standard Mode Allows you to store liquid detergent and softener in the AutoDose compartments and to toggle on off auto dosing of detergent and or softener 2 Dual Detergent Mode Allows you to stor...

Page 21: ...ted level 4 Gently pour only liquid softener in the AutoDose fabric softener tank Fill up to the maximum indicated level 5 Close the AutoDose cover lid 6 Gently close the detergent dispenser by pushing all the way in In Standard Mode you can toggle on off auto dosing of detergent and softener By default both AutoDose detergent and softener are enabled the first time appliance is powered on Press A...

Page 22: ...toggle on and off the relevant symbols will show on display if enabled If you have enabled the fine tuning feature in the App to allow it to be available on the control panel pressing on the AutoDose Detergent touchpad will toggle through the following options If you have enabled the fine tuning feature in the App to allow it to be available on the control panel pressing on the AutoDose Softener t...

Page 23: ...asic Setting To Select Detergent Amounts Advance Setting Detergent 2 Secondary compartment normal dosage Detergent 2 Secondary compartment a little more detergent Detergent 2 Secondary compartment a little less detergent Normal dosage default A little more detergent A little less detergent 3 Link Mode by using Electrolux Life App Same Detergent Enter the AutoDose configuration mode before proceedi...

Page 24: ...and hold touchpad to increase the increment to 10ml step 6 To save and exit configuration mode press and hold Temp and Spin touchpads combination again for 3 seconds or you can turn the knob to any position Do not refill the AutoDose tanks unless appliance indicates that one or both tanks are empty AutoDose low level indication Manual filling the detergent and additives You may need to use a diffe...

Page 25: ... or dry out It is recommended to clean the drawer as indicated in Care and Cleaning chapter see page 31 1 If you want your laundry to be spun or use temperature different from the one proposed by the washing machine press Spin and Temp touchpads repeatedly to change the spin speed and temperature Press the option touchpads if you want your laundry to be washed with special functions 2 If you want ...

Page 26: ...at you wish 2 Press Start Pause again The program will continue 3 While a program or the Delay End is operating the appliance door is locked and the display shows the indicator First set the machine to PAUSE by pressing the Start Pause touchpad Wait until the door lock indicator goes off then the door can be opened If the door lock indicator does not disappear this means that the machine is alread...

Page 27: ...ctivate the appliance Display will show the end of the last wash Press any touchpad again to show the last wash program NOTE The door lock indicator is on The door stays locked 1 To drain the water Press the Start Pause touchpad The appliance drains the water and spins with the maximum spin speed for selected program Alternatively before pressing the Start Pause touchpad you can press the Spin tou...

Page 28: ...e washing Rub particularly soiled areas with a special detergent or detergent paste Treat curtains with special care Remove hooks or tie them up in a bag or a net Make sure that no metal objects are left in the laundry e g coin hair clips safety pins pins Washing a maximum load makes the most efficient use of water and energy For heavily soiled laundry reduce the load size Cotton linen drum full b...

Page 29: ...and harm to the machine Do not use wrong types of detergent such as Top Loading Handwash detergent or Soap Based products in your frontload washing machine This can result in excessive suds longer cycle time low spin speeds poor rinsing and overloading of the motor The choice and quantity of detergent will depend on type of fabric delicates woollens cottons etc degree of soil size of the load wash...

Page 30: ...rature 95 C Hot iron max 200 C Dry cleaning in all solvents Dry cleaning in perchlorethylene petrol pure alcohol R 111 R 113 Dry cleaning in petrol pure alcohol and R 113 DO NOT dry clean Warm iron max 150 C Lukewarm iron max 110 C DO NOT iron Max wash temperature 60 C Max wash temperature 40 C Max wash temperature 30 C DO NOT wash at all Ironing Dry cleaning Drying Flat Tumble dry DO NOT tumble d...

Page 31: ...nd to use Tub Clean program to clean the drum regularly to remove any residue The drum should be empty of laundry Press Start Pause to start the program Select the Tub Clean program To run a maintenance wash WARNING CAUTION 8 1 External Cleaning 8 2 Descaling 8 3 After Each Wash 8 4 Maintenance Wash With Tub Clean Program 8 5 Cleaning The Detergent Dispenser And The Autodose Tanks 8 CARE AND CLEAN...

Page 32: ... position by aligning its holes on drawer hooks as indicated in the picture Close it till click sound is heard 4 Press the catch on the back as indicated in the picture and lift up the top cover to remove it 5 Wash the drawer and all inserts under running water Do not use sharp or metal brushes and sponges Do not clean with any sharp and metal brushes or any tools to avoid damaging pumps and senso...

Page 33: ...over and press till click sound is heard c Place the top cover on the tanks compartment and press till click sound is heard d Replace components on manual compartment To restore the functionality refill tanks with detergent and softener If you place a wrong additives in the tanks you can easily recover it by using the drain plug on both side of the drawer Before opening drain plugs ensure to place...

Page 34: ...n pump 1 Open the drain pump door 2 Place a suitable water container below the recess of the drain pump to collect the water that flows out Press the two levers and pull forward the drainage duct to let the water flow out 3 When the container is full of water put the drainage duct back again and empty the container Do step 2 3 again and again until no more water flows out from the drain pump 4 Pus...

Page 35: ...ing with exposed section facing up Make sure that you correctly tighten the filter to prevent leakages 9 Close the drain pump door Remove the water inlet hose from the water tap If your water is very hard or contains traces of lime deposit the water inlet filter may become clogged It is therefore a good idea to clean it from time to time To clean the water inlet filters 1 Close the water tap 2 Gui...

Page 36: ...er tap Remove the inlet hose behind the appliance Install the inlet hose again Make sure that the couplings are tight to prevent leakages Install the valve filter back to the housing Use a suitable tool pulling filter from the valve eg long nose pliers as picture Clean the filter under the water tap ...

Page 37: ...plug from the main socket Turn off the water tap 2 Remove the water inlet hose 3 Remove the drain hose from the rear support and unhook it from sink or spigot NOTE Make sure that the temperature is more than 0 C before you use the appliance again 4 Put the end of the drain and inlet hose in a container Let the water flow out of the hoses 5 When no more water flows install the inlet hose and the dr...

Page 38: ...firmly The water tap is closed Error code Open the water tap Machine does not start Machine does not fill the water Machine fills then empties immediately Malfunction Possible cause Solution Certain problems are due to lack of simple maintenance or oversights which can be solved easily without calling out an engineer Before contacting your local Service Centre please check troubleshooting Once the...

Page 39: ...treat the stubborn stains The correct temperature was not selected Check if you have selected the correct temperature Excessive laundry load Reduce load The drain hose is damaged Call Service Water leaks inside the machine Error code Disconnect the main plug from the main socket Turn off the water tab Contact your local Service Center There is water on the floor Unsatisfac tory washing results The...

Page 40: ...not evenly distributed in the drum the machine will not spin In this case redistribute the load manually and select the spin program Pause the machine and redistribute laundry manually Machine not installed properly Make sure the levelling of the appliance is correct Refer to Installation Transit bolts or packaging not removed Make sure that the packaging and or the transit bolts are removed Refer...

Page 41: ...m contact our service centre Before calling service centre make a note of the model serial number and purchase date of your machine the Service Centre will require this information If you are unable to identify or solve the problem contact our service centre Before calling service centre make a note of the model serial number and purchase date of your machine the Service Centre will require this i...

Page 42: ...g 1 5 kg 5 5 kg 2 kg 4 kg Program Max Capacity 85 X 60 X 65 9 cm Power supply Voltage Frequency Total power absorbed Water supply pressure Maximum Minimum 0 8 MPa 0 05 MPa 220 240 V 50 Hz 2100 W You are advised to keep all transit devices so that they can be refitted if the machine ever has to be transported again All transit bolts and packing must be removed before using the appliance CAUTION Use...

Page 43: ... the hoses Pull up the appliance in vertical position 9 Remove the power supply cable and the drain and inlet hoses from the hose holders A on the rear of the appliance Remove the cardboard top 2 Remove the polystyrene packaging materials 3 Remove the plastic bag which cover the machine 4 Open the door Remove all the items from the drum 5 7 Remove the polystyrene base ...

Page 44: ...It is important that your washing machine stands firm and leveled on the floor to ensure correct operation The appliance must not be installed behind a lockable door a sliding door or a door with a hinge on the opposite side to avoid restricting the washing machine door 10 11 Pull out the plastic spacers 12 Put the plastic caps in the holes X3 You can find these caps in the user manual bag Remove ...

Page 45: ...touch the wall or cupboard units Connect the water inlet hose to a tap with 3 4 BSP thread Use the hose supplied with the washing machine DO NOT USE OLD HOSES The inlet hose must not be lengthened If it is too short and you do not wish to move the tap you will have to purchase a new longer hose specially designed for this type of use Loosen the ring nut to angle the hose to the left or right depen...

Page 46: ...side diameter of the drain pipe must be larger than the outside diameter of the drain hose The drain hose must not be twisted or curled Run it along the floor only the part near the drainage point must be raised In this case make sure the end cannot come unhooked when the machine will be emptied This could be done by tying it to the tap with a piece of string or attaching it to the wall For the co...

Page 47: ...urchased the product Normally soiled laundry may be washed without prewashing in order to save detergent water and time the environment is protected too The machine works more economically if it is fully loaded With adequate pre treatment stains and limited soiling can be removed the laundry can then be washed at a lower temperature Measure out detergent according to the water hardness the degree ...

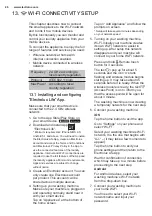
Page 48: ...hine Wi Fi Initially your machine creates its own Wi Fi network to assist in setting up After setup this network disappears and your machine will connect to your home Wi Fi network 6 Connect your washing machine 7 Connect your washing machine to your home Wi Fi Tap on Add Appliance and follow the prompts on screen Setup will take several minutes depending on your network speed Press and hold Remot...

Page 49: ...appears on the display 2 Press the Start Pause button to activate the Remote Start 8 Product registration Simply add your washing machine s name and the purchase date Connection success Please proceed to the next screen to register the washing machine Congratulations Now you re all set up You can start exploring the Electrolux Life App To switch the wireless connection off Press and hold Remote to...

Page 50: ...50 www electrolux com NOTE ...

Page 51: ...51 WARRANTY ...

Page 52: ...G0026058 001 A17711805 ...

Reviews: