background image


10 

USE AND CONTROL  

 
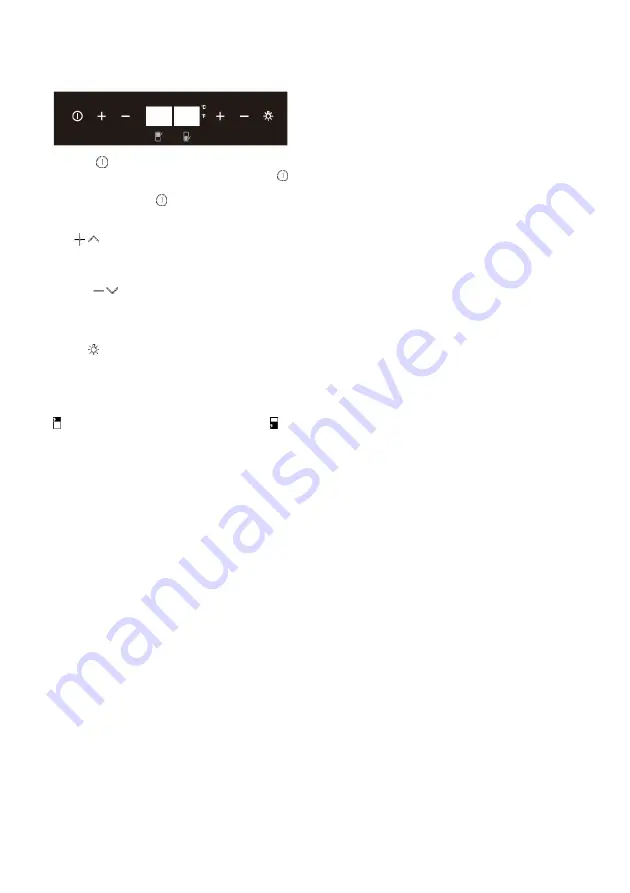
The Controls of Your Unit 


POWER 


To turn the appliance on/off, press and hold the 


key for 5 seconds.  

NOTE:

  Pressing  the 

 key  once  can  switch  off 

the audible alarm when the alarm is on. 


UP  


To increase (warm) the set temperature by 1°C or 
1ºF. 
 

DOWN  


To decrease (cool) the set temperature by 1°C or 
1ºF. 


LIGHT 


Used to turn the inner light on/off. 

 
Display 

Display  the  digital  temperature  and  service 
indicators. 

 is  for  UPPER/LEFT  temperature  zone  and   is 

for LOWER/RIGHT temperature zone.  
 

Indicator Light 

The  indicator  light  is  located  at  the  right  lower 
corner of the display. The indicator light will be on 
when  the  multi-key  function  is  selected.  To 
perform the multi-key function, press and hold the 
first  key,  then  press  the  rest  key  for  at  least  5 
seconds and then release all the keys.  
 

ºF/ºC


Selector


Select  the  temperature  display  setting  in 
Fahrenheit  or  Celsius  degree.  To  change  the 
temperature  from  Fahrenheit  to  Celsius  or  from 
Celsius  to  Fahrenheit,  press  and  hold  the 

LIGHT


key for 5 seconds. 
 

Key Lock (Optional) 

If in 2 minutes or longer without touching any key, 
the  key  lock  will  be  activated  automatically.  To 
remove the lock, press the 

UP

 and 

DOWN

 keys at 

the  same  time  for  at  least  5  seconds  and  the 
indicator  light  will  flash  three  times  to  confirm  the 
action. 
 

Setting the Temperature Control 


The unit has two separate temperature zones. 
The  temperature  of  both  zones  can  be  set 
between 5ºC and 22ºC (41ºF and 72ºF). The 
LOWER/RIGHT temperature zone is ideal for 
storing  white  and  red  wine  at  a  setting  of 
13°C  to  22°C  (55°F  to  72°F).  The 
UPPER/LEFT  temperature  zone  is  suitable 

for  storing  champagne  and  white  wine  at  a 
setting of 5°C to 13°C (41°F to 55°F). 


When the unit is plugged in for the first time, the 
unit  will  power  up  automatically  to  the  preset 
defaults.  The  preset  temperature  at  the  factory 
for  UPPER/LEFT  temperature  zone  is  10ºC 
(50ºF)  and  for  LOWER/RIGHT  temperature 
zone is 16ºC (60ºF). 


You can press the left side

 UP 

and

 DOWN 

keys 

to  control  the  internal  temperature  of  the 
UPPER/LEFT  temperature  zone  and  press  the 
right  side 

UP

  and 

DOWN

  keys  to  control  the 

internal  temperature  of  the  LOWER/RIGHT 
temperature  zone.  When  you  press  the  two 
keys  at  the  first  time,  the  display  will  show  the 
last temperature set previously. 

 
NOTE:


The 

temperature 

set 

for 

the 

LOWER/RIGHT  temperature  zone  must  always 
be  just  as  high  or  higher  than  that  in  the 
UPPER/LEFT  temperature  zone.  For  optimal 
performance,  the  set  temperature  of  the  two 
zones should differ by at least 4°C. 


The  temperature  that  you  desire  to  set  will 
increase  1ºC  or  1ºF  if  you  press  the 

UP

  mark 

once,  on  the  contrary  the  temperature  will 
decrease  1ºC  or  1ºF  if  you  press  the 

DOWN


mark once. The display flashes while you make 
the setting.  


After the temperature has been set, the display 
shows  the  current  inner  temperature  of  the 
particular temperature zone. 


To view the set temperature  at  any  time, press 
the 

UP

  or 

DOWN

  key,  the  set  temperature  will 

temporarily  flash  in  the  display  for  5  seconds. 
Then  the  display  shows  the  current  inner 
temperature again. 


Summary of Contents for EWK0462X

Page 1: ...Wine Cellar Instruction Manual EWK0462X EWK1262X Please read this manual carefully before it is installed and used for the first time It is essential to keep it for future reference ...

Page 2: ...oid a hazard The use of attachments not recommended by the manufacturer may be hazardous Place the unit on a dry level surface Do not operate if the housing is removed or damaged A loose fit between the AC outlet receptacle and plug may cause overheating and a distortion of the plug Contact a qualified electrician to replace loose or worn outlet Locate the unit away from direct sunlight and source...

Page 3: ... the back of this manual It lists causes of minor operating problems that you can correct by yourself DISPOSAL Dispose of your appliance packaging properly Ensure that any plastic wrappings bags etc are disposed of safely and kept out of the reach of babies and young children Danger of suffocation Refrigeration equipment must be properly disposed of in a professional and appropriate way in accorda...

Page 4: ...e 92 31 EEC with respect to Electromagnetic Compatibility NON REWIREABLE MAINS PLUG If your appliance is supplied with a non rewireable plug fitted to the mains lead you will find that it incorporates a fuse the value of which is indicated either on the base of the plug or on the fuse carrier Should the fuse need replacing you must use an ASTA approved one conforming to BS1362 of the same rating I...

Page 5: ...nce on a floor that is strong enough to support it when it is fully loaded To level your unit adjust the front leveling leg at the bottom of the unit For freestanding installation 100mm of space between the back and sides of the unit are suggested which allows the proper air circulation to cool the compressor and condenser for energy saving Even for built in installation it is a must to keep 5mm s...

Page 6: ...0 1772 620 1768 680 ELECTRICAL CONNECTION WARNING Improper use of the grounded plug can result in the risk of electrical shock If the power cord is damaged have it replaced by a qualified electrician or an authorized service center All electrical work should be carried out by a suitably qualified and competent person in accordance with local and national safety regulations Check that the voltage m...

Page 7: ...tion 2 Install the handle 4 tightly as shown above with two screws 3 and flat washers 2 provided 3 Replace the door gasket REVERSING THE DOOR HINGE It is possible to reverse the door on this appliance if required To do so follow the steps below DESIGN 1 1 Remove the adjustable ventilation grille 2 by unscrewing the screws 1 and then remove the ventilation grille 4 by unscrewing the screws 3 Fig 1 ...

Page 8: ...e left top hinge 8 included in the fittings on the left hand side of cabinet Fig 3 5 Unscrew and transfer the lower hinge bracket 5 and door supporter to the opposite side At the same time remove the stopper pin 4 to the opposite designated position of the lower hinge bracket Fig 1 6 Relocate the door shaft assembly to the designated position 7 Relocate the glass door to the designated position Th...

Page 9: ...t the appliance is unplugged and after careful cleaning leave the door ajar to allow air to circulate inside the cabinet in order to avoid possible condensation mold or odours forming OPERATING YOUR APPLIANCE This appliance is designed for operation at certain ambient temperatures The climate class is specified on the rating plate The appliance may not work properly if it is left for a long period...

Page 10: ...C 41ºF and 72ºF The LOWER RIGHT temperature zone is ideal for storing white and red wine at a setting of 13 C to 22 C 55 F to 72 F The UPPER LEFT temperature zone is suitable for storing champagne and white wine at a setting of 5 C to 13 C 41 F to 55 F When the unit is plugged in for the first time the unit will power up automatically to the preset defaults The preset temperature at the factory fo...

Page 11: ...gain INTERIOR LIGHT The interior light makes it easy to view your wine labels and enhances the display of your collection Touching the LIGHT mark toggles between 2 modes of operation for the internal lights functional default mode and showcase mode If you are in functional default mode the lights will turn on only when the door is open If you are in showcase mode the lights will be on whether or n...

Page 12: ...member that the noise of the compressor and the coolant circulating in the system is unavoidable DEFROSTING HYGROMETRY VENTILATION Your unit is designed with an automatic defrost system During the Off cycle the evaporator behind the rear wall of the unit defrosts automatically The condensate collects in the drain trough behind the rear wall of the unit and part of it flows through the drainage hol...

Page 13: ... wines see Wine Serving Temperature Chart above This being said and as it is for natural cellars used by wine producers for long period of storage it is not the exact temperature that is important but its consistency In other words as long as the temperature of your wine cellar is constant between 11ºC to 14ºC your wines will be stored in perfect conditions Not all wines will improve over the year...

Page 14: ... mild liquid detergent Rinse well and wipe dry with a clean soft cloth Do not clean the stainless steel with steel wool pads Suggest to using an all in one stainless steel cleaner to clean the stainless steel and always clean in the direction of grain POWER FAILURE In the event of a power interruption all previous temperature settings are automatically memorized If power is interrupted power surge...

Page 15: ...liance with a blanket or similar item ENERGY SAVING TIPS The appliance should be located in the coolest area of the room away from heat producing appliances and out of the direct sunlight Ensure that the unit is adequately ventilated Never cover air vents Clean dust and dirt from the condenser at regular intervals Only open the door for as long as necessary and for as short a time as possible Stor...

Page 16: ...iance in a cooler place Leave the appliance to work for a while until the set temperature has been reached Do not open the door more often than necessary Close door properly Check the door seal and clean or replace The light does not work Appliance is not connected to a power supply The circuit breaker tripped or a blown fuse The light was switched off on the control panel Connect the appliance Sw...

Page 17: ...Do not open the door more often than necessary Clear the obstructions and clean the dust Leave the appliance to work for a while until the set temperature has been reached The icon is lit up and flashing in the temperature display The display temperature is out of the range Only temperatures within the range 0 99 F 9 37 C the appliance can display will be shown If the temperature is not within thi...

Reviews: