background image

5

DRYING TIME button

6

DELAY START button

7

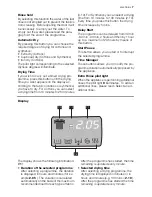
Display

8

START/PAUSE button

9

EXTRA RINSE pilot light

10

TIME MANAGER buttons

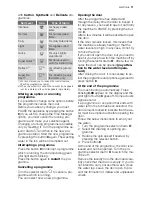
Table of symbols

Programmes Selector dial

= Time manager programmes


= Cotton

 +

=  Prewash


= Synthetics

= Delicates


= Wool / Handwah

= Silk


= Rinse

= Drain


= Spin

= Special programmes


 + 

= Energy Saving programme
(Economy)

= Blanket


= Easy Iron

= Drying programmes


Push buttons and pilot lights

= Temperature


= Cold

= Spin reduction


= Night cycle

= Prewash


= Rinse hold

= Automatic drying


= Extra dry

= Cupboard dry


= Iron dry

= Drying time


= Start/Pause

= Delay start


= Child safety lock

= Extra rinse


+/-

= Time Manager buttons

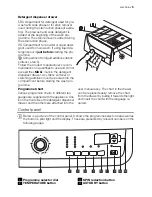
Programme Selector Dial

It allows you to switch the appliance on/off
and/or to select a programme.

Temperature

This button allows you to increase or de-
crease the washing temperature.

Spin speed Reduction

By pressing this button you can reduce the
maximum spin speed allowed for the selec-
ted programme or to select the available op-
tion(s).

Night Cycle

By selecting this function the machine will not
drain the water of the last rinse and all spin-
ning phases will be suppressed, so as not to
wrinkle the laundry. This washing cycle is
very quiet and it can be selected at night or
in times with a more economical power rate.
On some programmes the rinses will be per-
formed with more water. Before opening the
door it will be necessary to empty out the
water. To empty out the water, please read
the paragraph «At the end of the pro-
gramme».

 electrolux

Summary of Contents for EWW 126410 W

Page 1: ...user manual Washer dryer EWW 126410 W ...

Page 2: ... Never connect up a damaged appliance If parts are damaged contact your supplier If the appliance is delivered in the winter months when there are minus tempera tures Store it at room temperature for 24 hours before using for the first time General safety It is dangerous to alter the specifications or attempt to modify this product in any way During high temperature wash pro grammes the door glass...

Page 3: ...uids are used care should be taken to ensure that the fluid is removed from the garment before placing in the machine As some duvets and eiderdowns should be washed dried in large commercial ma chines because of their bulk please check with the manufacturer of the item before washing in a domestic machine The users should always check that they have not left their gas lighters disposable or otherw...

Page 4: ...rtical Product description Your new appliance meets all modern requirements for effective treatment of laundry with low water energy and detergent consumption Its new washing system allows total use of detergent and reduces water consumption so saving energy 1 2 3 4 5 6 1 Detergent dispenser drawer 2 Control panel 3 Door opening handle 4 Rating Plate 5 Drain pump 6 Adjustable feet 4 electrolux ...

Page 5: ...awer Any fabric softener or starching additives must be poured into the compartment before starting the wash pro gramme Programme Chart Various programme charts in different lan guages are supplied with the appliance One is on the front side of the detergent dispenser drawer and the others are attached into the user manual assy The chart in the drawer can be replaced easily remove the chart from t...

Page 6: ...lows you to switch the appliance on off and or to select a programme Temperature This button allows you to increase or de crease the washing temperature Spin speed Reduction By pressing this button you can reduce the maximum spin speed allowed for the selec ted programme or to select the available op tion s Night Cycle By selecting this function the machine will not drain the water of the last rin...

Page 7: ...ases by 5 mins Delay Start The programme can be delayed from 30 min 60 min 90 min 2 hours and then by 1 hour up to a maximum of 20 hours by means of this button Start Pause This button allows you to start or to interrupt the selected programme Time Manager These buttons allows you to modify the pro gramme duration automatically proposed by the appliance Extra Rinse pilot light When the appliance i...

Page 8: ...aragraph First use Ensure that the electrical and water connections comply with the installa tion instructions Remove the polystyrene block and any material from the drum Pour 2 liters of water into the main wash compartment of the deter gent drawer in order to activate the ECO valve Then run a cotton cycle at the highest temperature without any laundry in the machine to remove any manufacturing r...

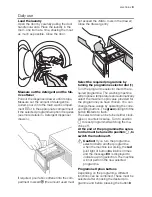
Page 9: ...programme The washing machine will propose a temperature and automatically select the maximum spin value provided for the programme you have chosen You can change these values by operating the corre sponding buttons The green pilot light of the button 8 starts to flash The selector dial can be turned either clock wise or counterclockwise Turn to position to reset programme Switching the ma chine o...

Page 10: ...ly to select the desired delay The relevant pilot light goes on The selected delay time value up to 20 hours will appear on the display a few sec onds then the duration of the programme will appear again You must select this option after you have set the programme and before you press button 8 You can cancel or modify the delay time at any moment before you press button 8 Selecting the delayed sta...

Page 11: ...he door After the programme has started and through the delay time the door is locked If for any reason you need to open it set firstly the machine to PAUSE by pressing the but ton 8 After a few minutes it will be possible to open the door If the door remains locked this means that the machine is already heating or that the water level is too high In any case do not try to force the door If you ca...

Page 12: ...that at the end of the cycle the laundry remains slightly wet we sug gest that you unfold the rolled up items redistribute them evenly in the drum and select an additional drying cycle of 20 30 minutes 6 At the end of the programme the buzzer sounds and three blinking 0 00 appear on the display The door is locked The last 10 minutes of the drying cycle correspond to an anti crease phase Dur ing th...

Page 13: ...the first time Make sure that no metal objects are left in the laundry e g hair clips safety pins pins Button up pillowcases close zip fasteners hooks and poppers Tie any belts or long tapes Remove persistent stains before washing Rub particularly soiled areas with a special detergent or detergent paste Treat curtains with special care Remove hooks or tie them up in a bag or net Maximum loads Reco...

Page 14: ...e used in this appliance powder detergents for all types of fabric powder detergents for delicate fabrics 60 C max and woollens liquid detergents preferably for low tem perature wash programmes 60 C max for all types of fabric or special for wool lens only The detergent and any additives must be placed in the appropriate compartments of the dispenser drawer before starting the wash programme If us...

Page 15: ...of the concentrated detergent Follow the product manufacturer s recom mendations on quantities to use and do not exceed the MAX mark in the detergent dispenser drawer Garment labels For drying follow the indications given on the manufacturer s labels May be tumble dried Drying at high temperature Drying at reduced temperature Do not tumble dry Drying cycle duration The drying time may vary dependi...

Page 16: ...lics viscose polyester NIGHT CYCLE RINSE HOLD EXTRA RINSE TIME MANAGER1 Handwash 40 Cold Main wash Rinses Maximum spin speed at 900 rpm Max load 2 kg Washing programme for machine washable wool as well as for hand washable woollens and delicate fabrics SPIN REDUCTION NIGHT CYCLE RINSE HOLD Silk 30 Cold Main wash Rinses Maximum spin speed at 700 rpm Max load 1 kg Delicate washing programme suitable...

Page 17: ...ad 2 kg For a single washable synthetic blanket or duvet Easy Iron 60 Cold Main wash Rinses Maximum spin speed at 900 rpm Max load 1 kg Selecting this programme the laundry is gently washed and spun to avoid any creasing In this way ironing is easier Furthermore the machine will perform additional rinses SPIN REDUCTION RINSE HOLD EXTRA RINSE Drying Synthetic Drying synthetic programme It can be us...

Page 18: ...5 45 IRON DRY Suitable for ironing Cotton and linen sheets tablecloths shirts etc 4 kg 3 kg 1 5 kg 1200 120 140 70 80 40 50 In compliance with EC directive EN 50229 the cotton reference programme for the data entered in the Energy Label must be tested dividing the maximum washing load by two equal parts and drying with DRYING TIME each of them Care and cleaning Warning You must disconnect the appl...

Page 19: ...wards and by pulling it out Flush it out under a tap to remove any traces of accumulated powder To aid cleaning the top part of the additive compartment should be removed Clean all parts with water Clean the chamber of dispenser drawer with a brush Washing drum Rust deposits in the drum may occur due to rusting foreign bodies in the washing or tap water containing iron Important Do not clean the d...

Page 20: ... appliance off and remove the mains plug from the socket Proceed as follows 1 Unplug the appliance 2 If necessary wait until the water has cooled down 3 Open the pump door levering on the groove with a coin or with the suitable tool that you can find in the bag con taining the instruction booklet depend ing on the model 1 2 4 Place a bowl with a small edge close to the pump to collect any spillage...

Page 21: ...whether the pump im peller rotates it rotates jerkily If it doesn t rotate please contact your Service Centre 9 Replace the filter into the pump by in serting it correctly into the special guides Screw the pump cover firmly by turning it clockwise 10 Replace the emergency emptying cap into the filter cover and fix it firmly 11 Close the pump door electrolux 21 ...

Page 22: ...the hose back to the machine and make sure the connection is tight 8 Turn on the water tap Emergency emptying out If the water is not discharged proceed as follows to empty out the machine 1 pull out the plug from the power socket 2 close the water tap 3 if necessary wait until the water has cooled down 4 open the pump door 5 place a bowl on the floor Remove the emergency emptying cap from the fil...

Page 23: ...roblem has been eliminated press the button 8 to restart the programme If after all checks the problem persists con tact your local Service Centre Problem Possible cause Solution The washing machine does not start The door has not been closed E40 Close the door firmly The plug is not properly inserted in the power socket Insert the plug into the power socket There is no power at the socket Please ...

Page 24: ...ted prior to washing Use commercial products to treat the stubborn stains The correct temperature was not selected Check if you have selected the correct temperature Excessive laundry load Reduce the laundry load The door will not open The programme is still running Wait the end of washing cycle The door lock has not been released Wait for some minutes until the door lock is released There is wate...

Page 25: ...lean the drain filter The machine is overloaded Reduce the laundry load in the drum The selected drying programme time or dryness degree was not suitable for the laundry Select the suitable drying programme time or dryness degree for the laundry If you are unable to identify or solve the prob lem contact our service centre Before tele phoning make a note of the model serial number and purchase dat...

Page 26: ...EC 92 75 standards The consumption data shown on this chart is to be considered purely indicative as it may vary depending on the quantity and type of laundry on the inlet water temperature and on the ambient temperature Installation Unpacking All transit bolts and packing must be re moved before using the appliance You are advised to keep all transit devices so that they can be refitted if the ma...

Page 27: ...l the machine on a flat hard floor Make sure that air circulation around the machine is not impeded by carpets rugs etc Check that the machine does not touch the wall or other kitchen units Level the washing ma chine by raising or lowering the feet The feet may be tight to adjust as they incorporate a self locking nut but the machine MUST be level and stable If necessary check the set ting with a ...

Page 28: ...osition of your water tap 3 Set the hose correctly by loosening the ring nut After positioning the inlet hose be sure to tighten the ring nut again to prevent leaks The inlet hose must not be lengthened If it is too short and you do not wish to move the tap you will have to purchase a new longer hose specially designed for this type of use Important Before connecting up the machine to new pipework...

Page 29: ...nection Any electrical work required to in stall this appliance must be carried out by qualified electrician or com petent person Information on the electrical connection is given on the rating plate on the inner edge of the appliance door Check that your domestic electrical installa tion can take the maximum load required al so taking into account any other appliances in use Connect the machine t...

Page 30: ...p where you purchased the product Packaging materials The materials marked with the symbol are recyclable PE polyethylene PS polystyrene PP polypropylene This means that they can be recycled by dis posing of them properly in appropriate col lection containers Ecological hints To save water energy and to help protect the environment we recommend that you follow these tips Normally soiled laundry ma...

Page 31: ...electrolux 31 ...

Page 32: ...132949720 00 102010 www electrolux com ...

Reviews: