background image

safety information 

electrolux  

5

Safety Information

In the interest of your safety and to
ensure the correct use, before
installing and first using the
appliance, read this user manual
carefully, including its hints and
warnings. To avoid unnecessary
mistakes and accidents, it is
important to ensure that all people
using the appliance are thoroughly
familiar with its operation and safety
features. Save these instructions
and make sure that they remain
with the appliance if it is moved or
sold, so that everyone using it
through its life will be properly
informed on appliance use and
safety.

General safety

It is dangerous to alter the
specifications or attempt to modify
this product in any way.

During high temperature washing
and drying programmes the door
glass may get hot. Do not touch it!

Make sure that small pets do not
climb into the drum. To avoid this,
please check into the drum before
using.

Any objects such as coins, safety
pins, nails, screws, stones or any
other hard, sharp material can cause
extensive damage and must not be
placed into the machine.

Only use the advised quantities of
fabric softener and detergent.
Damage to the fabric can ensue if
you over-fill. Refer to the
manufacturer’s recommendations of
quantities.

Wash small items such as socks,
laces, washable belts etc in a
washing bag or pillow case as it is
possible for such items to slip down
between the tub and the inner drum.

Do not use your washer-dryer to
wash and dry articles with
whalebones, material without hems
or torn material.

Always unplug the appliance and
turn off the water supply after use,
clean and maintenance.

Under no circumstances should you
attempt to repair the machine
yourself. Repairs carried out by
inexperienced persons may cause
injury or serious malfunctioning.
Contact your local Service Centre.
Always insist on genuine spare parts.

Installation

This appliance is heavy. Care should
be taken when moving it.

When unpacking the appliance,
check that it is not damaged. If in
doubt, do not use it and contact the
Service Centre.

All packing and transit bolts must be
removed before use. Serious
damage can occur to the product
and to property if this is not adhered
to. See relevant section in the user
manual.

After having installed the appliance,
check that it is not standing on the
inlet and drain hose and the worktop
is not pressing the electrical supply
cable.

If the machine is situated on a
carpeted floor, please adjust the feet
in order to allow air to circulate freely

Always be sure, that there is no
water leakage from hoses and their
connections after the installation.

132966410_GB.qxd  10/01/2008  9.34  Pagina  5

Downloaded From WashingMachine-Manual.com Manuals

Summary of Contents for EWX 12540 W

Page 1: ...User Manual EWX 12540 W Washer dryer Downloaded From WashingMachine Manual com Manuals ...

Page 2: ...Downloaded From WashingMachine Manual com Manuals ...

Page 3: ...ition is to offer a wide variety of quality products that make your life more comfortable You find some examples on the cover in this manual Please take a few minutes to study this manual so that you can take advantage of the benefits of your new machine We promise that it will provide a superior User Experience delivering Ease of Mind Good luck Downloaded From WashingMachine Manual com Manuals ...

Page 4: ...ntal information Contents Safety information 5 Product description 8 Control panel 9 Use 10 Washing 10 Drying 17 Washing and drying hints 19 International wash code symbol 22 Washing programmes 23 Drying programmes 25 Programme information 26 Care and cleaning 27 Something not working 30 Techical data 34 Consumption values 35 Installation 36 Environment concerns 42 Downloaded From WashingMachine M...

Page 5: ...ations of quantities Wash small items such as socks laces washable belts etc in a washing bag or pillow case as it is possible for such items to slip down between the tub and the inner drum Do not use your washer dryer to wash and dry articles with whalebones material without hems or torn material Always unplug the appliance and turn off the water supply after use clean and maintenance Under no ci...

Page 6: ...urer of the item before washing in a domestic machine The users should always check that they have not left their gas lighters disposable or otherwise in their clothing Never tumble dry items that have had contact with chemicals such as dry cleaning fluid These are of a volatile nature and could cause an explosion Only tumble dry items which have been washed in water or require air ing Plastic det...

Page 7: ...n be dangerous to children danger of suffocation Keep them out of children s reach Keep all detergents in a safe place out of children s reach Make sure that children or pets do not climb into the drum To avoid this the machine incorporates special feature To activate this device rotate the button without pressing it inside the door clockwise until the groove is horizontal If necessary use a coin ...

Page 8: ...ning handle Drain filter Adjustable feet 5 4 3 2 1 Prewash Wash Fabric Softener 1 2 3 4 5 EN001 Detergent dispenser drawer Your new appliance meets all modern requirements for effective treatment of laundry with low water energy and detergent consumption Downloaded From WashingMachine Manual com Manuals ...

Page 9: ... 9 10 Henceforth the programme selector dial the different buttons and the pilot light s will be indicated in all the book with the relevant numbers given in the table above Key symbols Cottons Synthetics Delicates Easy iron Spin Drain Rinses Silk Handwash Wool Cottons Eco Special programmes Drying Sector Cold Night Cycle Rinse hold Prewash Extra rinse Drying Time Delay Time manager Door locked Ch...

Page 10: ...ttons and simultaneously for about 6 seconds the acoustic signal is deactivated except for the events of operating problems By pressing these 2 buttons again the the acoustic signal is reactivated 5 4 Child safety lock This device permits you to leave the appliance not supervised without having the worry that children might be injured by or cause damage to the appliance This function remains able ...

Page 11: ...he display for a few seconds then the duration of the previously selected programme is 7 1 displayed The delay time value decreases by one unit every hour and then when 1 hour remains the time decreases every minute Alarm codes In the event of operating problems some alarm codes can be displayed for example E20 see chapter What to do if Incorrect option selection If an option which is not compatib...

Page 12: ...isplay After you have pressed button and the machine has started only the phase running icon stays on Soil level icons When selecting a programme on the display appears an icon indicating the degree of soilness automatically proposed by the machine for that programme Child lock This device permits you to leave the appliance unattended during it s functioning 7 4 7 3 8 7 2 Downloaded From WashingMa...

Page 13: ...ogramme selector dial Turn the programme selector dial to the required programme The green pilot light of button starts to flash and the display shows the duration of the selected programme The selector dial can be turned either clockwise or anticlockwise Position O to Reset programme Switching OFF of the machine At the end of the programme the selector dial must be turned to position O to switch ...

Page 14: ...zeros 0 00 the pilot light is still alight and the door is locked to indicate that the water must be emptied out 9 8 3 8 Rinse Hold by selecting this option the water of the last rinse is not emptied out to prevent the fabrics from creasing When the programme has finished the button light goes off the display shows 3 flashing zeros 0 00 the pilot light is still alight and the door is locked to ind...

Page 15: ...rt cannot be selected with Drain programme 8 6 8 8 8 6 8 8 8 8 6 Select the Start Pause by pressing button To start the selected programme press this button the green pilot light stops blinking The appliance starts operating and the door is locked The pilot light door locked illuminates to indicate that the appliance starts operating and the door is locked Also it indicates if the door can be open...

Page 16: ...rogramme Cancelling a programme Turn the selector dial to O to cancel a programme which is running Now a new programme can be selected Opening the door after the programme has started First set the machine to pause by pressing button If the light goes off the door can be opened If the light does not go off and the door cannot be opened this means that the machine is already heating that the water ...

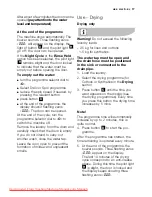
Page 17: ...ut another wash close the water tap Leave the door open to prevent the formation of mildew and unpleasant smells 8 9 9 8 Use Drying Drying only Warning Do not exceed the following laundry loads 2 5 kg for linen and cottons 1 5 kg for synthetics The water tap must be open and the drain hose must be positioned in the sink or connected to the drain pipe 1 Load the laundry 2 Select the drying programm...

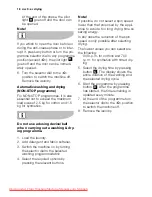
Page 18: ...the end of this phase the pilot light goes off and the door can be opened Note If you whish to open the door before or during the anti crease phase or to inter rupt it press any button or turn the pro gramme selector dial to any programme position except O the pilot light goes off and the door can be immedi ately opened 6 Turn the selector dial to the O position to switch the machine off Remove th...

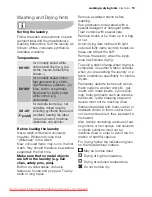
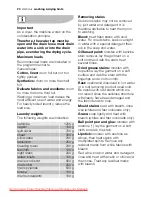
Page 19: ...e washing the laundry or a fabric conditioner specifically for tumble dryers Particularly delicate items such as syn thetic curtains woollen and silk gar ments with metal inserts nylon stock ings bulky garments such as anoraks bedcovers quilts sleeping bags and duvets must not be machine dried Garments padded with foam rubber or materials similar to foam rubber must not be machine dried they repre...

Page 20: ...nd dab the stain treat several times Dried grease stains moisten with turpentine lay the garment on a soft surface and dab the stain with the fingertips and a cotton cloth Rust oxalic acid dissolved in hot water or a rust removing product used cold Be careful with rust stains which are not recent since the cellulose structure will already have been damaged and the fabric tends to hole Mould stains...

Page 21: ...the wash programme If using concentrated powder or liquid detergents a programme without prewash must be selected The washer dryer incorporates a recirculation system which allows an optimal use of the concentrated detergent Pour liquid detergent into the dispenser drawer compartment marked just before starting the programme Any fabric softener or starching additives must be poured into the compar...

Page 22: ...0 C Hand wash Do not wash at all Bleaching Bleach in cold water Do not bleach Ironing Hot iron max 200 C Warm iron max 150 C Lukewarm iron max 110 C Do not iron Dry cleaning Dry cleaning in all solvents Dry cleaning in perchlorethylene petrol pure alcohol R 111 R 113 Dry cleaning in petrol pure alcohol and R 113 Do not dry clean Drying Flat On the line On clothes hanger Tumble dry high temperature...

Page 23: ...ager Extra rinse Main wash 3 rinses Short spin Max load 2 Kg Prewash 90 Heavy soiled cotton items heavily soiled Spin Red Night Cycle Rinse Hold Time Manager Extra rinse Prewash Main wash 3 rinses Long spin at the maximum speed Max load 5 Kg Delicates 40 Delicate fabrics for example curtains Night Cycle Rinse Hold Time Manager Extra rinse Main wash 3 rinses Short spin Max load 2 Kg Easy Iron 60 Sy...

Page 24: ...e for wool garments bearing the Pure new wool non shrink machine washable label Spin Red Night Cycle Rinse Hold Main wash 3 rinses Short spin Max load 1 Kg Silk 30 Silk items to be gentle washed and spun Night Cycle Rinse Hold Main wash 2 rinses Short spin Max load 1 Kg Programme Temperature Type of laundry Options Description of programme Handwash 40 Special programme for hand washing fabrics Spi...

Page 25: ...able for items to put away without ironing Cotton and linen bathrobes bath towels etc Synthetics and mixed fabrics jumpers blous es underwear house hold linen 1200 rpm 2 5 kg 85 95 1200 rpm 1 kg 40 50 900 rpm 1 5 kg 80 90 900 rpm 1 kg 55 65 Drying programmes Max Load Iron dry Suitable for ironing Cotton and linen sheets tablecloths shirts etc 1200 rpm 2 5 kg 65 75 1200 rpm 1 kg 30 40 Downloaded Fr...

Page 26: ...witch off the machine turn the selector dial to O Now can a new programme be selected Silk Delicate washing programme suitable for silk and mixed synthetics items Washing temperature is 30 C The maximum spin speed is automatically reduced Handwash and Wool When you select this programme you obtain a particularly delicate washing for machine washable wool as well as for hand washable woollens and s...

Page 27: ...that a maintenance wash be performed on a regular basis To run a maintenance wash The drum should be empty of laundry Select the hottest cotton wash programme Use a normal measure of detergent must be a powder with biological properties External cleaning Clean the exterior cabinet of the appliance with soap and water only and then dry thoroughly Cleaning the dispenser drawer The washing powder and...

Page 28: ...ould drain by gravity into the bowl When the bowl is full hook the hose back up and empty the bowl Repeat the procedure until water stops flowing out P0037 P0038 Unscrew and remove the filter Clean carefully under a fast running tap Warning When the appliance is in use and depending on the programme selected there can be hot water in the filter Never remove the filter during a wash cycle always wa...

Page 29: ...hose and the end of the inlet hose in a bowl Run the draining programme Drain Disconnect the appliance Screw the inlet hose and reposition the drain hose When you intend to start the machine up again make sure that the room temperature is above 0 C P1090 Emergency emptying out If the water is not discharged proceed as follows to empty out the machine pull out the plug from the power socket close t...

Page 30: ... water supply E20 problem with water draining E40 door open Once the problem has been eliminated press button to restart the programme If after all checks the problem persists contact your local Service Centre 8 8 Malfunction Possible cause Solution The washer dryer does not start The door has not been closed E40 The plug is not properly inserted in the power socket There is no power at the socket...

Page 31: ...ter has not fully screwed in after cleaning Reduce the detergent quantity or use another one Check the water inlet hose connection Replace it with a new one Screw fully in the drain filter The machine does not fill The water tap is closed E10 The inlet hose is squashed or kinked E10 The filter in the inlet hose is blocked E10 The door is not properly closed E40 Open the water tap Check the inlet h...

Page 32: ... not turned on E10 The drain filter is clogged E20 The machine is overloaded The selected drying programme time was not suitable for the laundry Select the drying time Open the water tap Clean the drain filter Introduce into the drum less laundry Select the suitable drying programme or time for the laundry The machine makes an unusual noise The machine is fitted with a type of motor which makes an...

Page 33: ...ction device has cut in because the laundry is not evenly distributed in the drum The laundry is redistributed by reverse rotation of the drum This may happen several times before the unbalance disappears and normal spinning can resume If after 10 minutes the laundry is still not evenly distributed in the drum the machine will not spin In this case redistribute the load manually and select the spi...

Page 34: ...5 MPa 0 8 MPa Maximum Cotton Maximum Load 5 kg Maximum Spin Speed 1200 rpm Electrical connection Voltage Overall power Fuse Information on the electrical connection is given on the rating plate on the inner edge of the appliance door Cotton Synthetics Maximum Dry Load 2 5 kg 1 kg Downloaded From WashingMachine Manual com Manuals ...

Page 35: ... 0 85 47 Wool 40 0 4 50 The consumption data shown on this chart is to be considered purely indicative as it may vary depending on the quantity and type of laundry on the inlet water temperature and on the ambient temperature It refers to the highest temperature for each wash programme The programme Cotton Economy with 5 kg at 60 C is the reference programme for the data entered in the energy labe...

Page 36: ... back making sure that the hoses are not squashed 2 Remove the polystyrene base and take off the bottom panel by unscrewing the central screw 3 Carefully slide out the right polythene bag P0457 P0255 4 Repeat the operation for the left and central polythene bags 5 Re fit the bottom panel using the 4 screws supplied with the door hinges in the plastic bag and the previously removed screw 6 Set the ...

Page 37: ...stment can be made with a spanner Accurate levelling prevents vibration noise and displacement of the machine during operation Never place cardboard wood or similar materials under the machine to compensate for any unevenness in the floor Water inlet Do not use the hose from your previous machine to connect to the water supply 1 Connect the hose to a tap with a 3 4 thread 2 Set the hose correctly ...

Page 38: ...nside diameter of the drain pipe must be larger than the outside diameter of the drain hose The drain hose must not be kinked P0022 The drain hose may be extended to a maximum of 4 metres An additional drain hose and joining piece is available from your local Service Centre Electrical connection Information on the electrical connection is given on the rating plate on the inner edge of the applianc...

Page 39: ... raise it to remove see the pictures below 820 600 600 600 595 820 P1240 Building in This appliance has been designed to be built into the kitchen furniture The recess should have the dimen sions shown in picture A When installing the appliance into the kitchen furniture ensure if possible the hoses are placed in either of the two recesses on the back of the appliance This will help to prevent the...

Page 40: ...stance B from upper edge of the door to the centre of the hole depends on the adjacent furniture s dimensions The required dimensions are given in the picture C The hinges will be fixed to the door by means of screws for wood 2 Fig B supplied with the appliance c Mounting the door Fix the hinges 1 to the machine by means of the M5x15 screws 3 Fig B The hinges can be adjusted to compen sate for pos...

Page 41: ...vert the position of the plates 7 the magnet 4 and the plate 5 Fig B and E Mount the countermagnet 6 and the hinges 1 as previously described 4 6 5 1 2 3 7 E P0983 P0984 6 4 D installation electrolux 41 Downloaded From WashingMachine Manual com Manuals ...

Page 42: ...ey can be recycled by disposing of them properly in appropriate collection containers Old machine Use authorised disposal sites for your old appliance Help to keep your country tidy The symbol on the product or on its packaging indicates that this product may not be treated as household waste Instead it shall be handed over to the applicable collection point for the recycling of electrical and ele...

Page 43: ...Downloaded From WashingMachine Manual com Manuals ...

Page 44: ...ANC Number 132 966 410 00 032008 Downloaded From WashingMachine Manual com Manuals ...

Reviews: