background image

EXP12EN1WI

................................................ .............................................

EN PORTABLE AIR

CONDITIONER

USER MANUAL

Summary of Contents for EXP12EN1WI

Page 1: ...EXP12EN1WI EN PORTABLE AIR CONDITIONER USER MANUAL ...

Page 2: ...n upright position Remove all the packaging Do not install or use a damaged appli ance Do not install or use the appliance where the temperature is less than 0 C Obey the installation instruction supplied with the appliance Do not install the appliance where there is direct sunlight Be careful when adjusting the horizontal louvres There is a risk of catching fingers on the fan Electrical connectio...

Page 3: ... in lets or inside of air outlets Do not operate or stop the appliance by pulling out the power cord Do not operate the appliance near any heat source or open fire Do not cover the appliance when in oper ation or immediately after use Do not drink water drained from the ap pliance If a burning smell or any other abnormali ty occurs deactivate the appliance im mediately CARE AND CLEANING Warning Ri...

Page 4: ... 1 EXHAUST AIR OUTLET 2 EXHAUST ADAPTOR A 3 BOTTOM TRAY DRAIN OUTLET 4 AIR INTAKE 5 DEHUMIDIFYING DRAIN OUTLET 6 EXHAUST HOSE STORAGE WHEN NOT IN USE ACCESSORIES Check all the accessories are included in the package and please refer to the Installation chapter for their usage A B C D E F G H I J PART PART NAME QUANTITY A Exhaust hose 1 pc B Unit Exhaust Adaptor A 1 pc 4 electrolux ...

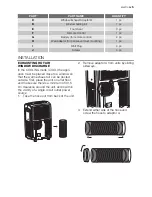
Page 5: ...ISCHARGE In the COOLING mode COOL the appli ance must be placed close to a window so that the warm exhaust air can be ducted outside First place the unit on a flat floor and make sure there s a minimum of 30 5 cm clearance around the unit and is within the vicinity of a single circuit outlet power source 1 Take the hose out from back of the unit 2 Remove adaptor A from units by sliding sideways 3 ...

Page 6: ...e and screw it to adaptor B 5 Slide the assembly onto unit 6 Affix the adaptor B into the window slider kit and seal Window slider kit Minimum 67 5 cm 26 6 inches Maximum 123 cm 48 5 inches Vertical window Horizontal window 6 electrolux ...

Page 7: ...is the best to keep the length to minimum re quired Also make sure that the hose does not have any sharp bends or sags INSTALLATION IN A DOUBLE HUNG SASH WINDOW 1 Cut the foam seals adhesive type A to the proper lengths and attach them to the window and stool A 2 Attach the window slider kit to the win dow stool Adjust the length of the win dow slider kit according to the width of window Cut the a...

Page 8: ... and stool A 2 Attach the window slider kit to the win dow stool Adjust the length of the win dow slider kit according to the height of window Cut the adjustable window slider kit if the height of window is less than 67 5 cm 3 Open the window sash and place the window slider kit B on the window stool C 4 Close the sliding sash securely against the window slider kit 5 Cut the foam seals to an appro...

Page 9: ...TROL BUTTONS 3 MODE SELECTOR MODE 4 SLEEP BUTTON SLEEP 5 RESET LOCK PIN BUTTONS RESET LOCK 6 FAN SPEED SELECTION 7 FAN SPEED SELECTOR FAN SPEED 8 TIMER BUTTONS TIMER ON TIMER OFF 9 SWING BUTTON SWING 10 ON OFF BUTTON BATTERY SIZE AAA Warning Do not mix old and new batteries Do not mix alkaline standard carbon zinc or rechargeable nickel cadmium batteries The Reset button RESET is depressed when yo...

Page 10: ...to mode AUTO you can not select the fan speed FAN MODE FAN In this mode there is no need to use the ex haust hose or drainage hose However if you require stale or smoky air to be re moved from the room hook up the duct accessories as described in the Exhaust ing hot Air section 1 Press the Mode button MODE until the Fan FAN indicator lights 2 Press the Fan FAN SPEED button to choose the desired fa...

Page 11: ...ILTER will illuminate after 250 hours of operation To reset after cleaning the filter press the Filter button FILTER and the light will go off DRAINAGE During the dehumidifying mode you will need a garden hose sold separately to drain the condensate from the unit Re move the rubber stopper from the hose connector then screw on a garden hose to the connector as shown The hose may then 1 Discharge i...

Page 12: ... filter as shown B C Wash the filter using liquid dishwashing detergent and warm water Rinse filter thoroughly Gentle shake excess water from the filter Be sure filter is thoroughly dry before replacing Or instead of washing you may vacuum the filter clean CABINET CLEANING Caution Be sure to unplug the air conditioner to prevent shock or fire hazard The cabinet front may be dusted with an oil free...

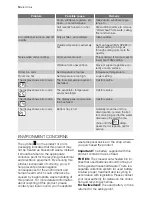
Page 13: ...r shut off by chang ing modes Wait approximately 3 minutes and listen for compressor to re start when set in the Cooling Mode COOL Air conditioner cooling but room is too warm NO ice forming on cooling coil behind decorative front Outdoor temperature below 16 C 60 F To defrost the coil set the Fan Mode FAN Air filter may be dirty Clean filter Refer to Care and Cleaning To defrost the coil set the ...

Page 14: ...o a drain location remove the bot tom drain plug and let the water drain away Restart the ma chine until the disap pears If error repeats call for service ENVIRONMENT CONCERNS The symbol on the product or on its packaging indicates that this product may not be treated as household waste Instead it should be taken to the appropriate collection point for the recycling of electrical and electronic eq...

Page 15: ... meth od of disposal of the used battery Battery including those which is heavy metal free should not be disposed of with household waste Please dispose of used battery in an environmentally sound manner Find out about the legal regulations which apply in your area electrolux 15 ...

Page 16: ...www electrolux com shop 2020252a0429 A 042012 ...

Reviews: