background image

Installation instructions

Installation

WARNING!

Any electrical and/or plumbing work required to install this appliance should be
carried out by a qualified electrician and/or plumber or competent person.

Remove all packaging before positioning the machine.
If possible, position the machine next to a water tap and a drain.

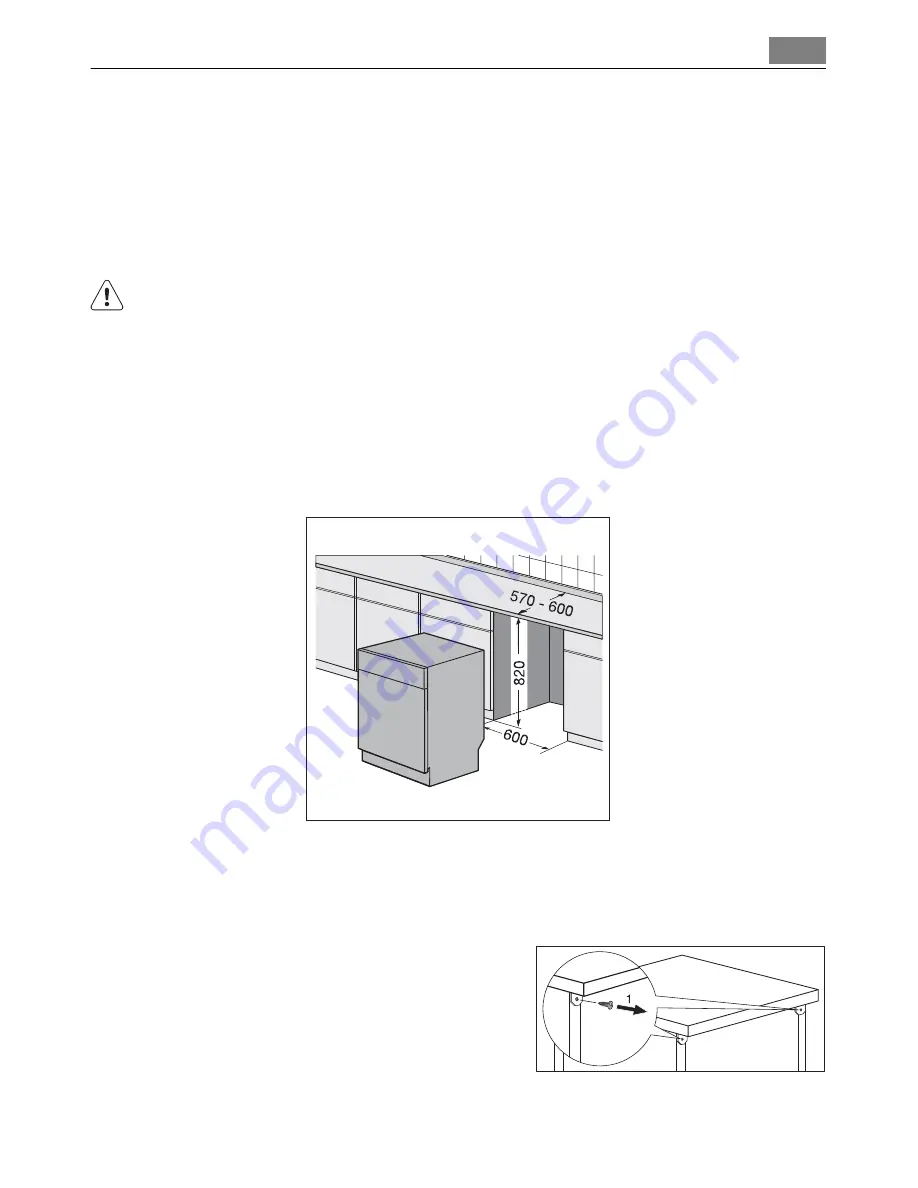
Fitting under a counter (kitchen worktop or sink)

By removing the machine's worktop, you can install it under a close fitting sink
unit or a pre-existing top, providing the dimensions of the recess correspond to
those shown in the picture.

Proceed as follows:

1. Remove the machine's worktop by

unscrewing the two rear retaining
screws, pull the worktop from the
back of the machine and slide out the
front slots, lifting the worktop.

2. Insert the machine after adjusting the

levelling with the adjustable feet.

Installation

35

Summary of Contents for FAVORIT 40860

Page 1: ...FAVORIT 50871 User manual Dishwasher ...

Page 2: ... as an integral part of our products To ensure optimal and regular performance of your appliance please read this instruction manual carefully It will enable you to navigate all processes perfectly and most efficiently To refer to this manual any time you need to we recommend youto keepitina safeplace Andpleasepassittoanyfutureowneroftheappliance We wish you much joy with your new appliance The fo...

Page 3: ...dishwasher salt 14 Filling with rinse aid 15 Adjusting the dosage of rinse aid 16 Daily use 16 Loading cutlery and dishes 16 The lower basket 18 The cutlery basket 18 The upper basket 19 Adjusting the height of the upper basket 20 Use of detergent 21 Fill with detergent 22 Multi tab function 23 Activation deactivation of the Multi Tab function 23 Washing programmes 25 Select and start a washing pr...

Page 4: ... data 33 Hints for test institutes 33 Installation instructions 35 Installation 35 Fitting under a counter kitchen worktop or sink 35 Levelling 36 Water supply connections 36 Water inlet hose with safety valve 37 Water outlet hose connection 38 Electrical connection 39 Environment concerns 39 Packaging material 39 Guarantee Customer Service 41 Guarantee Customer Service 41 European Guarantee 42 ww...

Page 5: ...nts in the dishwasher This could cause an explosion Knives and other items with sharp points must be loaded in the cutlery basket with their points down or placed in a horizontal position in the upper basket Only use products detergent salt and rinse aid suitable for dishwashers Avoid opening the door whilst the appliance is in operation hot steam may escape Do not take any dishes out of the dishw...

Page 6: ...nts in a safe place out of children s reach Keep children well away from the dishwasher when the door is open Installation Check your dishwasher for any transport damage Never connect a damaged machine If your dishwasher is damaged contact your supplier All packaging must be removed before use Any electrical and plumbing work required to install this appliance must be carried out by a qualified an...

Page 7: ...WARNING For electrical and water connection carefully follow the instructions given in spe cific paragraphs Safety information 7 ...

Page 8: ...ct description 1 Upper basket 2 Water hardness dial 3 Salt container 4 Detergent dispenser 5 Rinse aid dispenser 6 Rating plate 7 Filters 8 Lower spray arm 9 Upper spray arm 10 Worktop 8 Product description ...

Page 9: ...the opening and closing of the dishwasher s door occurs Internal light is equipped with led lamp CLASS 1 in accordance with EN 60825 1 1994 A1 2002 A2 2001 In case that this light has to be replaced please contact your local Service Force Centre Product description 9 ...

Page 10: ...n buttons Indicator lights Programme in progress Illuminates when a washing programme is set and remains illuminated for all the duration of the washing programme MULTITAB Indicates the activation deactivation of the Multi tab function see Multi tab function Salt Illuminates when the special salt has run out 1 10 Control panel ...

Page 11: ...a washing programme a zero will appear in the digital display the countdown of the delay start fault codes concerning malfunction of the dishwasher Setting mode The appliance is in setting mode when all programme lights are illuminated Always remember that when performing operations such as selecting a washing programme setting the water softener activating deactivating the rinse aid dispenser the...

Page 12: ...ffect on the operation of the appliance The higher the content of these minerals and salts the harder your water is Water hardness is measured in equivalent scales Clarke degrees French degrees TH and mmol l millimol per litre international unit for the hardness of water The softener should be adjusted according to the hardness of the water in your area Your local Water Authority can advise you on...

Page 13: ...2 1 Open the dishwasher door 2 Remove the lower basket from the dishwasher 3 Turn the water hardness dial to posi tion 1 or 2 see table 4 Replace the lower basket Setting electronically The dishwasher is factory set at level 5 1 Press the On Off button The dishwasher must be in setting mode 2 Press simultaneously and keep pressed buttons B and C until the lights of buttons A B and C start flashing...

Page 14: ...ng on the bottom of the machine for any period of time which may cause corrosion To fill 1 Open the door remove the lower basket and unscrew the cap of the salt con tainer by turning it anticlockwise 2 Pour 1 litre of water inside the container this is necessary only before filling with salt for the first time 3 Using the funnel provided pour in the salt until the container is full 4 Replace the c...

Page 15: ...atically added during the last rinse 1 Open the container by pressing the release button A 2 Add the rinse aid in the container The maximum level for filling is indicated by max The dispenser holds about 110 ml of rinse aid which is sufficient for be tween 16 and 40 dishwashing cycles depending upon the dosage setting 3 Ensurethatthelidisclosedafterevery refill Clean up any rinse aid spilt during ...

Page 16: ... streaks on the dishes or a bluish film on glassware or knife blades Daily use Check if it s necessary to refill with dishwasher salt or rinse aid Load cutlery and dishes into the dishwasher Fill with dishwasher detergent Select a wash programme suitable for the cutlery and dishes Start the wash programme Loading cutlery and dishes Sponges householdclothsandanyobjectthatcanabsorbwatermaynotbewashe...

Page 17: ...wing cutlery and dishes are not suitable are of limited suitability Cutlery with wooden horn china or mother of pearls handles Plastic items that are not heat resistant Older cutlery with glued parts that are not temperature resistant Bonded cutlery items or dishes Pewter or copper items Lead crystal glass Steel items prone to rusting Wooden platters Items made from synthetics fibres Only wash sto...

Page 18: ...es and other items of cutlery with sharp edges must be laid in the cutlery tray or in the upper basket because of the risk of injury Place knives small spoons and small forks in the cutlery tray which is in the upper basket Place forks and spoons that do not fit in the cutlery tray in the cutlery basket To ensure that all items of cutlery in the cut lery basket can be reached by the water you shou...

Page 19: ...rds For larger utensils such as whisks leave off one half of the cutlery grid The upper basket Load smaller fragile crockery and long sharp cutlery in the upper basket Arrange items of crockery on and under the folding cup racks so that they are offset from each other and water can reach all items Loading cutlery and dishes 19 ...

Page 20: ... fold it away to the left The row of spikes on the left of the upper basket is also in two parts and can be folded away Spikes not folded away place glasses mugs etc in the upper basket Spikes folded away more room for serv ing dishes Adjusting the height of the upper basket Maximum height of the dishes in the upper basket the lower basket With upper basket raised 22 cm 30 cm 20 Loading cutlery an...

Page 21: ...er it vertically The upper basket will latch into the lower or the upper position WARNING After loading your machine always close the door as an open door can be a hazard Before closing the door ensure that the spray arms can rotate freely Use of detergent Only use detergents specifically designed for use in dishwashers Please observe the manufacturer s dosing and storage recommendations as stated...

Page 22: ...This detergent will take effect during the prewash phase 4 When using detergent tablets place the tablet in compartment 1 5 Close the lid and press until it locks in place Detergent tablets Detergent tablets from different manu facturesdissolveatdifferentrates Forthis reason some detergent tablets do not at tain their full cleaning power during short washing programmes Therefore please use long wa...

Page 23: ...e Once this function is selected indicator light illuminated it will remain active also for the following washing programmes With the use of the Multi Tab function the cycle durations may change In this case in the digital display the indication of the running time of the programme is automatically updated Once the programme is running the Multi Tab function can NO longer be changed If you want to...

Page 24: ...he light of button B goes on flashing The digital display indicates the current setting Rinse aid dispenser deactivated 4 To change the setting press button B again the digital display indicates the new setting Rinse aid dispenser activated 5 To memorise the operation switch off the dishwasher by pressing the On Off button If you decide to turn back to the use of standard detergent system we advis...

Page 25: ...re intended as a guide and depends on the pressure and the temperature of the water and also by the variations of the power supply and the amount of dishes 2 During the Auto washing programme the amount of soil on the dishes is determined by how cloudy the water is The programme duration water and energy consumption levels can vary this depends upon if the appliance is fully or partially loaded an...

Page 26: ...he digital display You can choose from 1 to 19 hours of delay 2 Close the dishwasher s door the countdown starts automatically The number in the display is no longer flashing but fixed with static light 3 The countdown will decrease with steps of 1 hour 4 The opening of the door will interrupt the countdown 5 Once the delay start has elapsed the programme will start automatically With the delay st...

Page 27: ... point at which it was interrupted End of the washing programme The dishwasher will automatically stop The end of programme indicator light will illuminate The light of the programme just ended will remain on In the digital display appears a zero 1 Switch off the dishwasher by pressing the On Off button 2 Open the dishwasher s door leave it ajar and wait a few minutes before re moving the dishes i...

Page 28: ...ure that the machine is switched off 1 Open the door remove the lower basket 2 The dishwasher filter system compri ses a coarse filter A a microfilter B and a flat filter Unlock the filter system using the handle on the mi crofilter and remove the filter system 3 Turn the handle about 1 4 a turn an ticlockwise and remove the filter sys tem 4 Take hold of thecoarsefilter A by the handle with the ho...

Page 29: ...itting of the filters will produce poor washing results and may result in damage to the appliance Cleaning the spray arms NEVER try to remove the spray arms If residues of soil have clogged the holes in the spray arms remove them with a cocktail stick External cleaning Clean the external surfaces of the machine and control panel with a damp soft cloth If necessary use only neutral detergents Never...

Page 30: ...t the water inlet pipe and empty it Moving the machine If you have to move the machine moving house etc 1 Unplug it 2 Turn the water tap off 3 Remove the water inlet and discharge hoses 4 Pull the machine out together with the hoses Avoid over tilting the machine during transportation Something not working The dishwasher will not start or stops during operation Certain problems are due to the lack...

Page 31: ...ears in the digital display Anti flood device is activated Close the water tap and contact your local Service Force Centre The programme does not start The dishwasher s door has not been properly closed Close the door The main plug is not plugged in Insert the main plug The fuse has blown out in the household fuse box Replace the fuse Delay start has been set If dishes are to be washed immediately...

Page 32: ...le or no detergent has been used Where there are limescales deposits on the dishes the salt container is empty or the in correct level of the water softener has been set The drain hose connection is not correct The salt container cap is not properly closed The dishes are wet and dull Rinse aid was not used The rinse aid dispenser is empty There are streaks milky spots or a bluish coating on glasse...

Page 33: ...t kg 45 Hints for test institutes Testing in accordance with EN 60704 must be carried out with appliance fully loaded and using the test programme see Washing programmes Test in accordance with EN 50242 must be carried out when the salt container and rinse aid dispenser have been filled with salt and rinse aid respectively and using the test programme see Washing programmes Full load 12 standard p...

Page 34: ... with cutlery basket2 Cutlery basket 1 If there are cup racks in place on the lefthand side or the cutlery tray is in place remove them 2 If necessary you can remove the cup racks on the lefthand side and or the beer glass holder 34 Hints for test institutes ...

Page 35: ...n Fitting under a counter kitchen worktop or sink By removing the machine s worktop you can install it under a close fitting sink unit or a pre existing top providing the dimensions of the recess correspond to those shown in the picture Proceed as follows 1 Remove the machine s worktop by unscrewing the two rear retaining screws pull the worktop from the back of the machine and slide out the front...

Page 36: ...s advised If connection is made to a hot water supply the maximum permissible temperature is 60 C A hot water supply is not always efficient with very soiled crockery as it shortens the washing programmes a lot For making the connection itself the coupling nut fitted to the machine s supply hose is designed to screw onto a 3 4 gas thread spout or to a purpose made quick coupling tap such as the Pr...

Page 37: ... next to the tap Therefore thewater inlet hose isonly under pressurewhilethe wateris running If the water inlet hose starts to leak during this operation the safety valve cuts off the running water Please take care when installing the water inlet hose The electrical cable for the safety valve is in the double walled water inlet hose Do not immerse the water inlet hose or the safety valve in water ...

Page 38: ...ld cause the water to syphon back into the machine If you use a drain hose extension it must be no longer than 2 metres and its internal diameter must be no smaller than the diameter of the hose provided Likewise the internal diameter of the couplings used for connections to the waste outlet must be no smaller than the diameter of the hose provided When connecting the drain hose to an under sink t...

Page 39: ... replaced contact your local Service Force centre The plug must be accessible after the appliance has been installed Never unplug the appliance by pulling on the cable Always pull the plug The manufacturer accepts no liability for failure to observe the above safety pre cautions Environment concerns Packaging material The packaging materials are environmentally friendly and can be recycled The pla...

Page 40: ...ment By en suring this product is disposed of correctly you will help prevent potential negative consequences for the environment and human health which could otherwise be caused by inappropriate waste handling of this product For more detailed infor mation about recycling of this product please contact your local council your household waste disposal service or the shop where you purchased the pr...

Page 41: ...ppliance or defective part replaced shall become the Company s property This guarantee is in addition to your statutory and other legal rights Exclusions Damage or calls resulting from transportation improper use or neglect the re placement of any light bulbs or removable parts of glass or plastic Costs incurred for calls to put right an appliance which is improperly installed or calls to applianc...

Page 42: ...ent Electrolux Major Appliances Addington Way Luton Bedfordshire LU4 9QQ Tel 08705 350 350 Calls may be recorded for training purposes European Guarantee This appliance is guaranteed by Electrolux in each of the countries listed at the back of this user manual for the period specified in the appliance guarantee or otherwise by law If you move from one of these countries to another of the coun trie...

Page 43: ...719 1502 Lembeek Česká republika 420 2 61 12 61 12 Budějovická 3 Praha 4 140 21 Danmark 45 70 11 74 00 Sjællandsgade 2 7000 Freder icia Deutschland 49 180 32 26 622 Muggenhofer Str 135 90429 Nürnberg Eesti 37 2 66 50 030 Mustamäe tee 24 10621 Tallinn España 34 902 11 63 88 Carretera M 300 Km 29 900 Alcalá de Henares Madrid France www electrolux fr Great Britain 44 8705 929 929 Addington Way Luton ...

Page 44: ...Fonte Edificio Gonçalves Zarco Q 35 2774 518 Paço de Arcos Romania 40 21 451 20 30 Str Garii Progresului 2 S4 040671 RO Schweiz Suisse Svizzera 41 62 88 99 111 Industriestrasse 10 CH 5506 Mägenwil Slovenija 38 61 24 25 731 Gerbičeva ulica 98 1000 Ljubljana Slovensko 421 2 43 33 43 22 Electrolux Slovakia s r o Electrolux Domáce spo trebiče SK Seberíniho 1 821 03 Bratislava Suomi www electrolux fi S...

Page 45: ...45 ...

Page 46: ...46 ...

Page 47: ...47 ...

Page 48: ...www electrolux com www aeg electrolux co uk 117987850 01 09032007 Subject to change without notice ...

Reviews: