Section 4 Refrigeration
4-2
Soldering
1. All joints to be soldered must have proper fit.
Clearance between tubes to be soldered should be
from .001” to .006”. It is not practical to actually
measure this; however, you do not want a dry fit or
loose fit. Tubing joints should overlap about the
distance of their diameter except for restrictor tubes,
which should be inserted 1.25”.
2. Clean all joint areas with fine steel wool or
preferably an abrasive cloth, such as grit cloth
No. 23 or Scotch-Brite.
3. Apply a thin film of liquid flux recommended for
silver soldering to surfaces to be joined and to
surfaces immediately adjacent to joint.
4. Align tubing so no stress is on joint. Do not move
tubing while solder is solidifying or leaks will result.
5. Use a torch of adequate capacity so joint can be
quickly heated with a minimum of heat travel to
other points. Use a good grade of silver solder.
6. Solder connections. If tubing is properly cleaned
and fluxed, solder will flow readily. Use only enough
solder to make a good bond.
7. Allow joint to cool, then wash exterior with water to
remove flux.
Basic Components
The basic components of a refrigerator/freezer are a
compressor, condenser, evaporator, heat exchanger
(capillary tube and suction line) and drier.
Refrigerant Cycle
The refrigerant cycle is a continuous cycle that occurs
whenever the compressor is in operation. Liquid
refrigerant is evaporated in the evaporator by the heat
that enters the cabinet through the insulated walls and
by the heat from product load and door openings. The
refrigerant vapor is then drawn from the evaporator,
through the suction line to the compressor. Compression
raises the pressure and temperature of the vapor in the
compressor and the vapor is then forced through the
discharge valve into the discharge line and into the
condenser. Air passing over the condenser surface
removes heat from the high pressure vapor which then
condenses to a liquid. The liquid refrigerant then flows
from the condenser to the evaporator through the small
diameter liquid line (capillary tube). Before it enters
the evaporator, the liquid refrigerant is sub-cooled in the
heat exchanger by the low temperature suction vapor
in the suction line. When refrigerant is added, the frost
pattern will improve, the suction and discharge
pressures will rise, the condenser will become hot and
the wattage will increase.
Wear approved safety glasses when working
with or on any pressurized system or equipment.
Have an approved dry type fire extinguisher
handy when using any type of gas operated
torch.
WARNING
During application of heat, use wet cloths to
prevent heat from conducting to areas other
than the soldered joint. Use a sheet of metal
or torch guard pad as a heat deflector to keep
flame away from inflammable materials and
painted surfaces.
CAUTION
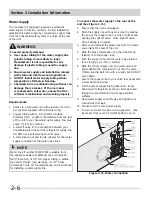
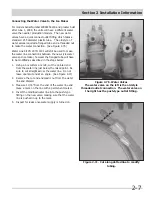
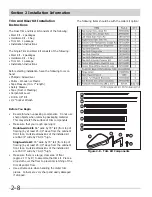
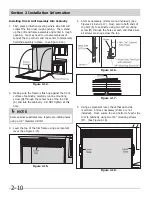
Summary of Contents for FPUH17D7KF All Freezer Professional Series
Page 2: ......
Page 20: ...Section 2 Installation Information 2 12 Figure 2 20 Figure 2 21 ...
Page 21: ...Section 2 Installation Information 2 13 Figure 2 22 Figure 2 23 ...
Page 24: ...Section 2 Installation Information 2 16 Notes ...
Page 26: ...Section 3 Electronic Control 3 2 Notes ...
Page 41: ...Section 4 Refrigeration 4 15 HFC 134a CFC 12 Pressure Temperature Chart ...
Page 44: ...Section 4 Refrigeration 4 18 Notes ...
Page 68: ...Section 6 Parts List 6 2 All Refrigerator Cabinet Exploded View And Parts List ...
Page 70: ...Section 6 Parts List 6 4 All Refrigerator Sealed System Exploded View And Parts List ...
Page 72: ...Section 6 Parts List 6 6 All Freezer Door Exploded View And Parts List ...
Page 74: ...Section 6 Parts List 6 8 All Freezer Cabinet Exploded View And Parts List ...
Page 76: ...Section 6 Parts List 6 10 All Freezer Sealed System Exploded View And Parts List ...
Page 78: ...Section 6 Parts List 6 12 Notes ...
Page 82: ...Section 7 Troubleshooting 7 4 Notes ...
Page 83: ...Section 8 Wiring Diagram 8 1 All Refrigerator Wiring Diagram ...
Page 84: ...8 2 Section 8 Wiring Diagram All Freezer Wiring Diagram ...

