background image

7

This Use & Care Guide provides general 

operating instructions for your model. Use 

the appliance only as instructed in this 

Use & Care Guide. Before starting the ap-

pliance, follow these important first steps.

Location

Choose a place that is near a grounded 

electrical outlet. Do Not use an extension 

cord or an adapter plug.
For the most efficient operation, the 

appliance should be located where 

surrounding temperatures will not exceed 

110°F (43°C). Temperatures of 32°F (0°C) 

and below will NOT affect operation. 

Additional compressor heaters are not 

recommended.
If possible, place the appliance out of 

direct sunlight and away from the range, 

dishwasher or other heat sources.
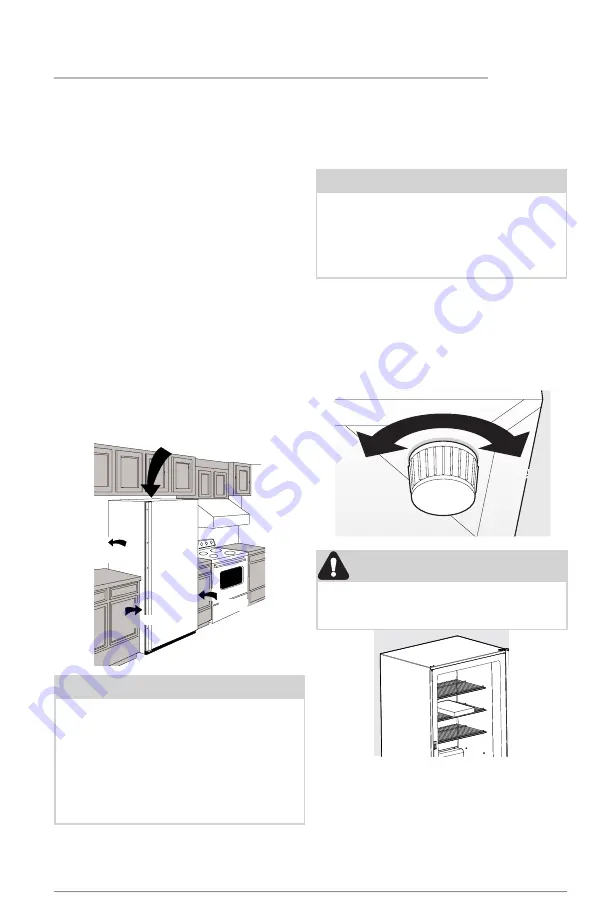
Allow space around the unit for good air 

circulation. Leave a 4 inch (101 mm) space on 

all sides of the unit for adequate circulation.


Installation

4" (101 mm) 

Air Space

4" 

(101 mm)

4"

(101 mm)

4"

(101 mm)

INSTALLATION

CAUTION

To allow door to close and seal 

properly, DO NOT let food packages 

extend past the front of shelves.

Leveling

Rest all bottom corners firmly on a solid 

floor. The floor must be strong enough to 

support a fully loaded appliance.

To Level the Appliance: 

Adjust the 

bottom feet by turning counterclockwise 

to lengthen and clockwise to shorten. Use 

a carpenter’s level to level the appliance 

from front to back. Adjust the leveling 

feet in front, 

½

 bubble higher, so the door 

closes easily. 

NOTE

The exterior walls of the unit may 

become quite warm as the compressor 

works to transfer heat from the inside. 

Temperatures as much as 30° F warmer 

than room temperature can be expect-

ed. For this reason it is particularly 

important in hotter climates to allow 

enough space for air circulation around 

your appliance.

NOTE

It is 

VERY IMPORTANT

 for your unit to 

be level in order to function properly. 

If the appliance is not leveled during 

installation, the door may be misaligned 

and not close or seal properly, causing 

cooling, frost or moisture problems.

Lengthen

Shorten

Summary of Contents for Frigidaire FFFU16F2VV

Page 1: ...265 8352 use care FREEZER A16531003 May 2020 Introduction 2 Important Safety information 3 Features 5 Installation 7 Door Removal Reversal 8 Controls and Settings 10 Storage Features 11 Saving Energy 12 Care and Cleaning 13 Troubleshooting 14 Limited Warranty 17 ...

Page 2: ... section will help you with common issues FAQs helpful tips and videos cleaning products and kitchen and home accessories are available at Frigidaire com We are here for you Visit our website chat with an agent or call us if you need help We may be able to help you avoid a service visit If you do need service we can get that started for you Let s make it official Be sure to register your product K...

Page 3: ...his appliance Child Safety This appliance is not intended for use by persons including children with reduced physical sensory or mental capabilities or lack of experience and knowledge unless they have been given supervision or in struction concerning use of the appliance by a person responsible for their safety Destroy or recycle the carton plastic bags and any exterior wrapping mate rial immedia...

Page 4: ...NOT RECOMMENDED Do NOT use an extension cord or adapter plug If the power cord is damaged it should be replaced by an authorized service technician to prevent any risk Never unplug the appliance by pull ing on the power cord Always grip the plug firmly and pull straight out from the receptacle to prevent dam aging the power cord Unplug the appliance before cleaning and before replacing a light bul...

Page 5: ...y according to model A Power On LED B Freezer Wire Basket C Short Depth Freezer Shelves D Temperature Control Knob E Full Depth Freezer Shelves F Interior LED G Fixed Door Bins H Front Leveling Feet A G F D G G G H E B C C E G H ...

Page 6: ...esidue from surfaces before turning on the appliance Rub a small amount of liquid dish soap over the adhesive with your fingers Rinse with warm water and dry with a soft cloth Do not use sharp instruments rubbing alcohol flammable fluids or abrasive cleaners to remove tape or glue These products can damage the surface of your appliance After you remove all of the package materials clean the inside...

Page 7: ...LLATION CAUTION To allow door to close and seal properly DO NOT let food packages extend past the front of shelves Leveling Rest all bottom corners firmly on a solid floor The floor must be strong enough to support a fully loaded appliance To Level the Appliance Adjust the bottom feet by turning counterclockwise to lengthen and clockwise to shorten Use a carpenter s level to level the appliance fr...

Page 8: ... Reinstall on the opposite side of the door 4 Remove the door and lay flat on a padded surface Remove the door stop plate at the bottom of the door and reinstall on the opposite side of door 5 Lay freezer on its back on a padded surface 6 Unscrew the right adjustable leveling foot A Remove the 4 screws B holding the bottom hinge C to the cabinet with an 8 mm socket with ratchet Screw the adjustabl...

Page 9: ...foot C on the left side of cabinet x4 B A C Bottom of Unit B o t t o m o f U n i t 10 Carefully stand the freezer up Place the door on the bottom hinge pin at 90 and rotate to the closed position 11 Attach the top hinge and hinge cover on the left side Attach the alarm board to the decorative cover then attach cover to the unit make sure not to pinch the wires on the alarm board 90 Bottom of Unit ...

Page 10: ... a range of temperatures for your personal satisfac tion If a colder temperature is desired turn the temperature control knob toward COLDEST and allow several hours for temperatures to stabilize between adjust ments Temperature Range 10 to 10ºF Temperature Control Door Ajar Alert If your door has been left open for 5 minutes or more the audible alert will sound until the door is closed Power On Li...

Page 11: ... sliding shelves remove shelf by pulling forward To replace shelf rest side edges on any pair of shelf rails and carefully push shelf back into position Make sure the 2 stops at the rear corners of the shelf securely fit into the notches at rear of the liner Fixed Door Bin The fixed door bin is especially designed to hold large containers or freezer bags ...

Page 12: ...that freeze too slowly may lose quality or spoil Be sure to wrap foods properly and wipe containers dry before placing them in the unit This cuts down on frost build up inside the unit Shelves and baskets should not be lined with aluminum foil wax paper or paper toweling Liners interfere with cold air circulation making the freezer less efficient Organize and label food to reduce door openings and...

Page 13: ...e Inside Wash inside surfaces of the unit with a solution of 2 tbsp 25 g of baking soda in 1 qt 1 l warm water Rinse and dry Wring excess water out of the sponge or cloth when cleaning in the area of the controls or any electrical parts Wash the removable parts with the baking soda solution mentioned above or mild detergent and warm water Rinse and dry Never use metallic scouring pads brushes abra...

Page 14: ...breaker Check house lights Call local electric company Appliance runs too much or too long Room or outside weather is hot Appliance has recent ly been disconnected for a period of time Large amounts of warm or hot food have been stored recently Door is opened too frequently or too long Door may be slightly open Temperature control is set too low Gaskets are dirty worn cracked or poorly fitted It s...

Page 15: ...ble temperatures They require heavy duty compressors This is normal When the surround ing noise level is low you might hear the compressor running while it cools the interior Longer sound levels when compressor comes on Appliance operates at higher pressures during the start of the ON cycle This is normal Sound will level off or disappear as appliance continues to run Popping or cracking sound whe...

Page 16: ...eds to be cleaned Foods with strong odors are in the appliance Clean interior with sponge warm water and baking soda Cover the food tightly DOOR PROBLEMS Door will not close Appliance is not level It rocks on the floor when it is moved slightly Floor is uneven or weak This condition can force the cabinet out of square and misalign the door Refer to Leveling in the INSTALLA TION section Level the f...

Page 17: ...ux parts or parts obtained from persons other than authorized service companies or external causes such as abuse misuse inadequate power supply accidents fires or acts of God DISCLAIMER OF IMPLIED WARRANTIES LIMITATION OF REMEDIES CUSTOMER S SOLE AND EXCLUSIVE REMEDY UNDER THIS LIMITED WARRANTY SHALL BE PRODUCT REPAIR OR REPLACEMENT AS PROVIDED HEREIN CLAIMS BASED ON IMPLIED WARRANTIES INCLUDING W...

Page 18: ...aire com 1 800 374 4432 Frigidaire ca 1 800 265 8352 owner support accessories service Our home is your home Visit us if you need help with any of these things registration See your registration card for more information ...

Reviews: